How to Make a PVC Bow Stand at Home
Making a PVC bow stand at home is a surprisingly straightforward DIY project that can save you money and keep your archery equipment organized and safe. This guide will walk you through the entire process, ensuring you have a sturdy and functional stand without needing complex tools or expensive materials. Having a dedicated stand prevents damage to your bow’s limbs and cams while also making it easier to string or unstring your bow.
Simply put, constructing a PVC bow stand involves cutting and assembling PVC pipes and fittings to create a stable, multi-pronged structure that securely holds your bow. This DIY project requires minimal tools, making it accessible for most enthusiasts looking to organize their gear efficiently and affordably.
Key Takeaways
- PVC bow stand construction is an accessible DIY project using readily available materials and basic tools.
- The core of the stand utilizes a central vertical pipe with horizontal arms to support the bow’s limbs.
- Proper measurement and secure fitting assembly are crucial for a stable and reliable stand.
- Customization options allow for adjustments based on bow size and personal preferences.
- This project offers a cost-effective alternative to commercially produced bow stands, enhancing gear organization and protection.
What is a PVC Bow Stand?
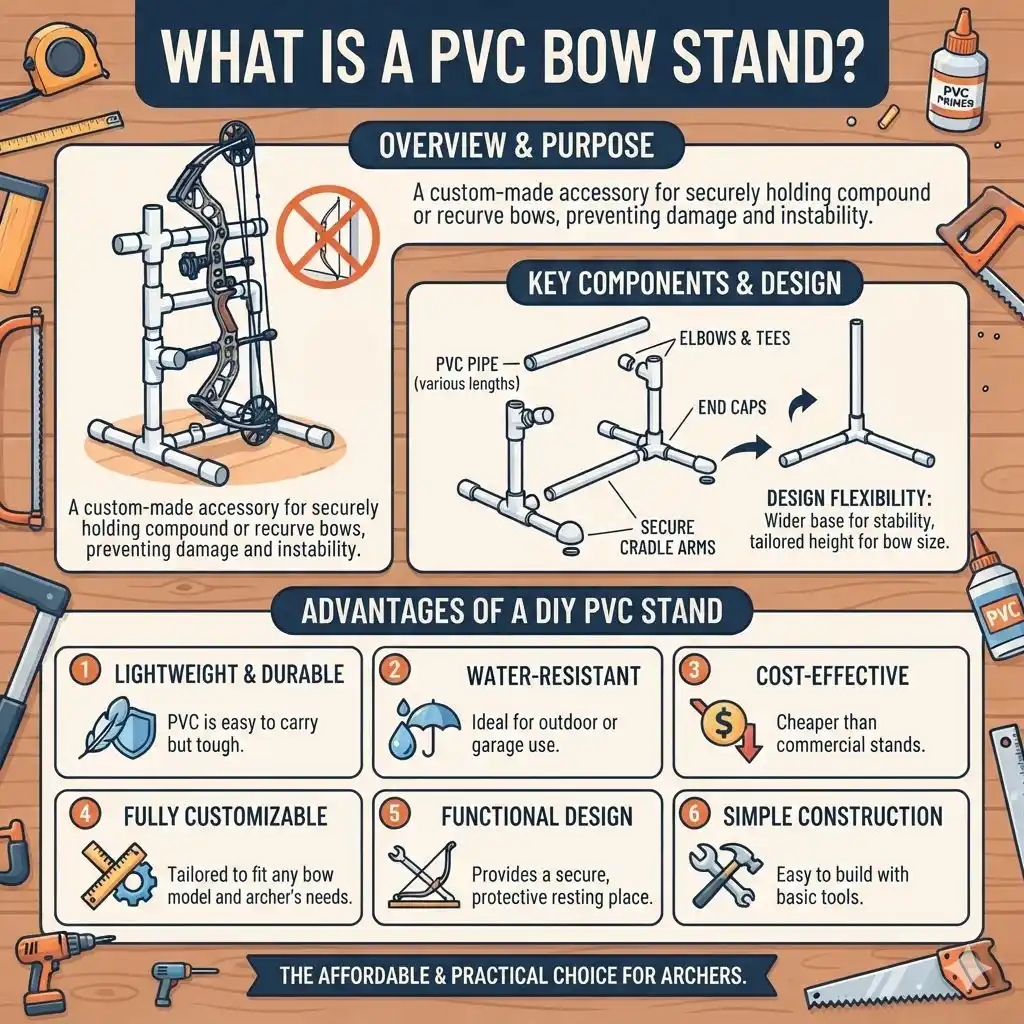
A PVC bow stand is a custom-made accessory constructed primarily from polyvinyl chloride (PVC) pipes and fittings. Its purpose is to provide a stable, upright resting place for a compound or recurve bow when it’s not in use. Unlike simply leaning a bow against a wall, which can cause damage or instability, a dedicated stand ensures the bow remains secure and protected.
The design typically features a base for stability and one or more upright sections with cradles or arms designed to hold the bow’s limbs or riser. This prevents the cams from resting on the ground and protects the bow’s delicate components from potential impact or stress. Many archers opt for this DIY solution due to its affordability and the ability to customize the size and shape to perfectly match their specific bow model.
Key components usually include PVC pipes of varying lengths, elbows, tees, and caps. The specific arrangement depends on the desired height and stability of the stand. For example, a wider base with more legs can offer greater stability, especially for heavier bows.
The material’s durability and resistance to moisture also make PVC an ideal choice for outdoor or garage use.
- Material Advantages: PVC is lightweight, durable, water-resistant, and easy to cut and assemble.
- Cost-Effective: Significantly cheaper than commercially manufactured bow stands.
- Customizable: Can be tailored to fit any bow’s dimensions and the archer’s specific needs.
- Functional Design: Provides a secure and stable resting place, protecting the bow.
- Simple Construction: Requires basic tools and minimal DIY experience.
Gathering Your Materials and Tools
Before you begin cutting and assembling, it’s essential to gather all the necessary materials and tools. This ensures a smooth building process and prevents delays. For a standard PVC bow stand, you’ll typically need a few feet of PVC pipe, typically 1.5 to 2 inches in diameter, and a selection of PVC fittings.
The exact quantities and types of fittings will depend on your chosen design, but common items include 90-degree elbows, T-fittings, and end caps.
You’ll also need a method for cutting the PVC pipe to the required lengths. A simple hacksaw works well for this, though a PVC cutter or a miter saw can provide cleaner, more precise cuts. For joining the pieces, PVC cement and primer are crucial.
The primer cleans the pipe surfaces and softens them slightly, allowing the cement to create a strong, permanent bond. Ensure you work in a well-ventilated area when using these products.
Safety gear is paramount. Always wear safety glasses to protect your eyes from flying debris when cutting and handling PVC. Gloves can also be beneficial, especially when working with PVC cement, which can be sticky.
A measuring tape is vital for ensuring all your cuts are accurate and your stand will be the correct height and proportion.
Essential Materials:
- PVC Pipe (1.5″ or 2″ diameter, approximately 4-6 feet)
- PVC T-fittings (e.g., 3-4)
- PVC 90-degree Elbow fittings (e.g., 4-6)
- PVC End Caps (e.g., 4)
- PVC Primer
- PVC Cement
Recommended Tools:
- Hacksaw or PVC Cutter
- Measuring Tape
- Sandpaper (medium grit, for smoothing edges)
- Safety Glasses
- Work Gloves
- Marker or Pencil
Step-by-Step: Building Your PVC Bow Stand
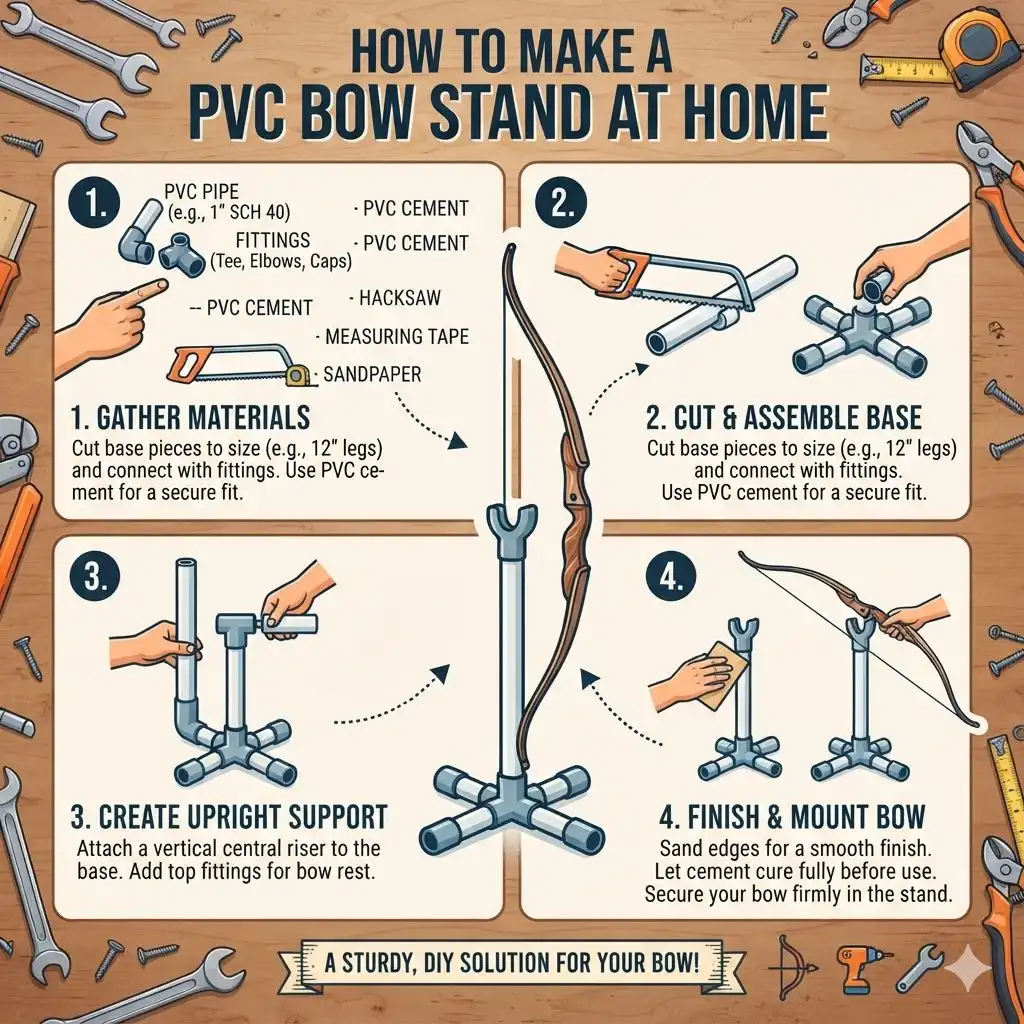
Let’s get started on constructing your functional PVC bow stand. This guide outlines a common, effective design. First, measure and cut your PVC pipe into the necessary lengths for the base and uprights.
A typical base might consist of four equal lengths, connected by elbow fittings to form a square or rectangular shape. The height of the uprights will determine how high your bow sits, so measure from the base to a comfortable level for your bow.
Once the pipes are cut, dry-fit all the pieces together first. This allows you to make any necessary adjustments before permanently bonding them with cement. Ensure the stand sits level and is stable.
After dry-fitting, apply PVC primer to the outside of the pipe ends and the inside of the fittings where they will connect. This prepares the surfaces for a strong bond. Immediately after priming, apply PVC cement to the same surfaces and quickly push the pieces together with a slight twist.
Hold them firmly for about 30 seconds to ensure the cement sets properly.
The upright supports are typically made using T-fittings. One pipe goes vertically into the T, and two horizontal pipes extend outwards from the T’s openings to cradle the bow’s limbs. The number of these T-fittings and the length of their horizontal arms will depend on the width of your bow and how many points of contact you want for support.
Two uprights with two arms each are generally sufficient for most compound bows.
- Cut Base Pieces: Cut four equal lengths of PVC pipe for the base. A length of 12-18 inches per piece usually creates a stable foundation.
- Assemble Base Frame: Connect the four base pieces using four 90-degree elbow fittings to form a square or rectangular frame. Ensure it lies flat.
- Cut Upright Pipes: Cut two main vertical pipes for the upright supports. The length depends on how high you want your bow, typically 24-36 inches.
- Prepare for Limb Supports: Cut eight shorter pieces of PVC pipe (e.g., 4-6 inches) for the limb cradles.
- Assemble Uprights with T-Fittings: Attach a T-fitting to the top of each main upright pipe. Connect two of the shorter pipes (limb cradles) into the side openings of each T-fitting. These will hold your bow’s limbs.
- Attach Uprights to Base: Securely cement the bottom of the main upright pipes into the center holes of two T-fittings that will be placed on the base. Alternatively, you can use more elbow fittings on the base and then connect the uprights to those.
- Add Stabilizer Arms (Optional): For added stability, you can attach additional T-fittings to the base frame and extend short pipes outward, capping them with end caps. This creates a wider, more grounded footprint.
- Reinforce Connections: Once all connections are made, allow the cement to cure fully according to the manufacturer’s instructions (usually 24 hours) before putting any weight on the stand.
Customizing Your PVC Bow Stand
The beauty of a PVC bow stand lies in its adaptability. You can easily modify the design to suit your specific archery needs and preferences. For instance, if you have a particularly heavy compound bow with wide limbs, you might need longer horizontal arms on your T-fittings or additional support points.
You can achieve this by using larger diameter PVC or by adding more T-fittings to create a wider cradle.
Another common customization is adding a small shelf or hook to hold accessories like release aids, quivers, or bow sights. This can be achieved by attaching an extra T-fitting or elbow onto one of the uprights or the base and then adding a short pipe with an end cap for a flat surface, or a small bracket if you’re feeling ambitious. For recurve bows, the design might shift to accommodate the narrower riser and longer limbs, possibly requiring a more central vertical support with angled arms.
The height is also fully adjustable. Some archers prefer a stand that brings the bow closer to waist height for easier access when stringing or unstringing, while others might opt for a taller stand to keep the bow further off the ground. You can also adjust the width of the base to make it more compact for transport or wider for maximum stability in a workshop setting.
The color of the PVC can also be customized using specialized spray paints designed for plastic, though this is purely aesthetic.
Customization Options:
- Adjustable Limb Supports: Use longer PVC pipes for the horizontal arms to accommodate wider bows.
- Accessory Holder: Add extra T-fittings or elbows to create a platform for quivers, release aids, or other gear.
- Height Adjustment: Simply cut your main upright pipes to your desired height.
- Base Width: Vary the lengths of your base pipes to create a wider or narrower footprint.
- Recurve Bow Adaptations: Modify the arm angles and placement to better support recurve bow risers and limbs.
- Coloring: Use plastic-specific spray paint to give your stand a personalized look.
Considering Different Bow Types
The design and construction of your PVC bow stand should ideally consider the specific type of bow you own. Compound bows, with their complex cam systems and wide limb stances, often require a stand with broader limb cradles. The horizontal arms of the T-fittings should be long enough to comfortably support each limb without putting undue pressure on the cams or strings.
A wider base also provides better stability for these heavier, more intricate bows.
Recurve bows, on the other hand, have a simpler structure. Their risers are typically narrower, and their limbs are longer and more slender. A PVC stand for a recurve might focus more on supporting the riser securely, possibly with a central upright that has a single cradle or padded arms designed to hold the bottom of the riser.
The emphasis here is on preventing the recurve from tipping over, as they generally don’t have the same potential for limb stress as compound bows if leaned incorrectly.
For traditional longbows or take-down recurves where the riser and limbs separate, the stand’s primary function is to hold the assembled bow upright. The design principles remain similar to recurves, focusing on stability and preventing the bow from falling. Some archers even create modular stands where different cradles or supports can be swapped out, allowing one stand to accommodate multiple bow types.
This modularity often involves using threaded PVC fittings or simple sleeve connections that can be easily disassembled and reconfigured.
| Bow Type | Stand Design Considerations | Key Features for Support |
|---|---|---|
| Compound Bow | Wider base, longer limb cradles. | Support for limbs and cams, high stability. |
| Recurve Bow | Riser-focused support, narrower cradles. | Secure grip on riser, prevents tipping. |
| Longbow | Similar to recurve, focus on upright stability. | Simple upright support, stable base. |
Choosing the right PVC diameter and fitting types is also important for structural integrity when accommodating different bow weights.
Tips for Durability and Stability
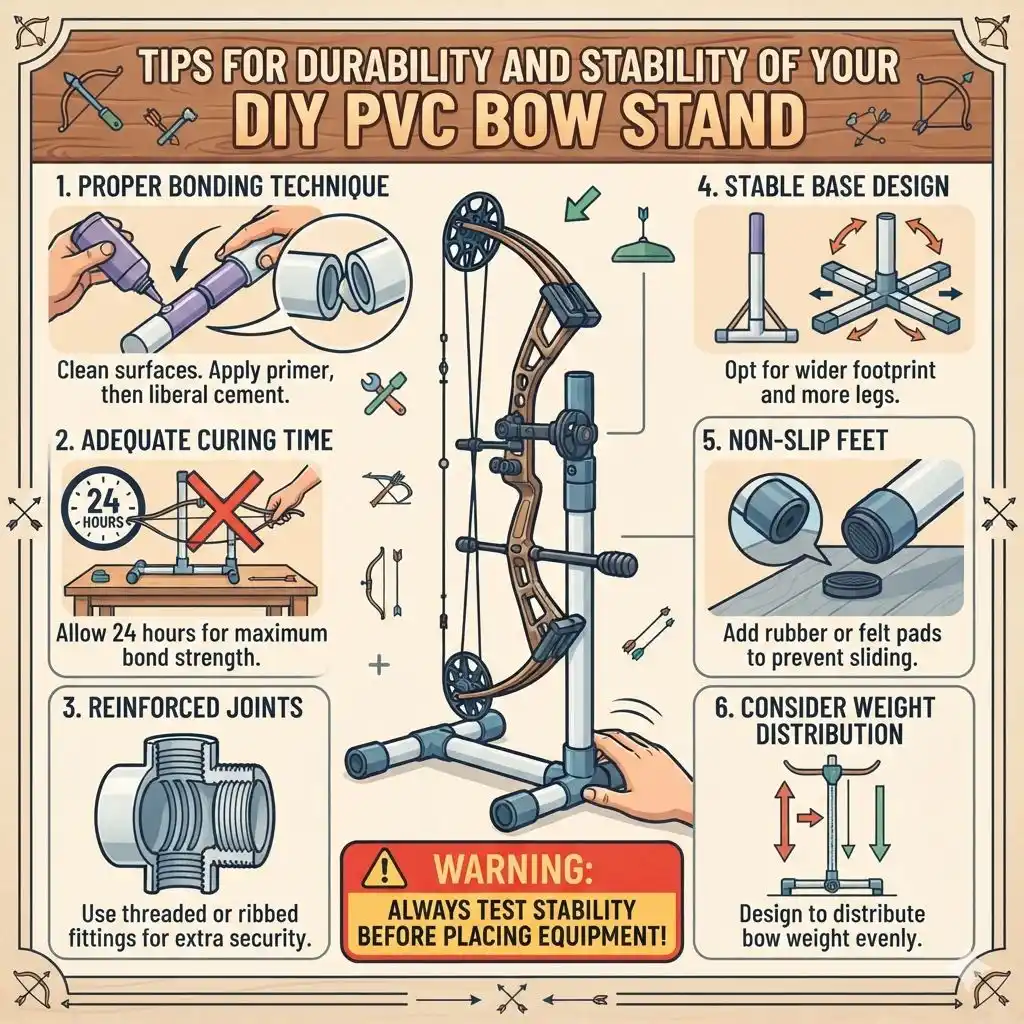
To ensure your DIY PVC bow stand lasts and remains reliably stable, a few key considerations can significantly enhance its durability. The most critical aspect is the proper application of PVC primer and cement. Ensure both surfaces are clean, dry, and free of debris before applying the primer.
The primer chemically softens the PVC, allowing the cement to fuse the pieces together on a molecular level. Don’t skimp on the cement; apply it liberally enough to create a slight bead when the pieces are joined, but not so much that it drips excessively.
Allowing adequate curing time is another vital step. While PVC cement sets quickly, it needs a full 24 hours to reach its maximum strength. Rushing this process by placing your bow on the stand too soon can compromise the integrity of the joints, leading to premature failure.
For added strength, especially on larger or heavier stands, you can consider using PVC fittings with internal ribs or threads for a more secure mechanical lock in addition to the chemical bond.
The stability of the stand is directly related to the design of its base. A wider base, employing more legs or a larger footprint, will naturally offer more resistance to tipping. If you plan to use the stand in a windy outdoor environment or if you have a particularly heavy bow, consider increasing the number of base connections or adding extra cross-braces.
For instance, forming a wider square base with stabilizing pipes extending outwards from the corners can greatly enhance its stability. You can also add rubber or felt pads to the bottom of the base pipes to prevent slipping on smooth surfaces and protect your flooring.
Warning: Always ensure your stand is completely dry and stable before placing your expensive archery equipment on it. Test its stability by gently pushing it from different angles.
- Proper Bonding Technique: Use PVC primer and cement correctly, ensuring full coverage and a slight bead upon joining.
- Adequate Curing Time: Allow a full 24 hours for the PVC cement to cure completely before use.
- Reinforced Joints: Consider using threaded fittings for additional mechanical strength on critical connections.
- Stable Base Design: Opt for a wider footprint, more legs, or cross-bracing for increased stability.
- Non-Slip Feet: Add rubber or felt pads to the base to prevent sliding and protect floors.
- Consider Weight Distribution: Design the stand to distribute the weight of the bow evenly across its support points.
Alternative Designs and Materials
While PVC is the go-to material for its affordability and ease of use, other options exist for those seeking different aesthetics or enhanced durability. Wood, for example, can be used to craft a more traditional-looking bow stand. This involves woodworking skills and tools, but the result can be a beautiful piece that complements a rustic workshop or hunting lodge.
Cedar or oak are good choices for their strength and resistance to rot.
Metal, such as aluminum or steel tubing, offers superior strength and durability. This approach requires metalworking tools like a welder or specialized pipe benders, making it a more advanced project. However, a metal bow stand can be incredibly robust and long-lasting, capable of supporting even the heaviest bows in demanding conditions.
It also allows for more intricate and potentially slimmer designs.
For a quick and dirty temporary solution, you might even consider a combination of materials. For instance, a sturdy wooden base could be combined with PVC uprights for a blend of stability and ease of assembly. Another creative approach involves repurposing existing items; a large bucket filled with sand or gravel can serve as a base, with a PVC pipe cemented into it for the upright support, though this might not be as stable or aesthetically pleasing as a dedicated frame.
| Material | Pros | Cons | Ideal For |
|---|---|---|---|
| PVC | Affordable, easy to cut/glue, lightweight, water-resistant. | Can become brittle in extreme cold, less aesthetically appealing than wood. | Beginner DIYers, budget-conscious builders, general use. |
| Wood | Aesthetic appeal, strong, customizable. | Requires woodworking tools, can be heavier, susceptible to moisture if not treated. | Archers seeking a traditional look, those with woodworking experience. |
| Metal (Aluminum/Steel) | Extremely durable, strong, lightweight (aluminum), can achieve slim profiles. | Requires specialized tools (welding, cutting), more expensive, can rust (steel). | Serious archers needing maximum durability, custom high-performance stands. |
The choice of material often comes down to balancing budget, skill level, and the desired lifespan and appearance of the bow stand.
Frequently Asked Questions
What is the best diameter for PVC pipe for a bow stand?
For most compound and recurve bows, 1.5-inch or 2-inch diameter PVC pipe is ideal. This provides sufficient strength and stability to support the weight of the bow without being overly bulky or heavy.
How do I ensure the PVC cement creates a strong bond?
Always use both PVC primer and cement, applying them to clean, dry surfaces of both the pipe and the fitting. Ensure you apply enough cement to create a slight bead when joined and hold the pieces together firmly for about 30 seconds. Allow the cement to cure for at least 24 hours for maximum strength.
Can I make a bow stand that is portable?
Yes, you can create a portable PVC bow stand by using threaded PVC fittings and unions. This allows you to easily disassemble the stand into smaller sections for transport. Alternatively, you could design it with fewer pieces that can be detached and reattached quickly.
How can I make the limb cradles softer to protect my bow?
You can add padding to the limb cradles by wrapping them with foam pipe insulation, hockey tape, or felt. These materials will provide a softer surface for your bow’s limbs to rest on, preventing scratches and reducing pressure points.
What if my bow is very heavy?
For heavier bows, consider using a thicker schedule of PVC pipe (e.g., Schedule 40 or Schedule 80) for increased strength, especially for the uprights and base. You may also want to use a wider base design with more contact points for better weight distribution and stability.
Final Thoughts
Building a PVC bow stand is a rewarding and practical project for any archer. It offers a cost-effective way to protect your equipment and keep your archery space organized. By carefully measuring, cutting, and assembling, you can create a durable and functional stand that perfectly suits your needs.
Remember to prioritize stability and proper bonding techniques for a stand that will serve you well for years to come.