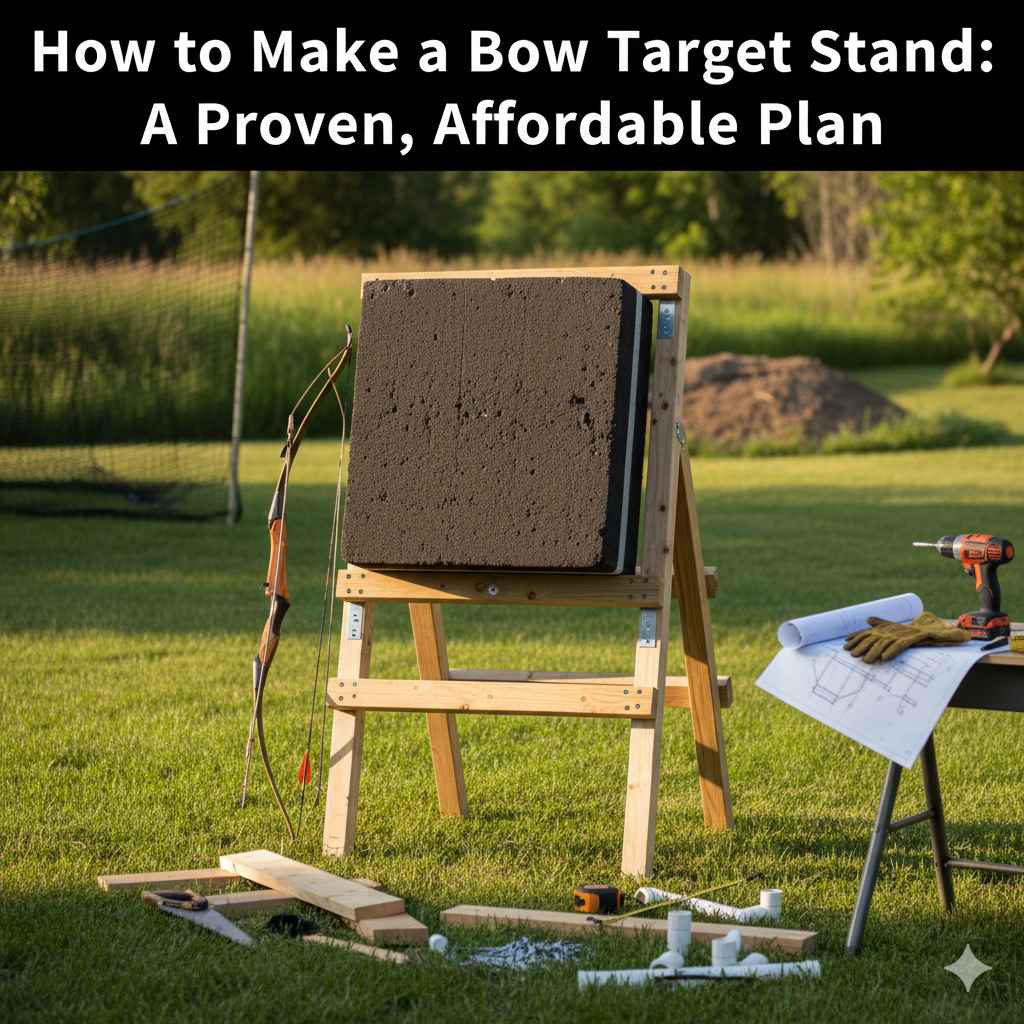
To make a bow target stand, you will need basic lumber (like 2x4s and a 2×6), wood screws, and simple tools. The design involves building two H-shaped frames for the legs and connecting them with a long support beam. This creates a sturdy, A-frame structure that can securely hold most bag or foam block targets for safe and effective practice.
Tired of propping your bow target against a tree or a wobbly chair? You’re not alone. Finding a safe and stable spot to practice can be frustrating, especially when you just want to focus on your shot. But don’t worry, the solution is easier and cheaper than you think. You don’t need to be an expert woodworker to build a reliable target stand. This guide will walk you through a proven, affordable plan step-by-step. Let’s build something you can be proud of!
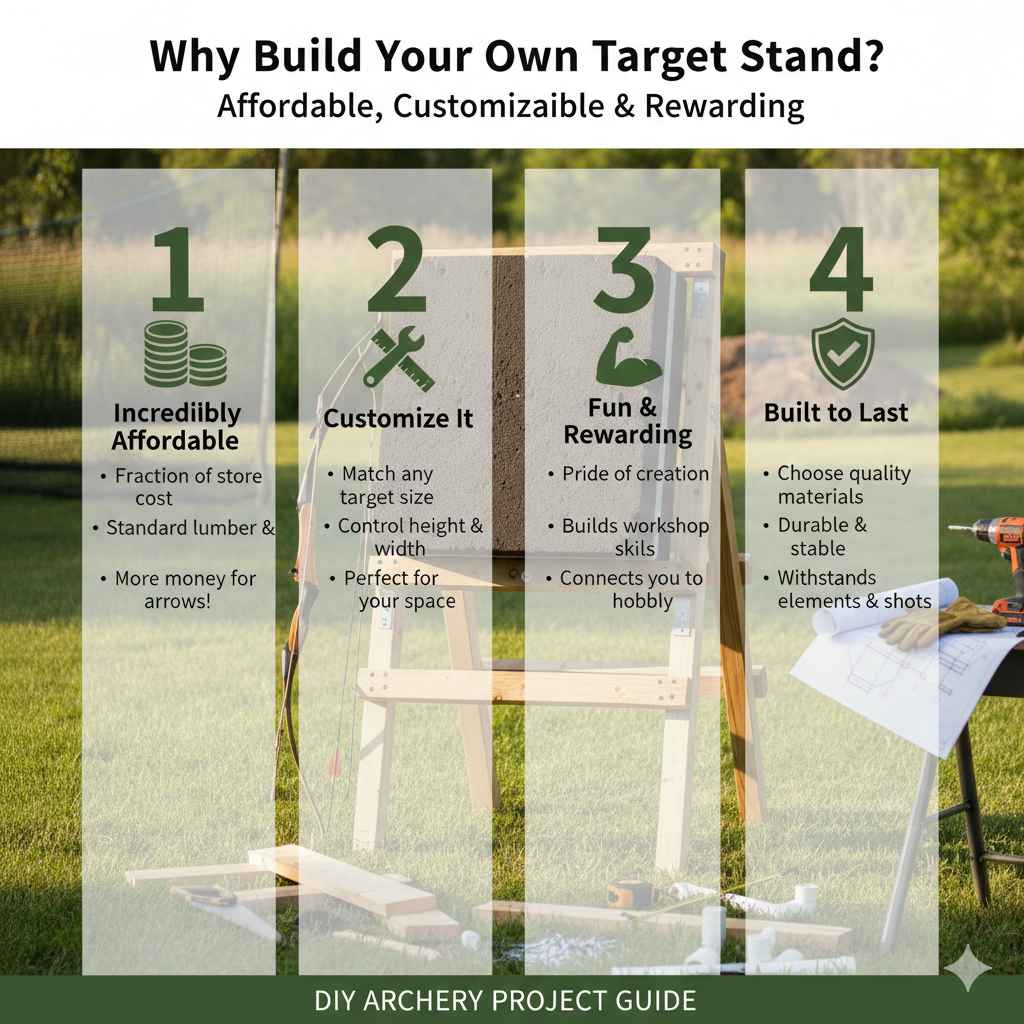
Why Build Your Own Target Stand?
Buying a pre-made target stand is always an option, but building your own comes with some fantastic benefits, especially for beginners. It’s a great way to get more connected with your new hobby and save money for other gear (like more arrows!).
- It’s Incredibly Affordable: You can build a rock-solid stand for a fraction of the cost of a store-bought model. Most of the materials are standard lumber and screws, which are easy on the wallet.
- You Can Customize It: Is your target an odd size? Do you want your stand to be taller or wider? When you build it yourself, you have complete control over the dimensions to perfectly match your target and your practice space.
- It’s a Fun and Rewarding Project: There’s a special kind of pride that comes from using something you built with your own two hands. This simple project is a great way to build confidence, both in your workshop skills and on the archery range.
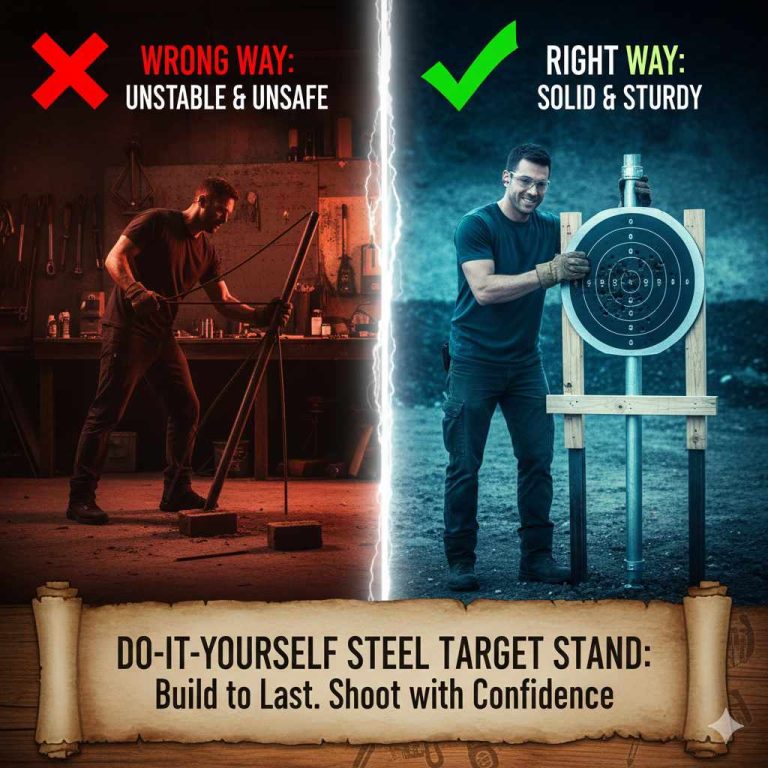
- Built to Last: You can choose quality materials to ensure your stand is far more durable and stable than many lightweight, flimsy options available in stores. It will withstand the elements and thousands of shots for years to come.
Before You Begin: Safety is Your Top Priority
Before we pick up a single tool, let’s talk about safety. A successful project is a safe one. Working with tools and lumber is straightforward, but it’s important to respect the process. Following these simple rules will ensure you finish your stand without any issues.
Workshop Safety
- Wear Safety Glasses: This is non-negotiable. Sawdust, wood chips, and other debris can fly into the air when cutting or drilling. Always protect your eyes.
- Protect Your Hands: A good pair of work gloves can prevent splinters when handling rough lumber and give you a better grip on your tools.
- Work in a Clear, Well-Lit Area: Make sure your workspace is free of clutter. A clean area reduces the risk of tripping or knocking something over. Good lighting helps you make accurate cuts and see what you’re doing.
- Secure Your Work: When cutting wood, use clamps to hold it firmly in place on a workbench or sawhorse. This prevents the wood from moving, ensuring a straight, safe cut.
Tool Safety
- Read the Manuals: If you’re using a power tool for the first time, take a few minutes to read the manufacturer’s safety instructions.
- Keep Fingers Away from Blades: Be mindful of where your hands are at all times, especially when using a saw. Use a push stick for small cuts if necessary.
- Disconnect Power: When changing blades or bits on a power tool, always unplug it from the power source first.
For a comprehensive guide on workshop safety, check out this helpful resource from WoodworkingShop.com. Taking a few moments to prioritize safety makes the whole process more enjoyable and stress-free.
Gathering Your Tools and Materials
One of the best parts about this project is that it doesn’t require a professional workshop full of expensive tools. You can build this entire stand with just a few basic items you might already have in your garage.
Essential Tools
You don’t need much to get started. Here is the list of basic tools for this project:
- Measuring Tape: For accurate cuts.
- Pencil or Marker: To mark your cut lines.
- Hand Saw or Power Saw: A circular saw or miter saw will make the job faster, but a simple hand saw works just fine.
- Power Drill with Phillips Head Bit: To drive the screws.
- Speed Square or Carpenter’s Square: Essential for marking straight, 90-degree lines for cutting.
- Safety Glasses and Work Gloves: As mentioned, safety first!
Materials Shopping List
This plan is designed to be as simple and cost-effective as possible. You can find everything you need at any major hardware store like The Home Depot or Lowe’s. Pressure-treated lumber is recommended if the stand will live outdoors, but standard framing lumber works well if it will be stored inside or in a covered area.
| Item | Quantity | Size/Type | Notes |
|---|---|---|---|
| Lumber (for legs) | 2 | 2×4, 8 feet long | This will be used for the vertical uprights and the feet of the stand. |
| Lumber (for cross-braces) | 1 | 2×4, 8 feet long | This will connect the legs and provide stability. |
| Lumber (for target rest) | 1 | 2×6, 8 feet long | This wide board will serve as the main support beam for your target. |
| Wood Screws | 1 box | 2.5-inch exterior screws | Get screws rated for outdoor use to prevent rust. |
| Target Hanger (Optional) | 1 | Large eye bolt or hook | This is for hanging bag targets. Not needed for block targets. |
Choosing the Right Lumber
At the hardware store, you’ll mainly see two types of lumber for a project like this: standard framing lumber (often pine, spruce, or fir) and pressure-treated (PT) lumber.
- Standard Lumber: This is the most affordable option. It’s lightweight and easy to work with. However, it’s not resistant to rot or insects. If you choose standard lumber, it’s a great idea to paint or seal it to protect it from rain and morning dew, especially if you plan to leave it outside.
- Pressure-Treated (PT) Lumber: This wood has been chemically treated to resist moisture, rot, and insects. It’s the perfect choice if your stand will be permanently outdoors. It costs a bit more and is heavier, but the durability is well worth it. According to the Environmental Protection Agency (EPA), always handle treated wood with gloves and wash your hands after.
For most beginners, standard framing lumber is a great starting point. Just give it a coat of outdoor paint, and it will serve you well for years.
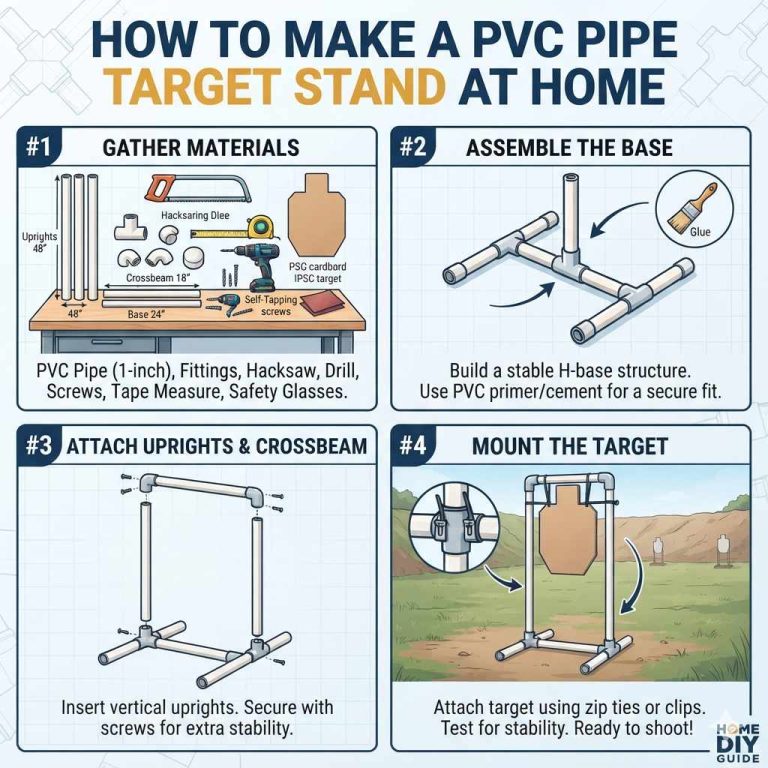
The Step-by-Step Building Guide
Alright, you’ve got your materials and your safety gear is on. It’s time to build! Follow these steps carefully, and you’ll have a finished stand in no time. Remember the old saying: “measure twice, cut once.”
Step 1: Measure and Cut Your Lumber
Accuracy here is key. Use your measuring tape, pencil, and square to mark your lines before you cut. A straight cut will make assembly much easier. Here is a breakdown of all the cuts you need to make.
| Piece Name | Lumber Used | Length | Quantity |
|---|---|---|---|
| Legs (Uprights) | 2×4 | 48 inches (4 feet) | 4 |
| Feet | 2×4 | 24 inches (2 feet) | 2 |
| Cross-Braces | 2×4 | 24 inches (2 feet) | 2 |
| Main Support Beam | 2×6 | 48 inches (4 feet) | 1 |
Pro Tip: Many large hardware stores have a cutting station and will often make a few cuts for you for free or a small fee. This can save you time and ensure your cuts are perfectly straight.
Step 2: Assemble the First Leg Frame
Now we’ll build the first of two “H”-shaped leg frames. This structure provides a wide, stable base.
- Take one of the 24-inch “Feet” pieces and lay it flat on the ground.
- Stand two of the 48-inch “Leg” pieces on top of the foot piece, one at each end. The legs should be standing on their narrow 1.5-inch edge. Make sure they are flush with the ends of the foot piece.
- Use your drill and two 2.5-inch screws to attach each leg to the foot piece. Drive the screws up from the bottom of the foot into the end of each leg. You should now have a “U” shape.
- Next, take one of the 24-inch “Cross-Brace” pieces. Position it between the two standing legs, about 12 inches down from the top. Make sure it’s level.
- Secure the cross-brace by driving two screws through the outside of each leg and into the ends of the brace.
You have now completed your first H-frame! It should be sturdy and able to stand on its own.
Step 3: Assemble the Second Leg Frame
You guessed it! Simply repeat the exact same process from Step 2 using the remaining two legs, one foot, and one cross-brace piece. Once you’re done, you will have two identical H-frames ready for the final assembly.
Step 4: Connect the Two Leg Frames
This is where your target stand really takes shape. We’re going to connect the two frames with the main support beam.
- Stand both H-frames upright, parallel to each other, about 40 inches apart.
- Take your 48-inch 2×6 “Main Support Beam” and lay it across the top of the two cross-braces you installed earlier. The wide, 5.5-inch side of the board should be facing up.
- Center the support beam so that it overhangs each cross-brace by a few inches.
- From the top of the 2×6 support beam, drive two or three screws down into each cross-brace to secure it firmly.
Your stand is now fully assembled and should feel incredibly solid. Give it a gentle shake to test its stability.
Step 5: Add the Target Hanger (For Bag Targets)
If you use a foam block target that can simply sit on the main support beam, you can skip this step. If you use a bag target with a hanging strap, you’ll need to add a way to hang it.
- Measure to find the center of your 48-inch main support beam (at the 24-inch mark).
- Drill a pilot hole slightly smaller than the threads of your eye bolt or hook.
- Screw the eye bolt or hook into the pilot hole until it is tight and secure.
You can now hang your bag target, and the bottom of the bag can rest against the cross-braces for extra support.
Step 6: Finishing Touches (Optional but Recommended)
Your stand is functional, but a few extra touches can make it last much longer and look great.
- Sanding: Lightly sand any rough edges or splinters to give the stand a smooth finish and make it safer to handle.
- Painting or Staining: Applying a coat of exterior paint, stain, or a clear water sealant is the best way to protect the wood from sun and rain. This step is highly recommended, even for pressure-treated wood, as it will dramatically extend the life of your stand.
Setting Up Your New Stand for Safe Shooting
A great stand is only part of the equation; using it safely is just as important. Proper placement is crucial for making sure every arrow you shoot lands exactly where it should—either in the target or a safe backstop.
- Choose a Safe Location: Find a spot with a clear, safe background. A large hill, a thick patch of woods, or the side of a barn can serve as a natural backstop. Never shoot in the direction of houses, roads, or areas where people might walk.
- Ensure a Solid Backstop: Even the best archers miss sometimes. Your backstop must be capable of stopping an arrow. Never rely on a simple fence or a thin wall.
- Check Your Surroundings: Before you start shooting, make sure no pets, children, or neighbors are in the area. Always be 100% certain of what is behind your target.
- Level Ground: Place your stand on the most level ground you can find. This ensures it won’t tip over and that your target is presented at a consistent angle for better practice.
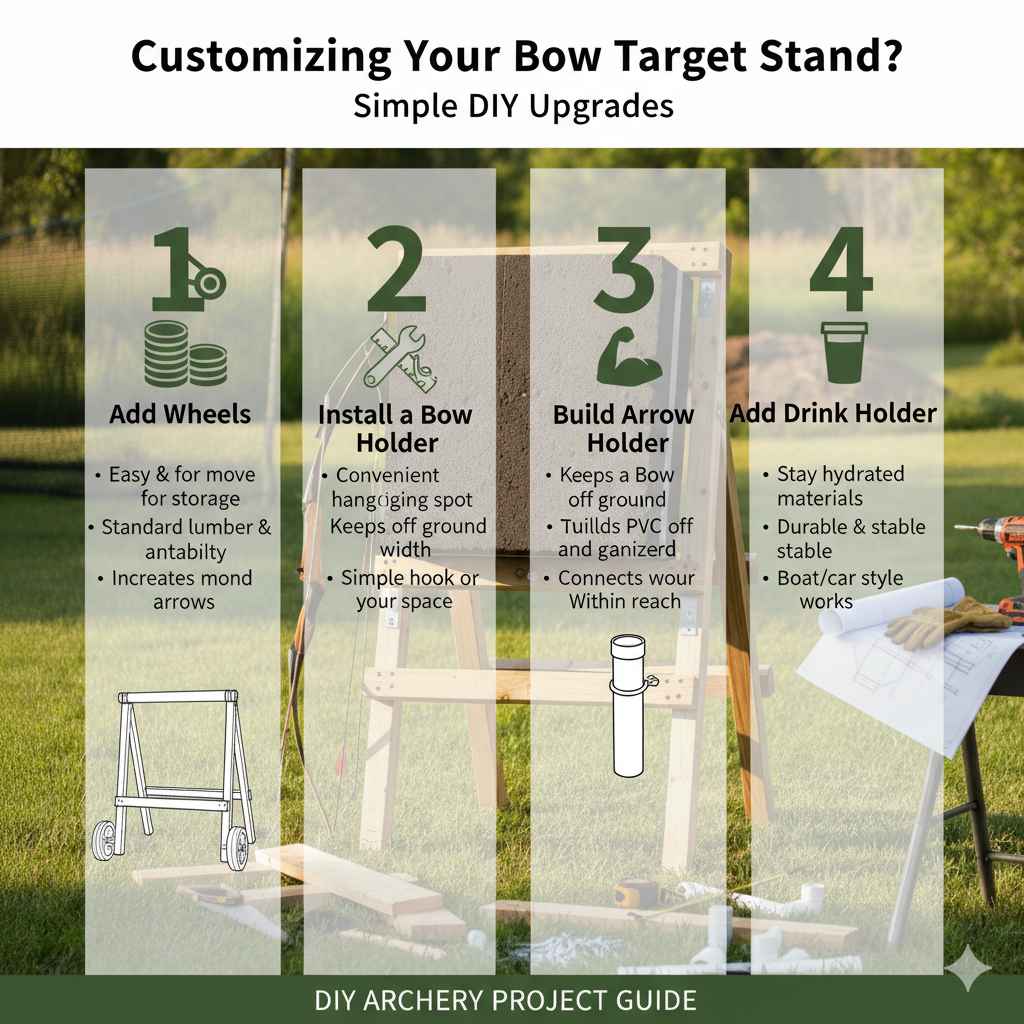
Customizing Your Bow Target Stand
Now that you have a basic, sturdy stand, you can get creative! Here are a few simple ideas to upgrade your design and make your practice sessions even better.
- Add Wheels: Attach a pair of small, sturdy wheels to the bottom of one of the H-frames. This allows you to easily tilt the stand back and roll it around your yard or into storage.
- Install a Bow Holder: Screw a large tool hook or a simple wooden peg into the side of one of the upright legs. This gives you a convenient place to hang your bow while you retrieve your arrows.
- Build an Arrow Holder: Attach a short piece of PVC pipe (about 4 inches in diameter) vertically to one of the legs. It makes a perfect holder for your arrows, keeping them off the ground and within easy reach.
- Add a Drink Holder: Staying hydrated is important! A simple cup holder designed for a boat or car can be easily screwed onto the stand for your water bottle.
Frequently Asked Questions (FAQ)
How tall should a bow target stand be?
A good rule of thumb is to have the center of your target at about shoulder height. The 48-inch legs in this plan will place most targets at a comfortable height for the average adult. You can easily adjust the leg length to make it taller or shorter to suit your preference.
Can this stand hold a heavy target?
Absolutely. This design, built with 2x4s and a 2×6, is extremely sturdy. It can easily support heavy bag targets (up to 100 lbs) and large foam block targets without any wobbling or instability.
Do I really need to paint or stain the stand?
If you use standard, untreated wood and plan to leave the stand outside, then yes, painting or sealing it is highly recommended. Moisture is wood’s worst enemy. A good coat of exterior paint will prevent rot and warping, making your stand last for many seasons.
What if my target is wider than the stand?
This plan is easily adjustable. If you have a very wide target, you can simply increase the length of the “Main Support Beam” and the “Cross-Braces.” For example, you could make them 36 inches long instead of 24 inches to create a wider base.
How much will this project cost?
Lumber prices vary by location, but you can typically build this entire stand for around $30 to $50. This is significantly cheaper than most pre-made stands, which often start at $80 and go up from there.
Can I disassemble it for storage?
While this design is built for sturdiness using screws, you could modify it for disassembly. Instead of screws, you could use bolts with wing nuts to connect the main support beam to the H-frames. This would allow you to quickly break it down into three flat pieces for easy storage.
Is a 2×4 strong enough for the legs?
Yes, a 2×4 is more than strong enough. When oriented vertically, it has excellent compressive strength and is the standard for building walls in houses. For a target stand, it’s a perfect balance of strength, weight, and cost.
Conclusion: Your New Best Practice Partner
Congratulations! You now have a complete, proven plan to build your very own bow target stand. By investing a little bit of time and effort, you’ve created a piece of equipment that is stronger, more affordable, and perfectly suited to your needs than anything you could buy. This stand isn’t just a project; it’s a tool that will help you become a better, more consistent archer.
Every time you set it up for practice, you’ll feel a sense of accomplishment. You’re not just practicing archery; you’re using something you built with your own hands to pursue your passion. So go ahead, set up your new stand, nock an arrow, and enjoy the satisfying thud of hitting your target, knowing you made it all possible. Happy shooting!