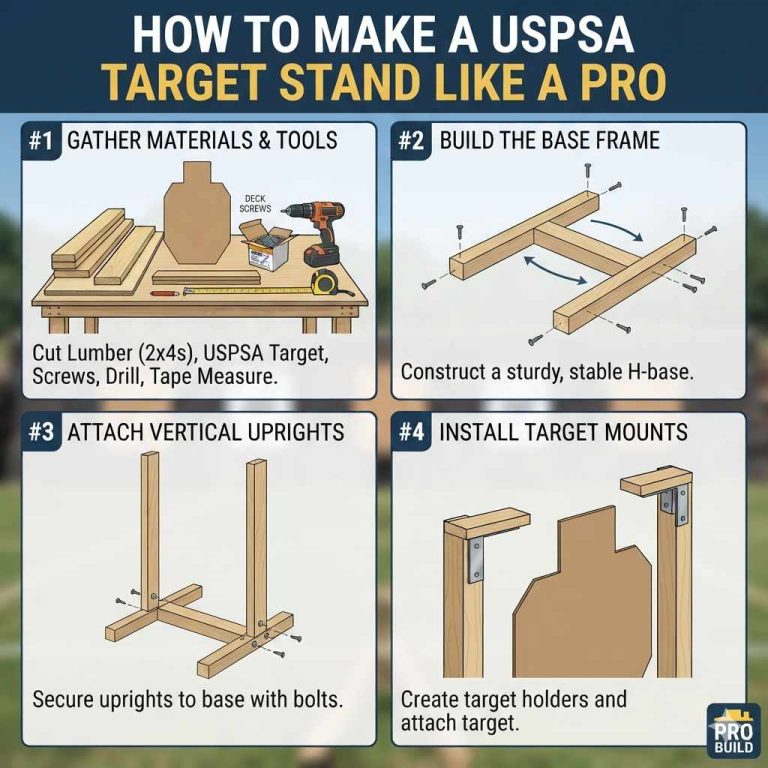
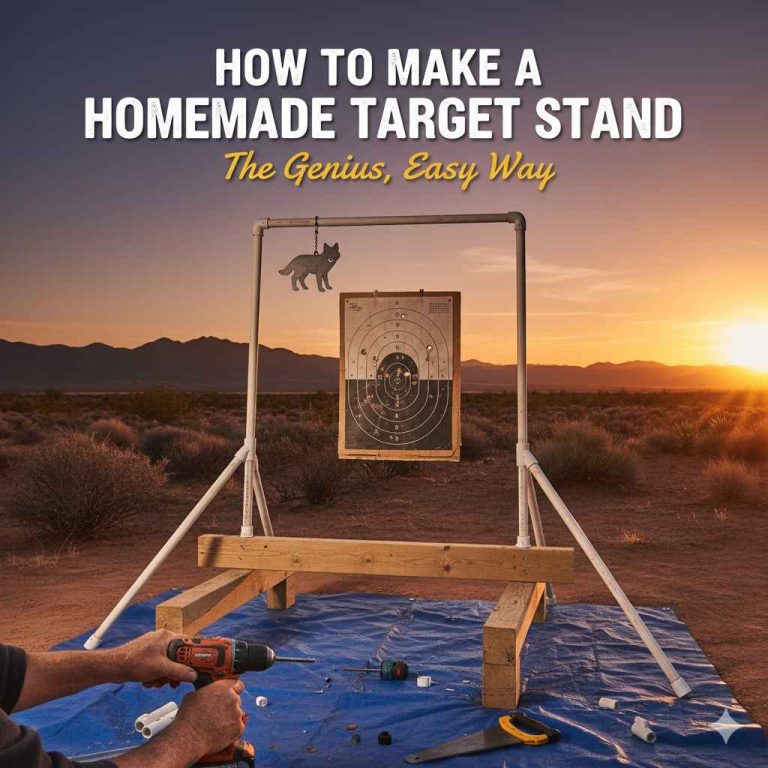
To build a body target stand, you will construct a simple ‘H’ frame from 2-inch PVC pipe. You’ll need four T-fittings, two 90-degree elbows, and pipe cut to size for the base, uprights, and a top crossbar. The design is lightweight, durable, easy to assemble without glue, and provides a stable base for your archery target.
Hello, archers! Salman here. Have you ever set up your new body target, only to have it wobble or tip over with the first good shot? It’s a common frustration. You want to focus on your aim, not on a flimsy stand that can’t handle the impact. Many store-bought stands are either too expensive or just not sturdy enough for regular practice.
Don’t worry, there’s a simple and affordable solution. You can build your own target stand that is strong, stable, and perfectly suited to your needs. This guide will walk you through a genius, easy-to-follow design. We will build a stand that you can be proud of, one that lets you focus on what really matters: hitting your mark. Let’s get started!
Why Build Your Own Target Stand?
Before we grab our tools, let’s talk about why a DIY stand is such a great idea for any archer, especially if you’re just starting out. It’s about more than just saving a few dollars; it’s about creating something that works perfectly for you.
The Big Three Benefits
- It Saves You Money: High-quality, durable target stands can be surprisingly expensive. By building your own, you can get a top-tier stand for a fraction of the cost. The materials we’ll use are common and affordable at any local hardware store.
- It’s Built to Last: This PVC design is incredibly tough. Unlike some metal stands that can rust or thin plastic stands that crack, PVC is weather-resistant and can absorb the shock of arrows hitting the target without breaking. It’s a stand that will last you for years.
- You Can Customize It: Is your target a little wider or taller than standard? No problem. The best part about this design is that you can easily adjust the measurements to fit your specific target perfectly. You can also paint it or add your own modifications later on.
Building your own gear is a rewarding part of the archery journey. It connects you more deeply to the sport and gives you a sense of accomplishment every time you set up for practice.

Understanding the Genius, Simple Design
So, what makes this design so special? It all comes down to a few key principles: stability, simplicity, and portability.
The core of this stand is a wide ‘H’ shaped base. This shape is naturally stable and resists tipping over, even on slightly uneven ground. The weight of the target is distributed evenly across the four feet of the base, keeping everything securely in place. We will use 2-inch Schedule 40 PVC pipe, which is thick, strong, and rigid—perfect for this job.
The entire stand is assembled using PVC fittings that slide together snugly. The magic is that you don’t need any glue! This is called a “dry fit.” This means you can easily take the stand apart in seconds, making it incredibly portable. You can toss it in the trunk of your car to take to the range or store it in a small corner of your garage. It’s the perfect blend of strength and convenience.
Gather Your Materials and Tools
Let’s get everything ready before we start building. A quick trip to a hardware store like The Home Depot should get you everything you need. Here’s a detailed list to take with you.
Materials List
This table outlines the essential parts for the stand. The costs are estimates and can vary based on your location and store.
| Item | Quantity | Size/Type | Estimated Cost | Purpose |
|---|---|---|---|---|
| PVC Pipe | Two 10-foot lengths | 2-inch, Schedule 40 | $20 – $30 | The main frame of the stand |
| PVC T-Fittings | 4 | 2-inch, Slip | $8 – $12 | Connects the base and uprights |
| PVC 90-Degree Elbows | 2 | 2-inch, Slip | $4 – $6 | Used for the top hanger bar |
| Rope or Bungee Cords | 2 | Approx. 3 feet each | $5 – $10 | To hang the body target |
| Sand (Optional) | Small bag | All-purpose sand | $5 | To weigh down the base for extra stability |
Tools You’ll Need
You don’t need a fancy workshop for this project. These basic tools will get the job done perfectly.
- Measuring Tape: For accurate cuts.
- Permanent Marker: To mark your cutting lines.
- Saw or PVC Cutter: A simple handsaw, hacksaw, or a dedicated PVC pipe cutter works great. PVC cutters give the cleanest edges.
- Sandpaper or a File (Optional): To smooth the edges of the pipe after cutting. This helps the fittings slide on more easily.
Step-by-Step: Let’s Build Your Target Stand!
Alright, with all our materials and tools ready, it’s time for the fun part. We’ll build this in simple stages. Follow along, and you’ll have a finished stand in no time.
Step 1: Cut Your PVC Pipe to Size
Precision is your friend here. Measure twice, cut once! Use your measuring tape and permanent marker to mark all your cuts before you start. Here is a cutting list that works for most standard 3D body targets. You can adjust the height of the uprights if needed.
Cutting List
- For the Base Feet: Cut four (4) pieces at 24 inches each. These will form the wide, stable feet of the ‘H’ frame.
- For the Base Connector: Cut one (1) piece at 30 inches. This piece connects the two sides of the base.
- For the Uprights: Cut two (2) pieces at 48 inches each. These determine the height of your stand. Feel free to make them shorter or taller to match your target.
- For the Top Hanger Bar: Cut one (1) piece at 30 inches. This is where your target will hang from.
Pro Tip: After cutting each piece, use a file or a piece of sandpaper to quickly smooth the inside and outside of the cut edge. This removes any small plastic burrs and makes assembly much smoother.
Step 2: Assemble the Base
The base is the foundation of our stand. It should look like a wide letter ‘H’ when you’re done.
- Take two of your T-fittings. The T-fitting has three openings. Think of it as having a “top” and a “bottom.” The single opening on the bottom will point up to hold the uprights. The two openings on the top will hold the feet.
- Take two of your 24-inch “feet” pieces. Push one into each side of the top of a T-fitting. Repeat this with the other T-fitting and the remaining two 24-inch pieces. You should now have two identical assemblies that look like this: Foot – T – Foot.
- Now, stand these two assemblies up, with the open end of the T-fittings facing each other.
- Take your 30-inch “base connector” piece. Insert one end into the open T-fitting on one assembly, and the other end into the T-fitting on the second assembly.
- Push everything together firmly. You now have a completed ‘H’ shaped base! Place it on the ground and make sure it sits flat.
Step 3: Add the Uprights
This part is the easiest. Your base should have two open T-fittings pointing straight up at the sky. These are for your uprights.
- Take your two 48-inch “upright” pieces.
- Insert one upright piece into each of the open T-fittings on the base.
- Push them down until they are seated firmly. Your stand is starting to take shape! It should now look like a giant goalpost.
Step 4: Create the Top Hanger Bar
The top bar is where all the action happens. This is what will hold your target.
- Take your two 90-degree elbow fittings. Place one on top of each of the 48-inch uprights.
- Position the elbows so that the open ends are facing each other.
- Take your final 30-inch “hanger bar” piece.
- Insert one end into one elbow and the other end into the second elbow. Push them together securely.
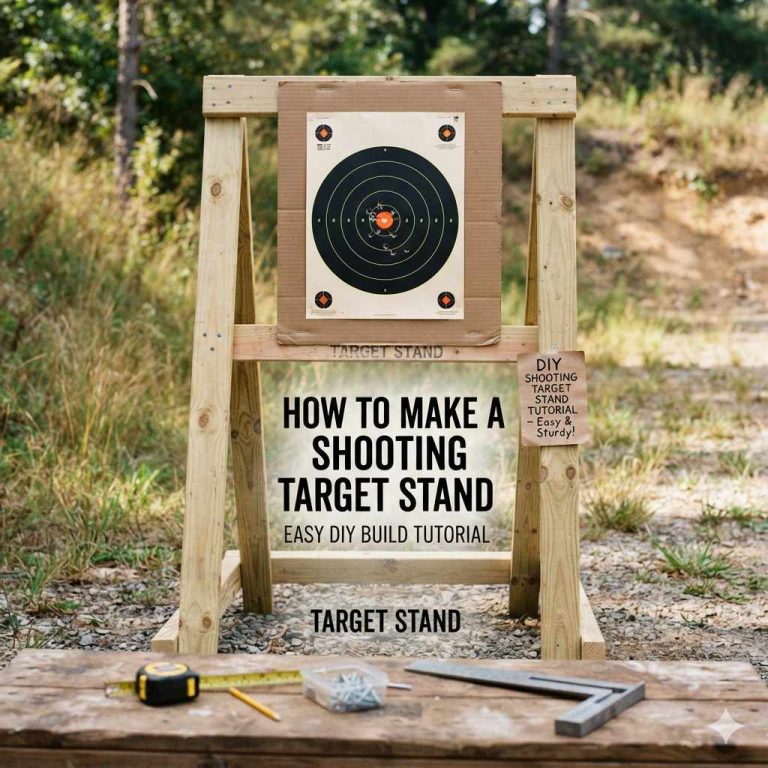
Congratulations! You have just built your body target stand. Step back and admire your work. It’s a simple, strong, and effective design.
Setting Up and Using Your Stand Safely
Building the stand is only half the fun. Using it safely is the most important part. An archer’s first priority is always safety. Let’s go over how to use your new stand correctly.
Finding the Right Spot
Where you place your target is critical. Always follow these rules:
- Know Your Backstop: Never, ever shoot without a safe backstop. This should be a large hill, a thick patch of woods where no one will be, or a purpose-built arrow backstop. Never assume you won’t miss the target.
- Clear Line of Sight: Ensure there is nothing and no one between you and the target, or anywhere behind the target. Be aware of paths, trails, or roads that might be nearby. The U.S. Forest Service provides excellent guidelines on safe shooting areas.
- Level Ground: Place your stand on the flattest ground you can find. This ensures it won’t rock or tip.
Hanging Your Target
Most 3D body targets have a grommet or a loop at the top for hanging. Using rope or bungee cords gives your target a little “give,” which helps it absorb the arrow’s energy and reduces wear on both the target and your stand.
- Loop your rope or bungee cord through the grommet on your target.
- Drape the ends over the top hanger bar of your stand.
- Tie it off securely, allowing the target to hang freely. It shouldn’t be swinging wildly, but it shouldn’t be rigid either.
Adding Stability (Optional but Recommended)
For heavier targets or on windy days, adding some weight to the base is a great idea. The easiest way to do this is with sand. You can simply lay sandbags over the feet of the base. Alternatively, you can fill the four 24-inch base pieces with sand before assembly for a more permanent, integrated weight solution. Just remember that this will make it heavier to transport.

Customizing Your Stand
One of the best things about a DIY project is making it your own. Here are a few simple ideas to customize your stand.
| Customization Idea | How to Do It | Benefit |
|---|---|---|
| Paint It | Use a spray paint designed for plastic. A light sanding beforehand will help the paint stick better. | Protects the PVC from long-term UV sun damage and lets you add your own personal style. Bright colors can also improve visibility. |
| Add Wheels | Drill holes in two of the base feet and attach small caster wheels. | Makes it incredibly easy to move the stand around your yard or the range without taking it apart. |
| Adjustable Height | Drill a series of holes through the uprights and the T-fittings. Use a pin or bolt to lock the uprights at different heights. | Allows you to easily change the target height for practicing different shots or to accommodate different targets. |
| Add an Arrow Holder | Attach a short piece of wider PVC pipe (e.g., 4-inch) vertically to one of the uprights using zip ties or clamps. | Gives you a convenient place to hold your arrows while you walk to retrieve your shots. |
Frequently Asked Questions (FAQ)
1. Can I use glue to make the stand permanent?
You can, but I don’t recommend it. The beauty of this design is that the dry-fit connections are very snug and strong enough for normal use. Keeping it glue-free means you can easily disassemble it for transport or storage. If you ever need to replace a part, it’s also much easier without glue.
2. How heavy of a target can this stand hold?
This 2-inch Schedule 40 PVC stand is very robust. It can easily hold most foam block targets, bag targets, and standard 3D deer or body targets, which typically weigh between 20 to 60 pounds. If you have an exceptionally heavy target, consider adding sand to the base for extra stability.
3. Is this stand weatherproof? Can I leave it outside?
Yes, PVC is a plastic that is highly resistant to rain, moisture, and temperature changes. You can leave it outside without worrying about rust or rot. However, over many years, direct sunlight can make PVC slightly more brittle. Painting it can help protect it from UV rays if you plan to leave it out permanently.
4. What’s the best tool for cutting PVC pipe?
A dedicated PVC pipe cutter (ratcheting or scissor-style) is the best choice. It makes clean, fast, and perfectly straight cuts with minimal effort. However, a simple hacksaw or handsaw works just fine. Just be sure to hold the pipe steady and cut as straight as you can.
5. Can I adjust the width for a wider target?
Absolutely! That’s the advantage of a DIY build. To make the stand wider, simply use longer pieces for the “Base Connector” and the “Top Hanger Bar.” A good rule of thumb is to make the stand about 6-8 inches wider than your target to ensure it hangs freely.
6. Why use 2-inch PVC instead of a smaller size?
While you could use 1.5-inch PVC, the 2-inch diameter provides significantly more rigidity and stability. The wider pipe and larger fittings create a much sturdier frame that won’t flex or wobble when an arrow impacts the target. For the small difference in cost, the upgrade in performance is well worth it.
7. What if the fittings are too tight or too loose?
PVC pipes and fittings have manufacturing tolerances, so you might find a connection that is extra tight or a bit loose. If it’s too tight, a little bit of sanding on the end of the pipe can help. If it’s slightly loose, you can wrap the end of the pipe with a single layer of electrical tape to create a snugger fit.
Conclusion: Your Reliable Practice Partner
There you have it—a complete guide to building a target stand that is not only affordable and simple to make but also incredibly durable and reliable. You’ve learned how to select the right materials, cut them accurately, and assemble a stand that will be your trusted practice partner for years to come.
This project is more than just about saving money; it’s about empowering yourself as an archer. By building your own equipment, you gain a deeper understanding of the gear you use every day. Every time you set up this stand, you can feel a sense of pride and accomplishment. Now, you can spend less time worrying about your target tipping over and more time focusing on your form, your release, and the satisfying thud of your arrow hitting its mark.
Happy shooting, and may your arrows always fly true!