How to Make a Bow Stand with PVC Pipe Easily
Making a bow stand with PVC pipe is a fantastic DIY project for any archer looking for a stable and affordable way to store their bow. This guide will walk you through the simple steps to construct a durable and functional PVC bow stand that keeps your equipment safe and accessible. Forget expensive store-bought options; crafting your own allows for customization and a sense of accomplishment.
We’ll cover the materials, tools, and step-by-step instructions to ensure you end up with a reliable stand perfect for your archery needs.
Simply put, building a PVC bow stand involves cutting and assembling standard PVC pipes and fittings. It requires minimal tools, is budget-friendly, and results in a sturdy stand that safely holds your bow upright, preventing damage to limbs and accessories.
Key Takeaways
- PVC bow stand construction is an accessible DIY project using readily available materials.
- The process involves simple cutting and assembly of PVC pipes and fittings, requiring basic tools.
- A DIY PVC bow stand offers a stable, protective storage solution that is significantly more affordable than commercial options.
- Customization is a key benefit, allowing you to adjust dimensions for different bow types or preferences.
- This project is ideal for archers seeking a practical, cost-effective way to care for their equipment.
What is a PVC Bow Stand and Why Build One?
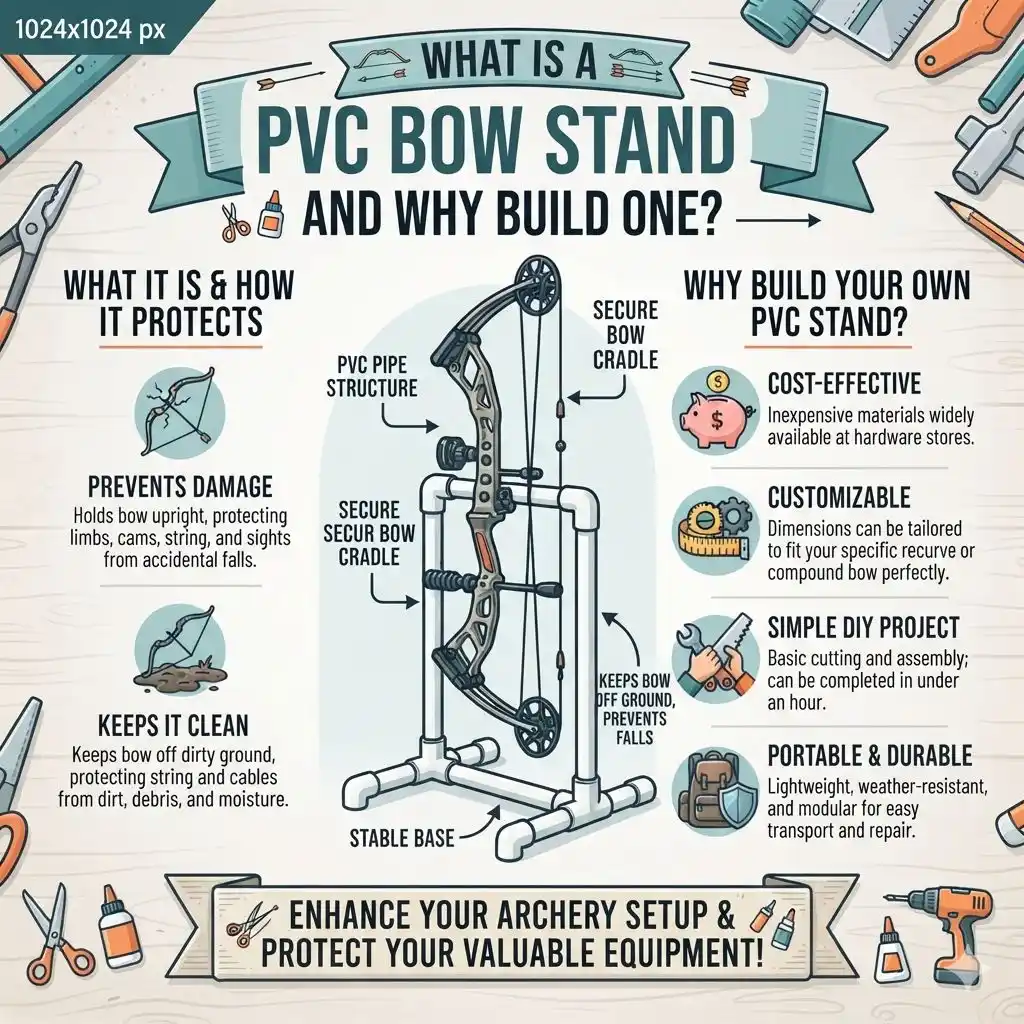
A PVC bow stand is a simple structure made from polyvinyl chloride pipes and fittings, designed to hold a compound or recurve bow upright. Its primary function is to prevent the bow from falling over, which could lead to damage of the limbs, string, cams, or accessories like sights and rests. By keeping the bow stable and off the ground, it also protects the string and cables from dirt and moisture, prolonging their lifespan and maintaining optimal performance.
Building your own PVC bow stand offers several compelling advantages over purchasing a pre-made one. Firstly, it’s incredibly cost-effective. PVC pipes and fittings are inexpensive and widely available at most hardware stores.
Secondly, it’s a straightforward DIY project that doesn’t require advanced carpentry skills. With basic cutting and assembly, you can have a functional stand in under an hour. Thirdly, you can customize the dimensions to perfectly suit your specific bow, whether it’s a long recurve or a compact compound bow.
This personalization ensures a snug and secure fit.
Furthermore, a homemade bow stand is highly portable and durable. PVC is resistant to weather and moisture, making it suitable for use in various conditions, from backyard practice sessions to hunting trips. The modular design also means if a piece breaks, it’s easy and cheap to replace.
For archers on a budget or those who enjoy a good DIY project, this is an excellent way to enhance their archery setup and protect their valuable equipment.
Benefits of a DIY PVC Bow Stand
- Cost-Effective: Significantly cheaper than store-bought alternatives.
- Customizable: Easily adjust height and width for your specific bow.
- Durable: PVC is weather-resistant and built to last.
- Easy to Build: Requires only basic tools and simple assembly.
- Protective: Keeps bow limbs, string, and accessories safe from damage.
- Portable: Lightweight and easy to transport to the range or field.
- Quick Project: Can often be completed in under an hour.
Essential Materials and Tools
Gathering the right materials and tools is the first step toward constructing your PVC bow stand. The beauty of this project lies in its simplicity and the common availability of its components. You’ll primarily be working with PVC pipes and a few connecting fittings.
The specific lengths and types of fittings will depend on the design you choose, but standard parts are universally compatible.
For tools, you won’t need anything specialized. A basic PVC pipe cutter or even a hacksaw will suffice for cutting the pipes to size. A measuring tape is crucial for ensuring accurate cuts and a well-proportioned stand.
You might also want a marker to denote cutting lines. While not strictly necessary for a basic stand, a PVC primer and cement can be used for a permanent, more rigid connection if desired, though many designs rely on friction-fit connections that allow for disassembly.
Here’s a breakdown of common materials. For a basic tripod design, you’ll typically need: a length of 1-inch or 3/4-inch diameter PVC pipe (around 4-6 feet), several 90-degree elbow fittings, and at least one T-fitting. The exact number of fittings depends on the complexity of your chosen design.
It’s always a good idea to buy a little extra pipe and a few more fittings than you think you’ll need, just in case of measurement errors or to explore alternative designs. Standard PVC fittings are color-coded for pipe size, so ensure your fittings match your chosen pipe diameter.
Recommended Materials List
- PVC Pipe: 1-inch or 3/4-inch diameter, approximately 4-6 feet (schedule 40 recommended for durability).
- 90-Degree Elbow Fittings: 3-4 pieces (for a tripod base).
- T-Fittings: 1-2 pieces (for connecting legs and the upright section).
- Couplers (Optional): To connect sections of pipe for easier storage or transport.
- PVC Primer and Cement (Optional): For permanent assembly.
- End Caps (Optional): To cover the ends of the pipes for a cleaner look or to prevent dirt ingress.
Essential Tools for Assembly
- Measuring Tape: For accurate measurements.
- Marker Pen: To mark cutting lines on the PVC pipe.
- PVC Pipe Cutter or Hacksaw: For cutting the pipe to desired lengths.
- Sandpaper or File: To smooth any rough edges after cutting.
- Safety Glasses: Always protect your eyes when cutting or assembling.
Step-by-Step: Building a Simple PVC Bow Stand (Tripod Design)
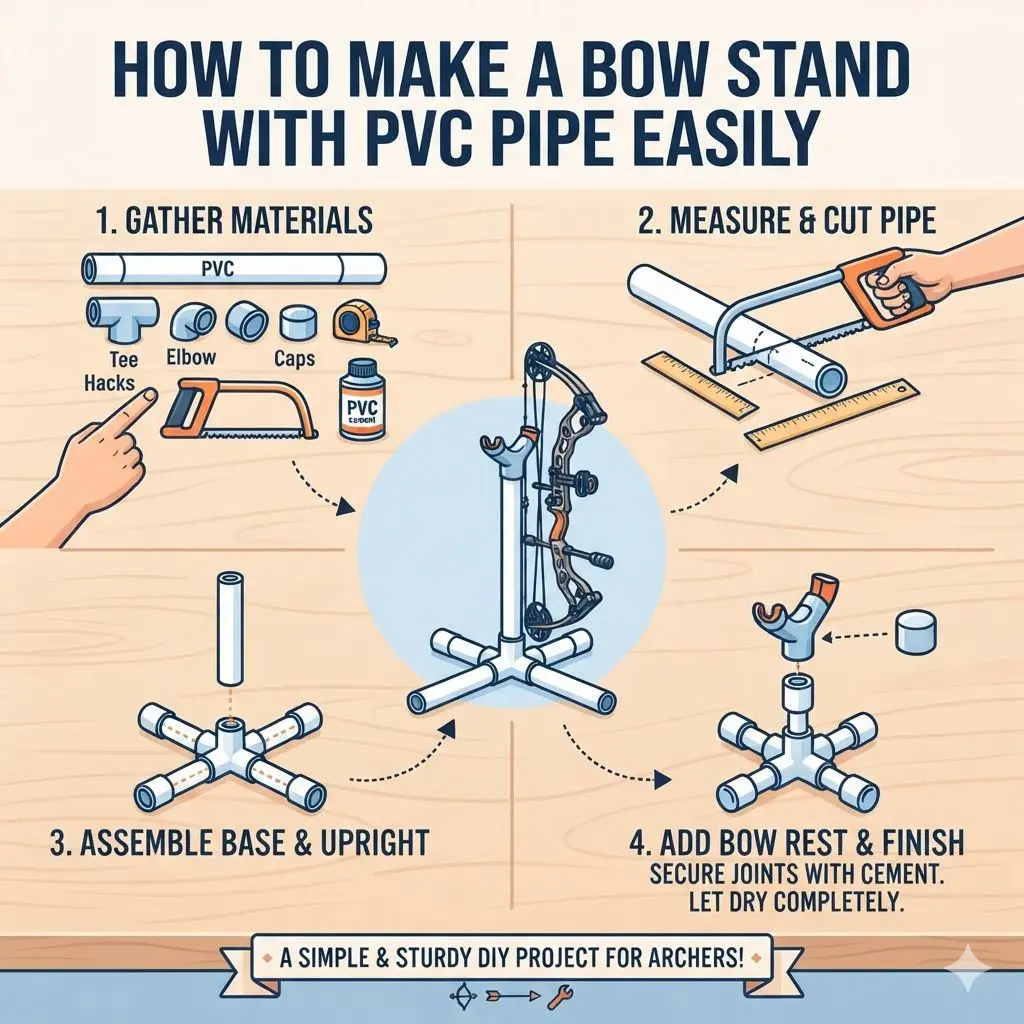
Let’s get started with constructing a basic, yet highly effective, tripod PVC bow stand. This design is popular because it’s stable and relatively simple to put together. We’ll break down the process into manageable steps, ensuring clarity for beginners.
Remember to measure twice and cut once to avoid wasting materials.
The first step involves cutting your PVC pipe into the necessary sections. For a typical compound bow, you might want the main upright section to be around 2-3 feet tall, and the legs to be roughly the same length, creating a stable base. However, you can adjust these lengths based on your bow’s dimensions and your personal preference.
Once cut, use sandpaper or a file to smooth any rough edges left by the cutter or saw. This not only makes the stand look cleaner but also prevents potential snags on your bow or clothing.
Next, we assemble the base. Take your three 90-degree elbow fittings and connect them using short lengths of PVC pipe, forming a triangular base when viewed from above. Alternatively, you can use three T-fittings attached to a central hub, with pipes extending outwards as legs.
A common approach is to create a stable tripod base by connecting three elbows at equal angles. The length of the pipe sections connecting these elbows will determine the spread of your base – a wider spread offers more stability.
Step 1: Cut Your PVC Pipes
- Measure and mark your PVC pipe for the main upright section. A height of 24-36 inches is a good starting point for most compound bows.
- Measure and mark three equal lengths for the tripod legs. For good stability, aim for leg lengths that are similar to the upright, or slightly shorter, depending on your desired angle.
- Using your PVC pipe cutter or hacksaw, carefully cut the marked sections. Ensure your cuts are as straight and perpendicular as possible.
- Lightly sand or file all cut edges to remove burrs and sharp fragments.
Step 2: Assemble the Base
This is where the stand starts to take shape. You’ll need your T-fittings and elbow fittings for this part.
- Take one T-fitting. Insert one elbow into one opening of the T.
- Insert another elbow into the other opening of the T. These will be two of your tripod legs.
- Now, take a short length of PVC pipe and insert it into the remaining opening of the T-fitting. This pipe will connect to your third leg or the main upright structure, depending on your design choice. A common method is to have one T-fitting act as the central hub for three legs. You would insert a short pipe into one opening of the T, and then attach elbows to the ends of three equally long pipes that will form your legs. These legs then connect to the central T-hub.
- For a classic tripod, you might use three T-fittings, each with an elbow on one end, and then connect these elbows to a central point or to a short cross piece. A simpler method is using one T-fitting as the central hub for three legs, each leg consisting of a pipe and an elbow at the end.
- Ensure all connections are snug. If using optional PVC cement, apply primer and then cement to the ends of the pipe and the inside of the fitting before joining for a permanent bond.
Important: Ensure the angles of your base legs create a wide enough stance for maximum stability. A good rule of thumb is that the angle between any two legs should be roughly 120 degrees.
Step 3: Attach the Upright Section and Top Support
Now, you’ll connect the main vertical part of the stand and create a cradle for your bow.
- Take the main upright PVC pipe section you cut earlier.
- Attach this upright pipe to the central point of your assembled base. If you used a T-fitting as the hub, this upright pipe will likely go into the remaining opening of the T.
- At the top of the upright pipe, you need to create a way to cradle your bow. A common method is to use a T-fitting or an elbow fitting. If you use a T-fitting, it will create two “arms” that can rest on your bow’s limbs or riser. If you use an elbow, it can help direct the bow inward.
- For a two-pronged support at the top, you can use a T-fitting. Insert a short piece of PVC pipe into the upright section, then attach a T-fitting to that. Into the two side openings of the T-fitting, insert short lengths of pipe, perhaps 3-4 inches long, capped with end caps if you have them. These will be the arms that hold your bow.
- Ensure the upright section is perfectly vertical and that the top support is level and centered.
| Assembly Step | Key Components | Tips |
|---|---|---|
| Pipe Cutting | PVC Pipe, Cutter/Saw, Marker, Measuring Tape | Ensure accurate, straight cuts. Smooth edges. |
| Base Assembly | T-Fittings, Elbows, Short Pipe Sections | Aim for a wide, stable triangle or tripod. |
| Upright & Top Support | Upright Pipe, T-Fitting/Elbow, Short Pipe, End Caps (optional) | Ensure upright is vertical. Top support should cradle bow securely. |
This table summarizes the main assembly stages and crucial components, ensuring you have a clear overview of the build process.
Step 4: Finishing Touches and Testing
Once assembled, it’s time to add any finishing touches and ensure your stand is ready for action. If you opted not to use PVC cement, you can now disassemble the stand for easier storage or transport. You can also add end caps to any exposed pipe ends for a cleaner look and to prevent dirt from accumulating inside the pipes.
Some people also like to paint their PVC stands to match their gear or simply for aesthetic preference.
The most important part is testing the stand’s stability and functionality. Carefully place your bow onto the stand, ensuring it’s held securely by the top support. Gently nudge the stand to check for wobbling.
If it feels unstable, you might need to widen the base, ensure all connections are tight, or add a cross brace if your design allows. If the top support is too wide or too narrow for your bow, you can easily adjust the length of the short pipes leading to the end caps or adjust the fittings.
Tip: For added stability, especially for heavier bows, consider using a wider pipe diameter (e.g., 1.5-inch) for the base legs and upright. You could also add a small crossbar connecting two of the base legs.
If the stand holds your bow securely and remains stable, congratulations! You’ve successfully built a functional PVC bow stand. Take it to the range and see how it performs in a real-world scenario.
Enjoy the convenience and peace of mind that comes with having a dedicated, stable spot for your bow.
Advanced Designs and Customizations
While the basic tripod design is excellent, there’s room to get creative and tailor your PVC bow stand to your exact needs. Customization is one of the biggest advantages of DIY projects, and bow stands are no exception. You can adjust heights, widths, and even the overall structure to better suit different types of bows or specific storage situations.
One common customization is creating a stand with a wider base for increased stability, particularly useful for heavier compound bows with complex cam systems. This can be achieved by using longer pipes for the legs or by adding a fourth leg to create a more robust four-point stance. Another popular modification is to incorporate a slot or groove into the top support arms.
This can be done by cutting a shallow channel into the PVC pipe or by using specialized fittings that already have a recessed area, ensuring the bow’s limbs sit snugly and securely without any chance of slipping off.
For archers who frequently travel, a collapsible or modular design can be a game-changer. This involves using PVC couplers or threaded fittings at key connection points (like where the legs meet the upright, or where the upright meets the base). This allows the stand to be easily taken apart into smaller, more manageable pieces for transport in a gear bag or the trunk of a car.
Think about adding a small shelf or hook made from additional PVC pieces to hold release aids, quivers, or other small accessories while you’re at the range.
Variations on the Basic Design
- Four-Legged Stability: Replace the tripod base with a square or rectangular base using four T-fittings and longer leg pipes for maximum stability.
- Adjustable Height: Use telescoping PVC pipes or a set of different sized pipe sections with couplers to create an adjustable height stand.
- Compact/Collapsible: Incorporate threaded pipe fittings or special PVC couplers at strategic points to allow the stand to be easily disassembled and reassembled for transport.
- Integrated Quiver Holder: Design a section of the stand to securely hold a bow quiver when the bow is not mounted.
- Padded Supports: Add foam padding or rubber grips to the top support arms to protect the bow’s finish and provide extra grip.
- Accessory Tray: Construct a small shelf or tray at the base or midway up the upright to hold tools, arrows, or other accessories.
Choosing the Right PVC Size
The diameter of PVC pipe you choose will impact the stand’s strength, weight, and appearance. Standard choices are 3/4-inch and 1-inch diameter pipes. Larger diameters like 1.5-inch or 2-inch can be used for very heavy bows or for maximum durability, but they will also increase the cost and weight of the stand.
For most recurve bows and lighter compound bows, 3/4-inch or 1-inch schedule 40 PVC pipe is perfectly adequate. It offers a good balance of strength, affordability, and ease of handling. Schedule 40 is the most common type of PVC pipe found in hardware stores and is suitable for most DIY applications due to its toughness and impact resistance.
If you have a particularly heavy compound bow with many accessories, or if you want a stand that feels exceptionally robust, opting for 1-inch or even 1.5-inch pipe for the main upright and base legs can provide extra confidence. When selecting fittings, ensure they match the diameter of your chosen pipe precisely. Mismatched sizes will not fit together correctly and can lead to a weak or unstable connection.
| Pipe Diameter | Pros | Cons | Best For |
|---|---|---|---|
| 3/4-inch | Lightweight, least expensive, easy to cut and handle. | May be less stable for heavier bows, can flex. | Recurve bows, very light compound bows, portable stands. |
| 1-inch | Good balance of strength and weight, widely available. | Slightly more expensive and heavier than 3/4-inch. | Most compound bows, general use, balanced stability. |
| 1.5-inch | Very strong and stable, durable, looks substantial. | Heavier, more expensive, requires larger fittings, harder to cut. | Heavy compound bows, very tall bows, maximum stability needs. |
Choosing the right PVC diameter is key to creating a bow stand that meets your specific needs for stability, portability, and budget.
Troubleshooting Common Issues
Even with a straightforward project like a PVC bow stand, you might encounter a few hiccups. The good news is that most issues are easily resolved with a bit of adjustment or by revisiting a previous step. Common problems often relate to stability, fit, or material choices.
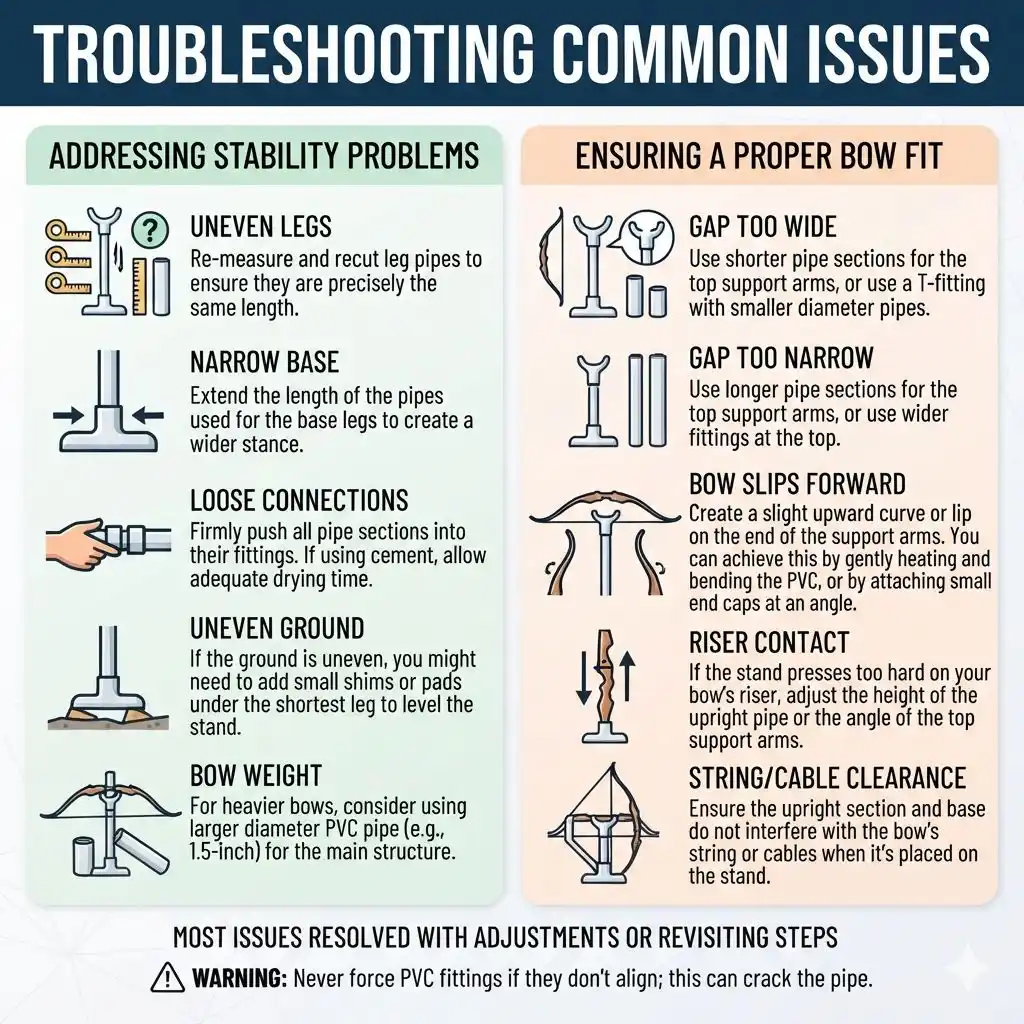
One of the most frequent issues is a wobbly stand. This can stem from uneven leg lengths, a base that isn’t wide enough, or loose connections. If your stand wobbles, first check if all the leg pipes are the same length.
Even a slight difference can cause instability. If they are equal, try widening the base by extending the leg pipes or adjusting the angle of the base fittings. Ensure all fittings are pushed in firmly, and if you used PVC cement, make sure it has fully cured before testing.
Warning: Never force PVC fittings together if they don’t seem to align. This can crack the pipe or fitting. If a cut is slightly off, you may need to recut the piece.
Another issue can be the top support not holding the bow securely. The gap might be too wide or too narrow, or the support might not be deep enough to prevent the bow from slipping. This usually requires adjusting the length of the small pipes that form the arms of the top support or even changing the type of fitting used at the top.
For instance, if your bow’s limbs are very wide, you might need longer support arms. If the bow tends to slide forward, you might need to add small stoppers or a slight upward curve to the support arms.
Addressing Stability Problems
- Uneven Legs: Re-measure and recut leg pipes to ensure they are precisely the same length.
- Narrow Base: Extend the length of the pipes used for the base legs to create a wider stance.
- Loose Connections: Firmly push all pipe sections into their fittings. If using cement, allow adequate drying time.
- Uneven Ground: If the ground is uneven, you might need to add small shims or pads under the shortest leg to level the stand.
- Bow Weight: For heavier bows, consider using larger diameter PVC pipe (e.g., 1.5-inch) for the main structure.
Ensuring a Proper Bow Fit
- Gap Too Wide: Use shorter pipe sections for the top support arms, or use a T-fitting with smaller diameter pipes.
- Gap Too Narrow: Use longer pipe sections for the top support arms, or use wider fittings at the top.
- Bow Slips Forward: Create a slight upward curve or lip on the end of the support arms. You can achieve this by gently heating and bending the PVC, or by attaching small end caps at an angle.
- Riser Contact: If the stand presses too hard on your bow’s riser, adjust the height of the upright pipe or the angle of the top support arms.
- String/Cable Clearance: Ensure the upright section and base do not interfere with the bow’s string or cables when it’s placed on the stand.
Frequently Asked Questions
What is the best type of PVC pipe to use for a bow stand?
Schedule 40 PVC pipe is the most common and recommended type for building a bow stand. It’s durable, impact-resistant, and readily available at hardware stores. Ensure the diameter you choose is appropriate for the weight and size of your bow.
Do I need to use PVC cement for my bow stand?
Using PVC primer and cement will create a permanent, very strong bond, making your stand more rigid. However, if you prefer a stand that can be easily disassembled for storage or transport, you can rely on friction-fit connections, ensuring all pipes are cut precisely and pushed firmly into the fittings.
How tall should a PVC bow stand be?
The ideal height for a PVC bow stand varies based on your bow and personal preference. A common range for the upright section is 24 to 36 inches. You want it tall enough so your bow sits comfortably without the limbs touching the ground, but not so tall that it becomes unstable.
Can I make a PVC bow stand for a recurve bow?
Yes, absolutely! Recurve bows are often lighter and simpler than compound bows, so a basic tripod stand made from 3/4-inch or 1-inch PVC pipe is usually more than sufficient. You might need to adjust the top support design slightly to accommodate the recurve’s limb shape.
How can I make my PVC bow stand more stable?
To increase stability, ensure your base is wide enough, with legs at a good angle. Using larger diameter PVC pipe for the main structure and base legs will also help. Adding a fourth leg to create a square base provides significantly more stability than a tripod.
Final Thoughts
Creating your own PVC bow stand is a rewarding and practical project for any archer. It’s a testament to how simple materials and basic skills can yield a functional and durable piece of archery gear. You now have the knowledge to build a stand that not only protects your bow but also enhances your overall archery experience by keeping your equipment secure and accessible.
Don’t hesitate to experiment with different designs and customizations to make it perfectly yours.