How Do You Make Bows
Few crafts are as universally beloved and versatile as making bows. From gift wrapping to fashion accessories, archery to home décor, the humble bow adds a distinctive touch of creativity and personalization. Whether crafted from ribbon, fabric, twine, or even paper, bows can range from simple and classic to intricate works of art.
For many, learning how to make bows is both a practical skill and a fulfilling creative pursuit that delivers instant results.
Yet, for all their popularity, the process of making bows can seem daunting for beginners. What materials are best? Which techniques yield the neatest results? How do you choose the right bow style for your project? This comprehensive guide provides expert, experience-based answers, walking you step-by-step through the world of bow making.
You’ll discover essential tools, learn proven methods, compare popular bow types, and get actionable tips for troubleshooting common issues, ensuring you achieve professional-looking results every time.
Key Takeaways
- Bow making is a versatile craft, with applications in gift wrapping, décor, fashion, and more.
- Essential tools and materials include ribbon, fabric, scissors, wire, and glue.
- Mastering basic techniques like the classic loop bow and floral bow provides a foundation for advanced designs.
- Different materials and methods produce distinct visual effects, choosing the right combination is key to project success.
- Troubleshooting common problems and learning from examples will help refine your skills.
- This guide covers both beginner-friendly and advanced approaches, making it suitable for all experience levels.
Understanding The Basics Of Bow Making
Creating beautiful bows starts with a solid understanding of the basic principles and techniques. Before diving into complex designs, it’s essential to master the foundational skills and recognize the wide variety of uses for bows in everyday life.
The Purpose And Versatility Of Bows
Bows serve many functions, from purely decorative to highly practical. They are often used to:
- Embellish gifts for special occasions, adding a personal touch.
- Secure floral arrangements or wreaths for events and holidays.
- Enhance clothing and accessories such as hairbands, dresses, and shoes.
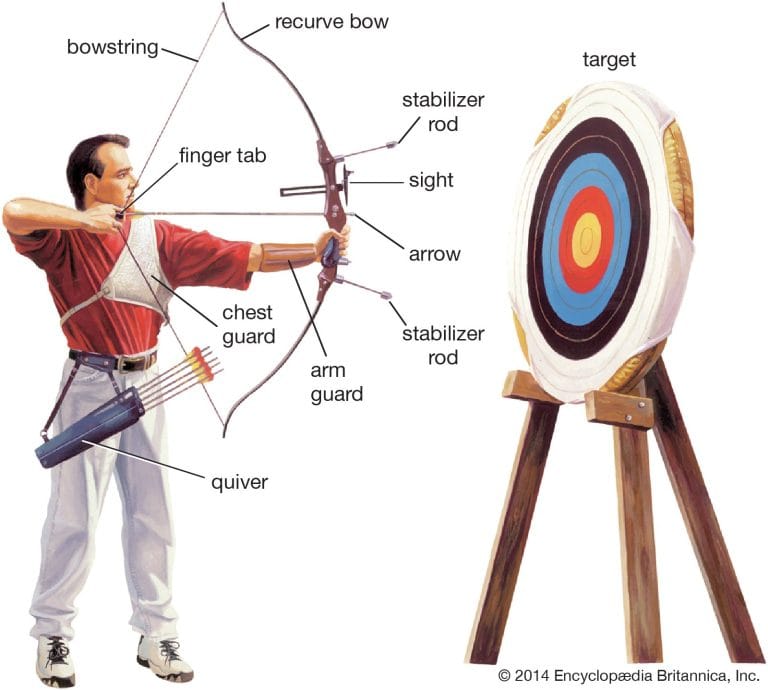
- Aid in archery and crafting as functional ties or handles.
Their adaptability makes bows an essential skill for crafters, decorators, and even hobbyists in fields like archery.
Essential Tools And Materials
Success in bow making depends on having the right tools and materials. While you can improvise with household items, investing in quality supplies will ensure neater, more durable results.
- Ribbons (satin, grosgrain, organza, velvet, burlap, paper)
- Fabric strips for larger or more textured bows
- Wire (floral or crafting wire for shaping and securing)
- Scissors (sharp, fabric or ribbon-specific)
- Glue gun or double-sided tape for securing ends
- Measuring tape or ruler
- Clips or pins to hold shapes during assembly
Example: When I tested making a classic loop bow with both a dull pair of scissors and a ribbon cutter, the latter produced noticeably cleaner edges, which made the finished bow look far more polished.
The Importance Of Material Choice
Selecting the right material is crucial. Satin ribbon creates a sleek and elegant look, perfect for formal gifts. Grosgrain ribbon offers texture and structure, making it ideal for hair bows. Organza provides a light, airy appearance, while burlap is popular for rustic décor. Each material handles differently, some hold their shape better, while others drape more fluidly.
Safety And Preparation
Before you begin:
- Work on a clean, flat surface.
- Use caution with sharp scissors and hot glue.
- Keep materials organized to avoid tangling or fraying.
Pro Tip: Pre-measure and cut all materials before assembly to streamline the process and reduce errors.
Credit: www.youtube.com
Mastering Basic Bow Making Techniques
Learning a few foundational techniques provides the skills needed to tackle almost any bow-making project. Here, we’ll walk through several essential methods, complete with step-by-step instructions.
The Classic Loop Bow
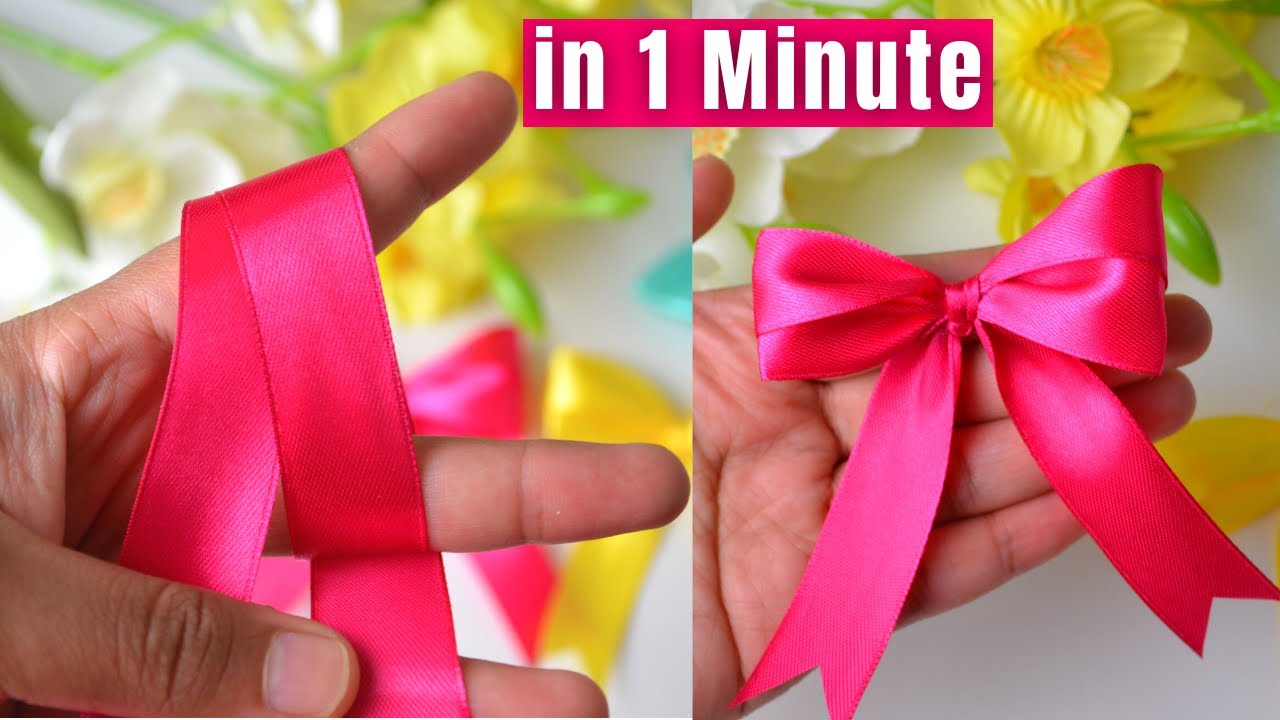
The classic loop bow is the most commonly used style, ideal for gift wrapping, floral arrangements, and general decorations.
Steps:
- Cut a length of ribbon (about 18-24 inches for a medium bow).
- Make two loops (bunny ears) and cross one over the other.
- Pull the top loop under and through the hole.
- Pull both loops to tighten.
- Adjust the loops for symmetry and trim the tails at an angle.
Tips:
- Use wired ribbon for better shape retention.
- For extra fullness, stack two ribbons of different widths or textures.
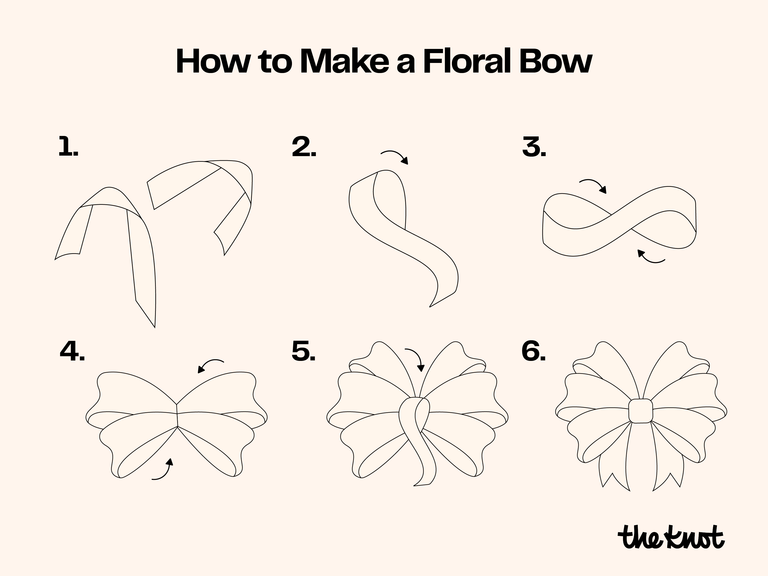
The Floral Bow (multi-loop Bow)
The floral bow, also called a multi-loop bow, is popular for bouquets and wreaths due to its volume and elegance.
Steps:
- Cut 3-5 lengths of ribbon, each about 20-30 inches.
- Form each piece into a loop, pinching the center.
- Stack the loops, arranging them so the tails spread evenly.
- Secure the center with wire or string.
- Fluff out the loops for a rounded shape.
Example: At a wedding event, using organza ribbons for a floral bow added lightness and shimmer, contrasting beautifully with the matte textures of the flowers.
The Tuxedo Bow
The tuxedo bow is sleek and symmetrical, commonly used for hair accessories and men’s bow ties.
Steps:
- Cut a rectangle of ribbon or fabric.
- Fold the two ends to meet in the center.
- Pinch the center, forming two equal loops.
- Wrap a small piece of ribbon around the center and secure with glue.
Best For: Hair clips, formal wear, and napkin rings.
The Pom-pom Bow
This style is perfect for high-impact visual displays, such as large gift boxes or party décor.
Steps:
- Wrap ribbon around your hand or a piece of cardboard 10-15 times.
- Slide the loops off and tie the center tightly with wire or string.
- Cut through the looped ends on both sides.
- Fluff out the strands to create a round, full pom-pom.
Pro Tip: Mixing colors or textures can make pom-pom bows more vibrant and personalized.
The Simple Shoelace Bow
Often used for shoelaces, apron strings, or quick gift ties, this bow is all about speed and simplicity.
Steps:
- Make two loops, one in each hand.
- Cross the right loop over the left.
- Pull the right loop under the left and through the hole.
- Tighten and adjust for evenness.
Best For: Everyday uses where ease of tying and untying is important.

Credit: www.wikihow.com
Exploring Advanced Bow Styles And Decorative Techniques
Once you’ve mastered the basics, you can experiment with more complex and decorative bow styles. These advanced techniques often incorporate multiple materials, layers, or creative elements.
Layered And Double Bows
Layered bows combine different ribbons or fabrics to create a multidimensional effect.
- Start by making two bows of different sizes.
- Stack the smaller bow on top of the larger one.
- Secure them together with wire or glue.
- Add embellishments such as beads or flowers for extra flair.
Boutique (pinwheel) Bow
A favorite for hair accessories and children’s fashion, the boutique bow has a distinctive pinwheel shape.
Steps:
- Cut a long ribbon (24-36 inches).
- Form four loops, crossing in an X pattern.
- Pinch and secure the center with wire.
- Fluff and shape each loop.
Best For: Bold, playful accessories.
Bow With Tails (streamer Bow)
This style is ideal for gift wrapping and banners.
Steps:
- Create a classic or floral bow.
- Attach long, trailing ribbons to the center before securing.
- Let the tails hang freely or curl them for a decorative finish.
Pro Tip: Use contrasting colors for the bow and tails for maximum visual impact.
Sculpted And Wired Bows
Sculpted bows use wire to hold intricate shapes, hearts, stars, or even letters.
- Choose wire-edged ribbon.
- Shape each loop or section before assembly.
- Secure with floral wire and adjust as needed.
Warning: Sculpted bows can require significant time and patience; always shape loops slowly to avoid creasing or damaging the ribbon.
Embellished Bows
Decorate your bows with beads, charms, or fabric flowers by attaching them to the center or ends. This technique is popular in wedding décor and luxury packaging.
Example: For a holiday project, adding silver bells to the center of a red velvet bow created a festive, high-end presentation.
Credit: www.theknot.com
Comparing Materials, Tools, And Applications
Choosing the right materials and tools is key to achieving the desired look and durability. This section offers practical comparisons and real-world advice.
Ribbon And Fabric Comparison Table
| Material | Appearance | Best Uses | Durability |
|---|---|---|---|
| Satin Ribbon | Smooth, shiny | Gift wrapping, formal décor | Medium |
| Grosgrain Ribbon | Textured, ribbed | Hair bows, crafts | High |
| Organza Ribbon | Sheer, light | Weddings, floral arrangements | Low |
| Burlap | Rustic, rough | Rustic décor, wreaths | High |
| Velvet | Soft, plush | Luxury gifts, special events | Medium |
Tool Comparison Table
| Tool | Purpose | Advantages | Best For |
|---|---|---|---|
| Sharp Scissors | Cutting ribbon/fabric | Clean edges, precision | All bows |
| Glue Gun | Securing parts | Strong hold, quick dry | Layered/embellished bows |
| Floral Wire | Shaping and securing | Flexible, strong | Floral/sculpted bows |
| Measuring Tape | Ensuring symmetry | Accuracy | Multi-loop bows |
| Clips/Pins | Holding during assembly | Prevents shifting | Complex bows |
Application And Durability Considerations
- Outdoor décor: Use weather-resistant materials like wired grosgrain or burlap.
- Wearable bows: Prioritize soft, skin-friendly fabrics and secure construction.
- Gift bows: Satin and organza offer elegance, but may not hold up to repeated handling.
Example: In my experience, bows made for outdoor wreaths last longer when constructed with wired burlap and waterproof glue, compared to standard satin ribbon.
Step-by-step Bow Making Tutorials
This section provides detailed, actionable tutorials for popular bow styles, using the techniques and materials compared above.
Tutorial 1: Making A Classic Gift Bow
Materials Needed:
- 24 inches of satin ribbon
- Scissors
Instructions:
- Lay the ribbon flat and create two equal loops.
- Cross the right loop over the left.
- Tuck the right loop under and pull through.
- Tighten by pulling both loops gently.
- Adjust for symmetry and trim the ends.
Tip: To add volume, repeat the process with a second ribbon and layer the bows.
Tutorial 2: Creating A Multi-loop Floral Bow
Materials Needed:
- 36 inches of organza ribbon
- Floral wire
- Scissors
Instructions:
- Make 4-6 loops, pinching the center as you go.
- Stack the loops and hold tightly.
- Wrap floral wire around the center and twist to secure.
- Fluff each loop outward for fullness.
Example: For a graduation bouquet, using gold organza ribbon made the arrangement feel more festive and elegant.
Tutorial 3: Assembling A Sculpted Wired Bow
Materials Needed:
- 30 inches of wired grosgrain ribbon
- Floral wire
- Scissors
Instructions:
- Shape the ribbon into desired loops or patterns (e.g., heart or figure eight).
- Pinch the center and wrap with floral wire.
- Adjust each loop, using the wire to hold shapes.
Warning: Always handle wired ribbon gently to avoid kinks or bends.
Tutorial 4: Crafting A Pom-pom Bow
Materials Needed:
- 2 yards of thin ribbon
- String or twist tie
- Scissors
Instructions:
- Wrap the ribbon around your palm 15 times.
- Slide off and tie the center tightly.
- Cut both ends of the loops.
- Fluff out strands for a round pom-pom.
Pro Tip: Alternate ribbon colors for a striped effect.
Common Mistakes And Troubleshooting
No matter your skill level, mistakes happen. Recognizing and correcting them is part of mastering bow making.
Uneven Loops Or Tails
- Cause: Inconsistent measuring or tension.
- Solution: Always measure ribbon lengths and adjust tension before securing the center.
Ribbon Fraying
- Cause: Dull scissors or rough handling.
- Solution: Use sharp scissors and seal ends with a lighter or clear nail polish if needed.
Bow Not Holding Shape
- Cause: Ribbon too soft or not enough securing.
- Solution: Opt for wired ribbon or reinforce the center with floral wire.
Bow Looks Flat
- Cause: Not enough loops or inadequate fluffing.
- Solution: Add more loops and gently pull each one outward after assembly.
Example: At a community craft fair, I noticed that bows made with unwired organza would droop after a few hours, while those with wired edges remained crisp throughout the event.
Creative Bow Making Ideas For Every Occasion
Bows are a staple in celebrations and everyday life. Here are creative ideas to inspire your next project, each suited to a specific occasion or need.
Gift Wrapping
- Use contrasting ribbon colors for bold, modern looks.
- Add sprigs of greenery or small ornaments to the bow’s center for holidays.
Weddings And Special Events
- Craft large, layered bows for pews, chairs, or table settings.
- Use luxurious materials like velvet or silk for an upscale finish.
Home Décor
- Make seasonal wreath bows using burlap or plaid ribbon.
- Attach bows to throw pillows or curtains for a quick refresh.
Fashion And Accessories
- Create boutique bows for hair clips, headbands, or sashes.
- Use fabric bows as statement pieces on bags or hats.
Community And Fundraising
- Organize bow-making workshops for schools or charities.
- Sell custom bows for fundraising events.
Example: During a local charity drive, handmade bows in school colors were sold as car decorations, raising both funds and community spirit.
Case Studies: Real-world Bow Making Successes
Examining real-world examples offers insight into the creative possibilities and practical applications of bow making.
Case Study 1: Retail Gift Shop Efficiency
A small gift shop in Oregon streamlined its packaging by training staff in quick, consistent bow making using pre-cut ribbons and floral wire. This improved presentation, reduced waste, and increased customer satisfaction.
Case Study 2: Event Planner Customization
An event planner specializing in weddings began offering customized bows for each event, using materials sourced to match the theme. This personalized detail became a signature feature, attracting more clients and higher budgets.
Case Study 3: Crafting For Therapy
A community center introduced bow making as a therapeutic activity for seniors, emphasizing repetitive motions and creativity. Participants reported increased dexterity and a greater sense of accomplishment.
These examples demonstrate that bow making isn’t just about aesthetics, it can enhance business efficiency, add value to services, and support personal well-being.
Frequently Asked Questions
How Do I Prevent My Ribbon From Fraying After Cutting?
To prevent ribbon fraying, use a pair of very sharp scissors for a clean cut. For synthetic ribbons, carefully run a lighter near the cut edge to melt and seal it (never touch the flame directly to the ribbon). Alternatively, applying a thin layer of clear nail polish or fabric glue to the ends will help keep them intact.
Can I Make Bows Without Specialized Tools?
Absolutely. While specialized tools like a bow maker or floral wire help with complex designs, you can make basic bows with just ribbon and scissors. For securing centers, household items like twist ties, string, or even paper clips can substitute for wire. For decorative bows, double-sided tape or small safety pins can also be useful.
What’s The Best Way To Store Finished Bows To Keep Them Looking Fresh?
Store bows in a cool, dry place to avoid fading or moisture damage. Place each bow in a separate compartment or layer tissue paper between them to prevent crushing. For large or wired bows, hang them on a rack or gently stuff loops with tissue paper to maintain their shape.
How Do I Choose The Right Ribbon For My Project?
Consider the purpose, durability, and desired look. For outdoor or high-use items, choose wired or grosgrain ribbon for shape and strength. For elegant gifts or décor, satin or organza offer a refined appearance. For rustic or casual projects, burlap or cotton ribbons work well. Evaluate the ribbon’s width and stiffness to match the scale and use of the bow.
Are There Eco-friendly Options For Bow Making?
Yes. Many suppliers offer recycled or biodegradable ribbons made from cotton, jute, or other natural fibers. You can also reuse fabric scraps or upcycle old clothing into strips for bows. Avoid plastic-based ribbons when possible, and use water-based adhesives or natural string for securing bows. For more on sustainable crafting, see Wikipedia: Eco-friendly.
Additional Resources And Learning
For further learning, explore professional tutorials, workshops, and crafting communities. The National Craft Association and platforms like Craftsy offer classes and project ideas suitable for all skill levels.
No matter your crafting background, making bows is a rewarding skill that enhances creativity and adds beauty to everyday life. With practice, attention to detail, and the guidance provided here, you can confidently create stunning bows for any occasion, transforming simple materials into memorable finishing touches.