Adjusting your Genesis bow’s draw length is straightforward and crucial for accuracy and comfort. This guide will walk you through the simple, tool-free process, ensuring a perfect fit for your shot every time.
Welcome, fellow archers! Ever feel like your bow just isn’t quite right? Maybe it feels a bit too long or a bit too short when you draw it back. This can really affect your aim and make shooting less enjoyable. The good news about the Genesis bow is that it’s designed to be incredibly easy to adjust, especially for beginners. We’re going to make sure your Genesis bow fits you perfectly, so you can shoot straighter, feel more comfortable, and really enjoy your time at the range. Let’s get your bow dialed in, step by step!
Why Adjusting Draw Length Matters
Think of draw length like the perfect glove size for your hand. If it’s too big or too small, it just doesn’t feel right, and you can’t do your best. For a bow, the draw length is the distance your drawing hand gets to when the bow is fully drawn. Getting this right is super important for a few key reasons:
- Accuracy: When your bow’s draw length is set correctly, your anchor point (where you pull the string back to your face) will be consistent. This consistency is the foundation of hitting your target reliably. An inconsistent draw length leads to inconsistent shots, no matter how good your aim is.
- Comfort: A bow that’s too long in draw length can strain your arm, shoulder, and back. Conversely, one that’s too short can feel awkward and limit your power. The right draw length makes shooting feel natural and smooth, allowing you to focus on your technique, not on fighting the bow.
- Power: The draw length directly influences how much energy is stored in the bow. A properly adjusted draw length allows the bow to transfer its energy efficiently to the arrow, resulting in better arrow speed and penetration. It’s about getting the most out of your bow.
- Safety: While not the primary adjustment concern for Genesis, an incorrectly sized bow could potentially lead to improper form, which could increase the risk of strain or minor injury over time if consistently forced. Ensuring a good fit promotes better, safer shooting habits from the start.
The Genesis bow system is renowned for its user-friendly design, particularly its adjustable draw length. Unlike many other bows that require swapping out cams or modules, the Genesis uses a unique system that allows for quick and easy adjustments without any special tools. This makes it an ideal choice for new archers or families where one bow might be used by multiple people of different sizes.

Understanding Your Genesis Bow’s Draw Length System
The magic behind the Genesis bow’s adjustable draw length lies in its innovative cam system. Genesis bows feature what’s called a “single cam” system, but with a very special twist. Most single cam bows have a module or a setting on the cam that dictates the draw length. You usually have to take the bow apart, loosen screws, rotate the module, and re-tighten, often needing a bow press. The Genesis bow, however, does this differently. It utilizes a specific cam that can be rotated to achieve a range of draw lengths.
This cam has a finite number of positions, each corresponding to a specific draw length. When you adjust the cam to a different position, it changes how the bowstring comes off the cam, thereby altering the effective draw length. You’ll be looking for the position that feels most comfortable and allows for a consistent anchor when you draw the bow.
How to Measure Your Ideal Draw Length
Before you start adjusting your Genesis bow, it’s essential to know what your ideal draw length actually is. There are a few ways to figure this out. We want to find the length that allows you to draw the bow smoothly and comfortably, stopping at a consistent point on your face.
The Arm Span Method (A Quick Estimate)
This is a common rough estimate. Stand with your back against a wall, arms outstretched. Have a friend measure the distance from the tip of one middle finger to the tip of the other middle finger. Then, divide that measurement by 2.5. This will give you an approximate draw length in inches. While a decent starting point, it’s not as accurate as other methods.
The Bow Square Method (More Accurate)
This method uses a tool called a bow square, which is an L-shaped ruler that attaches to your bowstring and bow riser. It’s a more precise way to get your measurement once you can draw the bow.
- Nock an arrow: Place an arrow on your bowstring, ensuring it’s nocked correctly.
- Place the bow square: Attach the “hook” of the bow square to the arrow nock. Ensure the “shelf” of the bow square rests against the arrow rest.
- Draw the bow: Carefully draw the bow back as if you were about to shoot, but stop before fully drawing. Aim to replicate your natural anchor point. Do NOT dry fire the bow.
- Read the measurement: The bow square will have markings on it. Where the arrow nock is, read the number on the bow square. This is generally considered your draw length.
For beginners, it’s often best to have an experienced archer or archery shop professional help you with this measurement. They can guide you on proper drawing technique and anchor points to ensure an accurate reading.
Using a Measuring Tool
If you don’t have a bow square, you can use a flexible measuring tape. With an arrow nocked and the bow drawn to your natural anchor point (again, be careful not to dry fire), you can measure from the point where the arrow contacts the riser to the serving of the string at your anchor point. This is less precise than a bow square but can give you a good idea.
Tools You’ll Need (Spoiler: You Might Not Need Any!)
One of the greatest features of the Genesis bow is that it’s designed to be adjusted without specialized tools for draw length. You won’t need a bow press or any complex wrenches for this specific adjustment. This is a huge win for beginners!
However, to measure your draw length initially, or to confirm your adjustments, you might want:
- A measuring tape: A flexible tape measure is useful for estimating your draw length or confirming measurements.
- A friend: Having someone to help measure or observe your form can be very beneficial, especially when first learning.
- Your Genesis Bow: Of course!
- An arrow: To check nocking point and alignment.
The actual adjustment process itself is remarkably simple and relies on a part of the bow that’s designed to be rotated by hand—the cam. This tool-free design is a testament to Genesis’s commitment to making archery accessible.
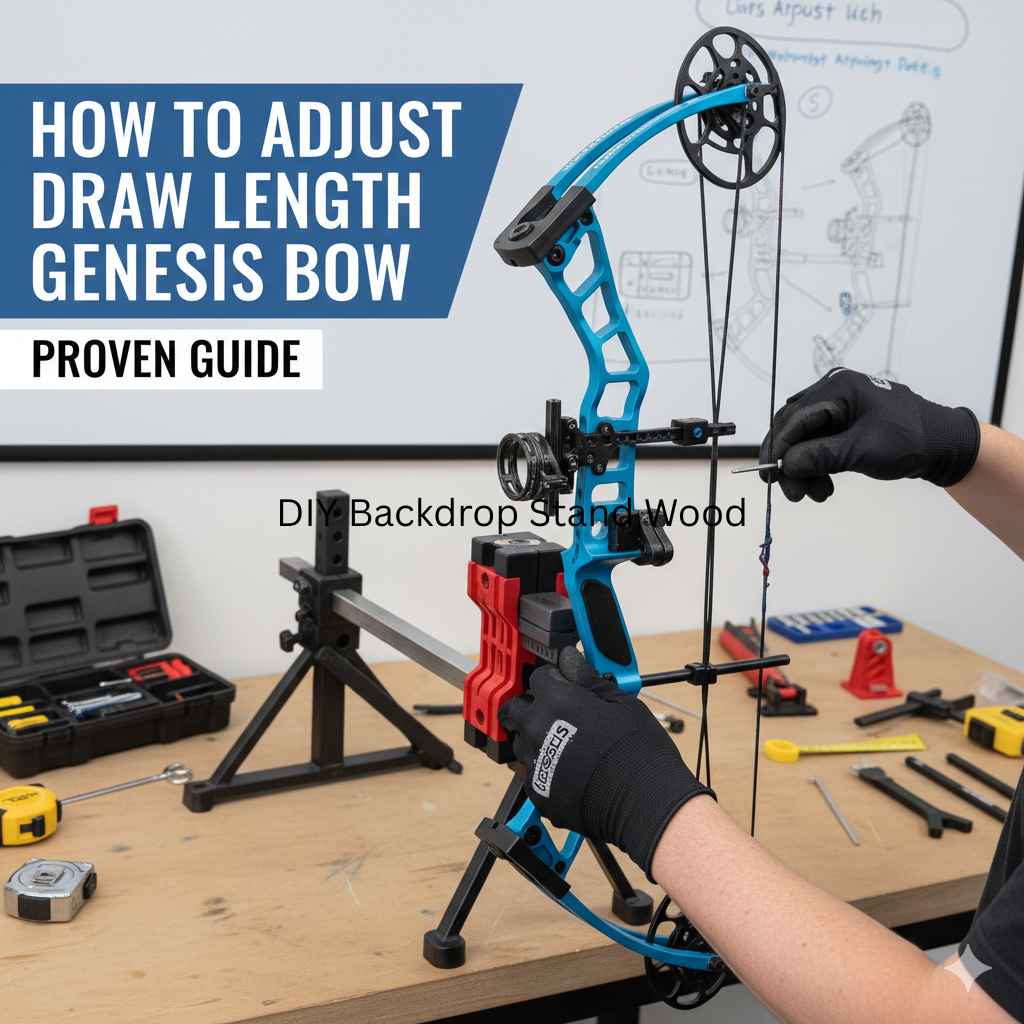
Step-by-Step Guide: How to Adjust Draw Length on Genesis Bow
This is where the magic happens! Adjusting the draw length on your Genesis bow is surprisingly straightforward. Remember, the Genesis bow has a draw length adjustable system directly on the cam. You won’t be changing modules or cams. Instead, you’ll be rotating the cam itself to one of its available positions.
Step 1: Identify the Cam Positions
Take a close look at the cam at the bottom of your bow. You’ll notice that the cable groove on the cam isn’t perfectly circular. Instead, it has distinct notches or positions. These notches are where the bowstring will sit. Genesis cams typically have a set number of positions, often marked with letters or numbers. These markings indicate the different draw lengths achievable.
Important Note: Always refer to your Genesis bow’s owner’s manual for the specific markings and draw length ranges for your model. Generic information is helpful, but the manual is definitive.
Step 2: Prepare the Bow for Adjustment
You need to relieve the tension on the bowstring and cam so you can rotate it. The Genesis bow handles this cleverly:
- Place the bow on the ground: Set your Genesis bow on a stable, flat surface.
- Position the cam: The wheel (cam) at the bottom of the bow should be resting on the limb. This means the bowstring is not under tension from this cam.
- Check the other cam: The top cam will still have some tension from being attached to the cables. However, because the bottom cam is resting on the limb, the overall tension holding the limbs together is significantly reduced.
This resting position is key. It means you don’t need a bow press to rotate the cam. You can do it by hand!
Step 3: Rotate the Cam
Now, you’re ready to make the adjustment. You’ll be rotating the bottom cam.
- Grip the cam: Firmly grip the bottom cam with your hand. You might need a bit of force, but it should be manageable.
- Observe the markings: Look at the markings on the cam and align them with the point on the limb where the cam is supposed to align. Your manual will show you which marking corresponds to which limb position or draw length.
- Rotate the cam: Apply gentle, steady pressure to rotate the cam. You might feel it click into place as it moves from one position to the next. You want to move the cam until the correct alignment marks are visible. For example, if you are moving to a longer draw length, you will typically rotate the cam counter-clockwise. If you are moving to a shorter draw length, you will rotate it clockwise. The exact direction depends on the specific cam design, so consult your manual.
- Ensure it’s seated: Once rotated, ensure the cam is fully seated in its new position against the limb. The reference marks should align correctly.
Step 4: Verify the Adjustment
After rotating the cam, you need to check if the draw length has changed and if it feels correct.
- Draw the bow (carefully!): Gently draw the bow back about halfway. Listen for any unusual noises.
- Check the string path: Ensure the bowstring is still properly seated in the groove of the cam.
- Try a full draw (controlled): If everything feels and sounds normal, draw the bow back to your typical anchor point. Have a friend observe or use a mirror. Does it feel more comfortable? Is your anchor point consistent?
- Measure again (optional but recommended): If you have a bow square, use it to measure your new draw length. Compare it to your ideal measurement.
Step 5: Test Fire and Fine-Tune
The ultimate test is shooting the bow.
- Shoot a practice arrow: With your new draw length, shoot a few arrows at a close target.
- Focus on feel: Pay attention to how the bow feels as you draw and shoot. Is there less strain? Is your aiming more stable?
- Adjust as needed: If it still doesn’t feel quite right, repeat the process. You might need to go back a notch longer or shorter. It’s often a process of small adjustments until you find that “sweet spot.”
Remember, it might take a few tries to find the perfect setting. Don’t be discouraged! The Genesis system is designed for these easy, iterative adjustments.
Visualizing the Adjustment
To help you visualize, let’s imagine the bottom cam. On the face of the cam, you’ll see a center bolt that allows it to rotate. Around the edge of the cam, where the bowstring goes, are the adjustable positions. Typically, each position is a little notch or flattened area where the string sits securely. When you move the cam, you’re essentially moving the point where the string leaves the cam relative to the limb it’s attached to. If you set the cam to a position that represents a shorter draw length, the string effectively “comes off” the cam earlier in the draw cycle. If you set it to a longer draw length, the string stays on the cam longer, extending your draw.
Table: Genesis Bow Draw Length Settings (Example)
This is a simplified example. Your specific Genesis bow model may have slightly different markings or ranges. Always consult your owner’s manual.
| Cam Marking | Approximate Draw Length (Inches) | Effect |
|---|---|---|
| A | 25″ | Shortest draw length |
| B | 26″ | Slightly longer draw |
| C | 27″ | Medium draw length |
| D | 28″ | Longer draw length |
| E | 29″ | Longest draw length |
To adjust your draw length, you would rotate the cam to the marking that corresponds to your ideal draw length measurement. If your measured draw length is 27.5 inches, you’d likely choose marking ‘C’ or ‘D’ and then consider a slight adjustment if available and necessary after shooting.
Common Pitfalls and How to Avoid Them
Even with a simple system, there are a few things to watch out for:
- Confusing Draw Length with Grip Torque: Remember, adjusting draw length is about the bow’s geometry. Grip torque is how you hold the bow. They are separate!
- Not Consulting the Manual: While the process is simple, Genesis bow models might have slight variations in their cam rotatable positions or markings. The manual is your best friend here. You can find manuals online on the Genesis Archery website.
- Over-Torquing the Cam: While you need enough force to rotate the cam, avoid forcing it excessively, which could damage the cam or limb. It should click into place naturally.
- Improper Arrow Nocking: Always ensure your arrow is securely nocked on the string and properly seated on the rest. An improperly nocked arrow when drawing the bow can cause issues. Note that Genesis bows typically use a specific type of rest and nock system.
- Dry Firing: NEVER draw and release the bowstring without an arrow. This is called “dry firing” and can severely damage the bow and potentially cause injury. All adjustments and draw tests should be done with an arrow nocked.
- Ignoring How it Feels: The numbers are guides, but your own comfort and consistency are paramount. If a setting feels wrong, try the next one.
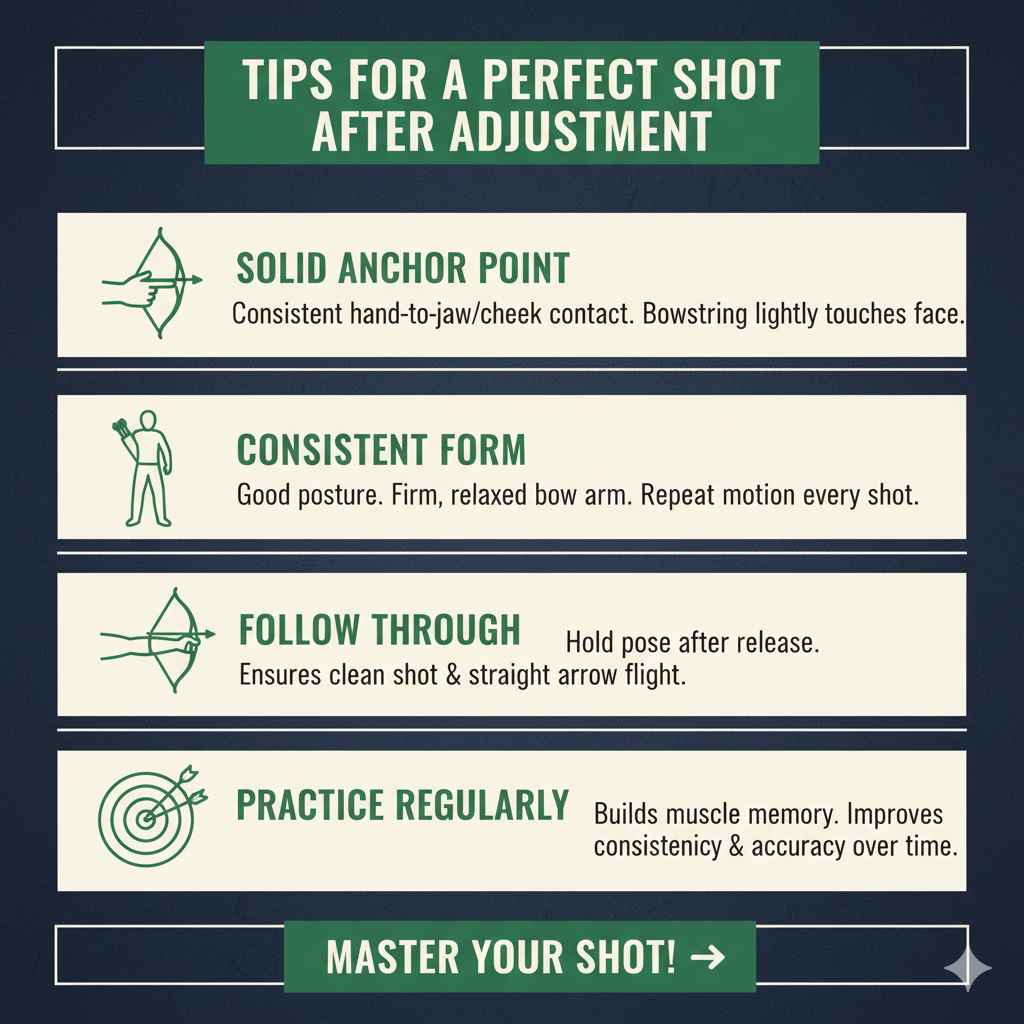
Tips for a Perfect Shot After Adjustment
Once you’ve adjusted your draw length, here are a few tips to help you achieve that perfect shot:
- Solid Anchor Point: With the correct draw length, you should be able to reach a consistent anchor point every time. This is typically where your drawing hand meets your jawbone or cheekbone, with the bowstring lightly touching it.
- Consistent Form: Maintain good posture, keep your bow arm firm but not locked, and aim to execute the same drawing and release motion with every shot.
- Follow Through: After releasing the arrow, keep your drawing hand and arm in the same position for a moment. This “follow-through” helps ensure a clean release and a straight arrow flight.
- Practice Regularly: The more you shoot, the more your muscles will learn the correct form, and the more consistent you’ll become.
Is Your Bow Still Not Right? Troubleshooting
If you’ve adjusted the draw length and are still experiencing issues, consider these points:
- Is it truly the draw length? Sometimes, what feels like a draw length problem is actually a form issue when drawing or anchoring.
- Check for damage: Inspect the cams, limbs, cables, and string for any visible wear or damage.
- Creep: If the string seems to slowly slip or the limbs don’t return perfectly, there might be an issue with the cables or cam timing. This is less common on a Genesis but can happen with heavy use.
- Consult an Expert: If you’re unsure or the problem persists, take your bow to a qualified archery technician or visit an archery shop. They can diagnose and fix more complex issues, ensuring your bow is safe and performing optimally. For example, websites like the USA Archery club finder can help you locate experienced individuals or shops near you.
Frequently Asked Questions (FAQ)
Q1: How many draw length settings does a Genesis bow typically have?
A1: Genesis bows feature a rotatable cam that allows for a specific range of draw lengths. While the exact number can vary slightly by model or if it’s a compound or recurve version (Genesis is primarily known for their compound), they usually offer 5 to 7 distinct positions, typically providing a draw length range of about 25 to 31 inches.