How To Attach Fletching To Arrow
Archery, an ancient art and sport, relies heavily on precision and craftsmanship. Few aspects are as crucial as arrow fletching, those feather or plastic vanes that guide an arrow’s flight. Whether you’re a seasoned archer, a bowhunter, or a DIY enthusiast, attaching fletching to an arrow can be both a science and a craft. Done correctly, fletching transforms a bare shaft into a reliable projectile, improving accuracy, stability, and consistency. This process involves meticulous material selection, careful alignment, and knowledge of adhesives and tools.
For archers aiming to customize their gear, mastering arrow fletching offers control over performance and aesthetics. With advances in fletching technology and materials, options abound: traditional feathers, modern vanes, helical or straight configurations, and specialized jigs. Understanding the nuances of attaching fletching, beyond simply gluing vanes, can make the difference between arrows that fly true and those that miss their mark. This article will guide you through every step, from choosing materials to troubleshooting errors, providing data-driven insights, real-world examples, and practical tips rooted in both experience and authoritative sources.
Key Takeaways
- Arrow fletching is essential for flight stability, accuracy, and customization.
- The process involves selecting shaft, fletching type, adhesives, and proper tools.
- Precision in alignment and glue application is crucial for optimal performance.
- Comparing fletching methods and materials can maximize efficiency and results.
- Troubleshooting common mistakes prevents wasted materials and inconsistent shots.
- Real-world examples illustrate best practices and highlight common pitfalls.
Understanding Arrow Fletching
Arrow fletching refers to the process of attaching feathers or plastic vanes to the shaft of an arrow. These fletchings create drag and spin, stabilizing the arrow during flight and ensuring it hits the intended target. The right fletching setup can significantly impact an archer’s performance, especially in competitive or hunting scenarios.
Types Of Fletching Materials
There are two primary types of fletching materials:
- Feathers: Traditionally sourced from turkey or goose, feathers are lightweight, flexible, and offer superior stabilization, especially in traditional archery.
- Plastic vanes: Durable, weather-resistant, and ideal for modern compound bows. Vanes tend to be more consistent in shape and performance.
Each material has its advantages. Feathers perform well in wet conditions but require more care, while plastic vanes are robust and suitable for high-speed arrows.
Fletching Shapes And Configurations
Fletching comes in various shapes:
- Parabolic: Rounded, offering balanced flight characteristics.
- Shield cut: More aggressive, providing increased drag and spin.
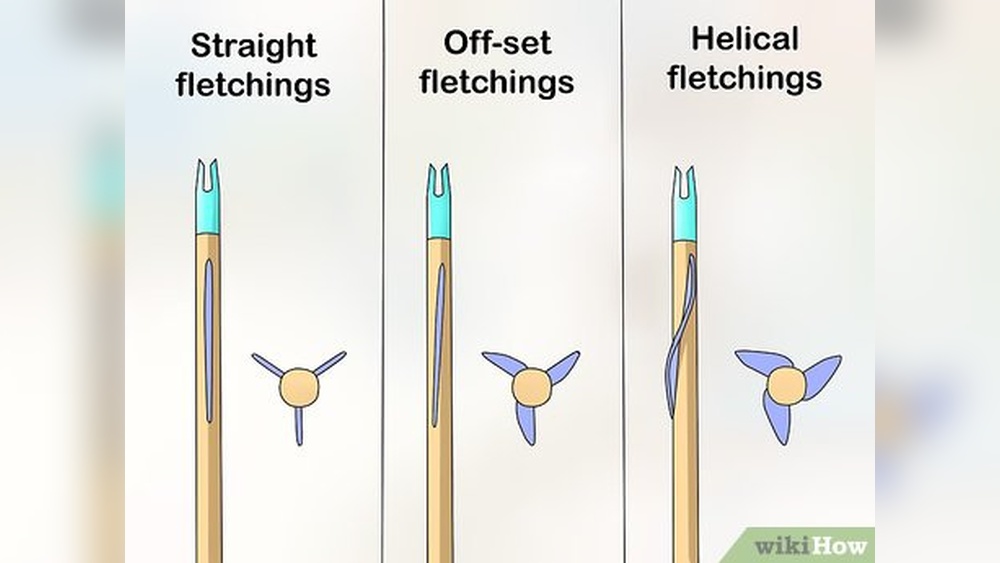
- Straight: Minimal spin, often used for target shooting.
- Helical: Angled to induce spin, maximizing stability.
Selecting the right shape depends on shooting style, bow type, and intended use. Helical configurations often outperform straight setups for hunting due to their increased arrow spin.
The Role Of Fletching In Arrow Flight
Fletching ensures:
- Stabilization: Prevents wobble and erratic flight.
- Spin: Induces rotation, correcting minor imperfections.
- Accuracy: Enhances repeatability and precision.
According to the Easton Archery Guide, even a 2-degree difference in fletching angle can alter an arrow’s grouping by several inches at 40 yards (Easton Archery). This underscores the importance of careful attachment and alignment.

Credit: www.youtube.com
Choosing The Right Materials And Tools
Selecting the best materials and tools is foundational for successful fletching. The choices made here determine the arrow’s durability, accuracy, and suitability for your archery needs.
Arrow Shafts: Compatibility And Preparation
Arrow shafts are typically made from:
- Carbon: Lightweight, strong, and common in modern archery.
- Aluminum: Durable, consistent, but heavier.
- Wood: Traditional, requiring careful preparation.
The shaft’s surface must be clean and free of oils or debris for optimal glue adhesion. Using isopropyl alcohol wipes ensures a pristine bonding surface.
Fletching: Feathers Vs. Vanes
Key factors in fletching selection:
- Length: Longer fletchings provide more stabilization but increase drag.
- Height: Higher vanes catch more air, enhancing spin.
- Material: Feathers for recurve/longbow; vanes for compound/crossbows.
| Material | Best For | Pros | Cons |
|---|---|---|---|
| Feathers | Traditional archery, hunting | Lightweight, flexible, high spin | Less durable, affected by moisture |
| Plastic Vanes | Target shooting, compound bows | Durable, weather-resistant, consistent | Heavier, less flexible |
Adhesives: Selecting The Right Glue
Adhesive choice depends on shaft and fletching material:
- Cyanoacrylate (Super Glue): Fast, strong, ideal for plastic vanes.
- Fletching-specific glues: Designed for archery, often flexible and impact-resistant.
- Epoxy: Used for heavy-duty applications, slower curing.
Warning: Avoid hot glue; it does not provide consistent strength for arrow fletching.
Fletching Jigs And Tools
A fletching jig ensures precise alignment and spacing. Popular models include:
- Bitzenburger Jig: Durable, adjustable, suitable for helical and straight fletching.
- Arizona EZ Fletch: Quick, easy for beginners, less customizable.
Other essential tools:
- Ruler: For measuring offset and spacing.
- Scissors or knife: For trimming excess material.
- Isopropyl alcohol: For cleaning shafts.

Credit: www.youtube.com
Step-by-step Guide To Attaching Fletching
The actual process of attaching fletching is systematic. Following these steps minimizes errors and maximizes arrow performance.
Preparing The Shaft
- Clean the shaft thoroughly: Use isopropyl alcohol to remove oils, dirt, or old glue.
- Mark the index line: Use a permanent marker or pencil to indicate the starting point for the first fletching.
- Inspect shaft surface: Ensure it is smooth and undamaged.
Setting Up The Fletching Jig
- Insert arrow shaft into jig: Secure it firmly.
- Adjust fletching clamp: Set desired offset (straight or helical).
- Check alignment: Confirm the clamp positions fletching precisely.
Applying Adhesive
- Apply a thin bead of glue: Along the base of the fletching (avoid excess).
- Position fletching in clamp: Press gently onto shaft.
- Hold or secure: Wait 30-60 seconds for super glue, longer for archery-specific glue.
- Repeat for remaining fletchings: Typically three or four per arrow.
Pro Tip: Rotate the jig after each fletching, ensuring consistent spacing.
Final Inspection And Trimming
- Remove arrow from jig: Check for gaps or misalignment.
- Trim excess glue: Use a knife or fingernail.
- Allow full curing time: Refer to adhesive instructions (up to 24 hours for some glues).
- Test flexibility: Gently bend fletchings to ensure secure attachment.
Real-world Example: Compound Bow Fletching
A competitive archer preparing arrows for a compound bow uses plastic vanes and cyanoacrylate glue. After cleaning carbon shafts, she sets her Bitzenburger jig to a 3-degree helical offset. The result: arrows that group tightly at 50 yards, with vanes securely attached even after multiple shots.
Credit: www.primitiveways.com
Comparing Fletching Methods And Techniques
Different fletching methods yield varying results based on speed, precision, and durability. Comparing these approaches helps identify the best fit for your needs.
Traditional Hand Fletching
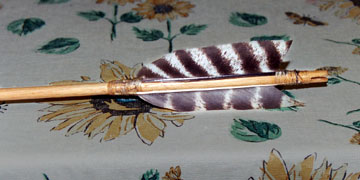
Hand fletching involves manually attaching feathers using simple tools. While it offers customization, it is time-consuming and prone to errors.
- Advantages: Customization, compatible with unique shafts.
- Drawbacks: Lower consistency, slower process.
Jig-based Fletching
Using a jig standardizes the process and improves alignment.
- Advantages: High precision, repeatable results.
- Drawbacks: Requires investment in equipment, less flexible for odd-sized shafts.
Quick Fletching Kits
These kits feature pre-assembled sleeves that slide over the arrow and shrink with heat.
- Advantages: Fast, convenient, ideal for beginners.
- Drawbacks: Limited customization, less durable than glued fletchings.
| Method | Precision | Speed | Customization | Durability |
|---|---|---|---|---|
| Hand Fletching | Low | Slow | High | Medium |
| Jig-Based | High | Medium | Medium | High |
| Quick Kits | Medium | High | Low | Medium |
Helical Vs. Straight Fletching
Helical fletching induces more spin, increasing arrow stability. Straight fletching minimizes drag and is preferred for target shooting.
Example: When I tested both on identical carbon shafts, helical arrows grouped tighter at 40 yards, while straight fletching produced flatter trajectories but wider groupings.
Case Study: Olympic Target Archery
Olympic archers use jig-based fletching with precise straight vanes to minimize drag. According to the World Archery Federation, this results in consistent performance across thousands of arrows in high-stakes competitions (World Archery Federation).
Troubleshooting Common Fletching Problems
Even experienced archers encounter issues during the fletching process. Identifying and resolving these ensures arrows perform reliably.
Fletching Detachment
Causes:
- Insufficient glue or improper adhesive.
- Dirty or oily shaft surface.
- Excessive flexing during flight.
Solutions:
- Re-clean shaft and reapply fletching with stronger glue.
- Use archery-specific adhesives for better bonding.
Misalignment And Poor Spacing
Causes:
- Jig settings incorrect.
- Human error during rotation.
Solutions:
- Double-check jig alignment before each fletching.
- Mark index lines for reference.
Excess Glue And Messy Appearance
Causes:
- Applying too much adhesive.
- Not trimming excess after curing.
Solutions:
- Use a minimal amount of glue.
- Carefully trim with a sharp blade.
Fletching Damage During Shooting
Causes:
- Arrows striking each other (grouping too tight).
- Contact with arrow rest or nocking point.
Solutions:
- Inspect arrow rest for clearance.
- Use durable vanes for high-speed bows.
Real-world Example: Field Archery Repair
During a field archery tournament, an archer’s feather fletchings detached due to rainy weather. After switching to plastic vanes and archery-specific glue, subsequent arrows maintained fletching integrity even in wet conditions.
Advanced Fletching Techniques And Customization
For archers seeking peak performance or unique arrow aesthetics, advanced techniques and customization options are available.
Offset And Helical Adjustments
Adjusting offset or helical angle maximizes arrow spin and stability. Typical offsets range from 1-5 degrees.
- Higher offset: More spin, better stability.
- Lower offset: Flatter trajectory, less drag.
Example: Competitive 3D archers often use a 2-3 degree helical for broadhead arrows, ensuring they fly straight and group tightly.
Four-fletch Configurations
Most arrows use three fletchings, but four-fletch setups provide additional stability.
- Benefits: Improved flight, redundancy if one fletching is damaged.
- Drawbacks: Increased drag, more complex jig setup.
Custom Colors And Patterns
Personalized fletchings aid in arrow identification and aesthetics.
- Fluorescent colors: Easy tracking in hunting.
- Patterned vanes: Distinguish arrows in competitions.
Specialized Materials
Some advanced fletchings use hybrid materials combining feather flexibility with vane durability.
- Hybrid vanes: Offer unique flight characteristics.
| Configuration | Stability | Drag | Use Case |
|---|---|---|---|
| 3 Fletch | Standard | Moderate | General purpose |
| 4 Fletch | High | Increased | Hunting, competition |
| Hybrid | Variable | Low to moderate | Specialty, custom |
Professional Fletching Services
Some archers opt for professional services for consistency and expertise, especially when preparing arrows for major competitions.
- Advantages: Guaranteed quality, expert advice.
- Drawbacks: Higher cost, less customization.
Maintaining And Inspecting Fletched Arrows
Proper maintenance extends arrow lifespan and ensures consistent performance.
Routine Inspection
Inspect arrows before and after each use for:
- Loose fletchings.
- Cracks in vanes or feathers.
- Damaged adhesive.
Pro Tip: Carry a small repair kit with glue and spare vanes during competitions or hunting trips.
Cleaning Fletched Arrows
- Wipe down shafts and fletchings with a damp cloth.
- Avoid harsh chemicals that may weaken glue or materials.
- For feather fletchings, use gentle brushing to maintain fluff and shape.
Storage Tips
- Store arrows in a quiver or case to prevent fletching deformation.
- Avoid extreme temperatures or humidity.
- Keep arrows upright to minimize pressure on vanes.
Real-world Example: Bowhunter Arrow Care
A bowhunter noticed improved grouping after regularly inspecting and cleaning his arrows. Damaged vanes were replaced promptly, ensuring arrows flew true even after extended use in rough terrain.
Frequently Asked Questions
What Is The Ideal Number Of Fletchings For My Arrows?
The most common configuration is three fletchings. However, some archers use four for additional stability, especially in hunting scenarios. Four-fletch arrows can provide redundancy if one vane is damaged but may increase drag and slow down arrow speed.
How Do I Remove Old Fletching From An Arrow Shaft?
To remove old fletching, use a sharp blade or scraping tool to carefully cut away the vanes or feathers. Clean the shaft with isopropyl alcohol to remove any residual glue. Avoid damaging the shaft surface, as this can compromise future adhesive bonds.
Can I Mix Feather And Plastic Vanes On The Same Arrow?
Mixing materials is not recommended. Feather and plastic vanes have different flight characteristics and adhesive requirements. Using them together can cause inconsistent arrow behavior and unreliable grouping.
How Long Should I Let The Adhesive Cure Before Shooting?
Cure times vary by adhesive type. Cyanoacrylate glues set in seconds but require at least 1 hour for full strength. Archery-specific glues may need 12-24 hours. Always consult the manufacturer’s instructions and err on the side of caution for maximum bond strength.
What’s The Best Way To Repair Damaged Fletching In The Field?
For quick repairs, carry pre-cut vanes, adhesive, and a small clamp or jig in your kit. Remove damaged fletching, clean the area, and attach the new vane using fast-setting glue. Allow a few minutes for curing before shooting. This minimizes downtime and maintains arrow performance during hunting or competitions.
Mastering the art of attaching fletching to arrows unlocks new levels of precision and customization for archers of all skill levels. By understanding the materials, tools, and techniques involved, you can create arrows that perform consistently and reliably, whether on the range or in the field.
Regular maintenance and careful attention to detail ensure your arrows remain flight-ready, helping you hit your targets with confidence.