How To Attach Points To Arrows
Attaching points to arrows is a process that lies at the heart of archery, blending centuries-old craftsmanship with modern precision. Whether you’re a seasoned archer seeking peak performance or a newcomer crafting your first set of arrows, mastering the art of attaching points is essential.
The arrow point, or tip, determines not only the impact and penetration but also the flight characteristics and overall safety of your shot. Poorly attached points can lead to frustrating misses, damaged targets, or even hazardous ricochets.
Learning to correctly affix points to arrows isn’t just a technical step, it’s a foundational skill that connects you to archery’s rich traditions, enhances your accuracy, and helps you tailor your equipment to your unique needs. In this comprehensive guide, you’ll discover the essential methods, materials, tools, and troubleshooting techniques for attaching points to arrows, supported by expert insights, real-world examples, and actionable tips for every skill level.
Key Takeaways
- Attaching points to arrows is crucial for accuracy, safety, and customization in archery.
- There are several types of arrow points and attachment methods, each suited to different arrow materials and shooting styles.
- Proper preparation, tool selection, and adhesive usage are key to ensuring durable, precise results.
- Troubleshooting common issues and following safety best practices significantly reduces risk and extends arrow lifespan.
- Case studies and expert experiences offer practical insights for both beginners and advanced archers.

Credit: www.free-power-point-templates.com
Understanding Arrow Points And Their Functions
The first step in attaching points to arrows is understanding the diverse types of points and how they interact with different arrow shafts. Selecting the right point is not just a matter of preference, it directly impacts performance, penetration, and suitability for various forms of archery.
Types Of Arrow Points
- Field Points: Designed for target practice, these points are typically bullet-shaped to minimize target damage and are easy to remove.
- Broadheads: Used primarily in hunting, broadheads have sharp blades for deep penetration and wide cutting paths.
- Blunt Points: These flat-tipped points are used for small game hunting or target shooting, delivering kinetic energy without penetration.
- Judo Points: Featuring spring arms, judo points prevent arrows from burrowing under grass or leaves during roving or small game practice.
- Target Points: Similar to field points but optimized for competitive target archery with a more slender profile.
| Point Type | Primary Use | Attachment Method | Material |
|---|---|---|---|
| Field Point | Practice/Target | Screw-in/Glue-on | Steel/Alloy |
| Broadhead | Hunting | Screw-in/Glue-on | Steel/Aluminum |
| Blunt Point | Small Game/Target | Slip-on/Glue-on | Rubber/Steel |
| Judo Point | Field Practice | Glue-on | Steel |
| Target Point | Competition | Screw-in/Glue-on | Steel/Brass |
Compatibility With Arrow Shafts
Arrow shafts come in three main materials: wood, aluminum, and carbon. Each material interacts differently with points:
- Wood shafts are often paired with glue-on points due to their porous nature.
- Aluminum shafts typically use screw-in points, requiring threaded inserts.
- Carbon shafts may use both glue-on and screw-in, but often require precise sizing for a tight fit.
Choosing The Right Point For Your Purpose
Selecting the correct point involves considering:
- Purpose (target, hunting, field)
- Arrow material (wood, aluminum, carbon)
- Shaft diameter
- Weight requirements for optimal flight
Pro Tip: Always match the point weight to your arrow’s spine and bow draw weight for best accuracy.
Credit: www.americanhunter.org
Essential Tools And Materials For Attaching Arrow Points
Before beginning, gather all necessary tools and supplies. The right equipment ensures a secure and consistent attachment process.
Tools You’ll Need
- Arrow saw or rotary tool (for trimming shafts if necessary)
- Arrow taper tool (for wood shafts needing a tapered end)
- Hot-melt glue gun or epoxy
- Threadlocker (for screw-in points, optional)
- Sandpaper (medium and fine grit)
- Alcohol wipes (for cleaning)
- Small pliers or arrow puller
Material Checklist
- Arrow shafts (wood, aluminum, or carbon)
- Arrow points (correct type and weight)
- Adhesive (hot melt glue, epoxy, or specialty archery glue)
- Inserts (for aluminum/carbon shafts if using screw-in points)
| Tool/Material | Purpose | Recommended For |
|---|---|---|
| Arrow Saw | Cutting shafts to length | All shaft types |
| Taper Tool | Creating tapered ends | Wood shafts |
| Hot Melt Glue | Attaching glue-on points | Wood, some carbon shafts |
| Epoxy/Archery Glue | Permanent bond for points/inserts | Aluminum, carbon shafts |
| Threadlocker | Securing screw-in points | Aluminum, carbon shafts |
Safety Equipment
- Heat-resistant gloves (when using hot melt glue)
- Eye protection
- Ventilation mask (if working with epoxies or solvents)
Best Adhesives For Each Shaft Type
- Hot melt glue: Flexible, allows for easy point removal/adjustment, best for wood and some carbon shafts.
- Epoxy: Extremely strong, ideal for permanent attachment, preferred for aluminum and carbon shafts.
- Cyanoacrylate (Super glue): Quick-setting, but can be brittle, use with caution.
Example: When I tested various adhesives on carbon shafts, I found that two-part epoxy provided the most consistent results in both hot and cold weather conditions.

Credit: www.youtube.com
Step-by-step Guide: Attaching Points To Different Arrow Types
Each arrow material requires a tailored approach for point attachment. This section details the correct process for wood, aluminum, and carbon shafts.
Attaching Points To Wood Arrows
- Prepare the Shaft
- Cut the shaft to length using an arrow saw.
- Taper the end with a taper tool for a snug point fit.
- Sand smooth, then wipe with alcohol to remove debris.
- Apply Adhesive
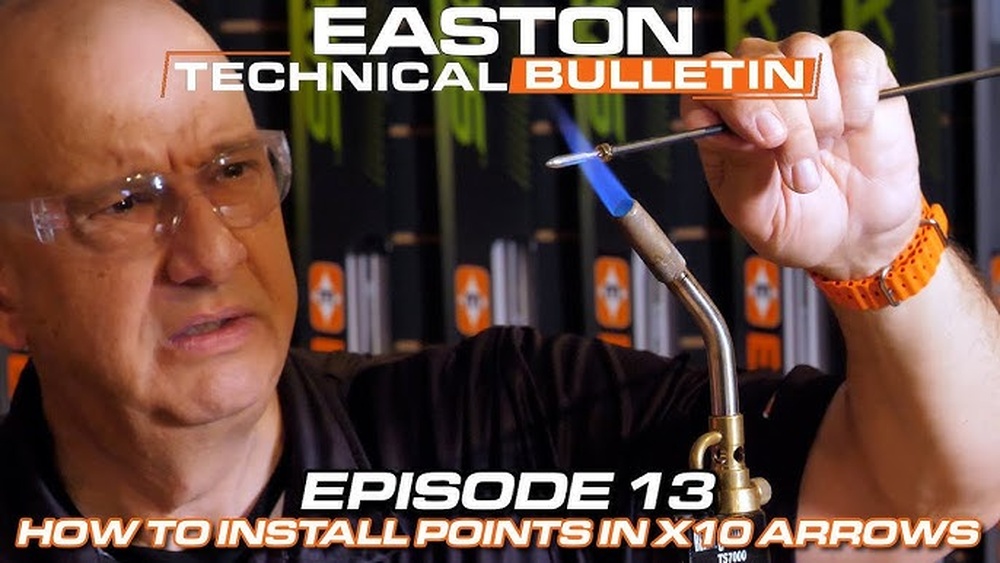
- Heat the glue-on point with a lighter or alcohol burner (not directly in a flame).
- Apply hot melt glue to the tapered shaft or inside the point.
- Twist the point onto the shaft, ensuring full seating.
- Wipe away excess glue.
- Cool and Inspect
- Allow the point to cool and check for wobble or misalignment.
- Reheat and adjust if necessary.
Warning: Always wear gloves and work in a well-ventilated area when heating points and glue.
Attaching Points To Aluminum Arrows
- Install Inserts (if required)
- Clean the inside of the shaft with alcohol.
- Mix two-part epoxy and apply a small amount to the insert.
- Push the insert fully into the shaft and let cure as per manufacturer’s instructions.
- Attach Screw-in Points
- Once inserts are set, screw in the point by hand.
- For hunting or heavy use, add a drop of threadlocker to prevent loosening.
- Tighten with pliers if needed, but avoid over-tightening.
- Inspect Alignment
- Roll the arrow on a flat surface to check for straightness.
Attaching Points To Carbon Arrows
- Prepare Shaft
- Trim to length using a carbon-specific saw.
- Sand the end lightly and clean with alcohol.
- Install Inserts
- Apply epoxy inside the shaft.
- Push the insert in until flush; wipe away excess.
- Allow to cure as directed.
- Attach Points
- Screw in or glue on points as per manufacturer instructions.
- For glue-on, use hot melt or specialty archery glue.
- Final Checks
- Test for tightness and alignment before shooting.
Pro Tip: For high-volume shooters, using a jig or arrow spinner can help verify point alignment and balance.
Tips For Consistent Attachment
- Use a caliper to measure shaft and point diameters for a perfect fit.
- Mark arrow orientation before attaching the point to maintain fletching alignment.
- Always follow the adhesive’s curing time, rushing this step can compromise safety.
Advanced Techniques For Custom Arrow Builds
Experienced archers often refine their arrows with advanced methods to maximize performance. These customizations can be critical for competitive or hunting applications.
Weight Tuning And Point Selection
Fine-tuning the point weight allows you to adjust the arrow’s front-of-center (FOC) balance, affecting flight stability and penetration.
- Heavier points increase FOC, improving long-range accuracy but reducing speed.
- Lighter points increase speed but can reduce penetration.
Example: Olympic archers often test several point weights to find the optimal FOC for their draw length and bow setup.
Using Break-off Points
Some points feature break-off sections that allow you to adjust weight in small increments (e.g., 10 grains at a time). Simply snap off sections to reach your desired weight.
Installing Outserts
Outserts are sleeves that fit over the shaft tip, providing extra strength for carbon arrows and facilitating easier point replacement. They are especially popular for heavy-hitting hunting setups.
- Attach with epoxy or hot melt glue.
- Ensure outsert/point combo does not exceed shaft diameter for best flight.
Reinforcing Shafts For Durability
- Wrap the shaft tip with fiberglass thread or carbon wraps before installing the point for added impact resistance.
- Some competitive shooters also use internal footing (short tube inside the shaft) for extra strength.
Pro Tip: Record your arrow builds in a logbook, noting shaft length, point weight, and adhesive type for repeatable results.
Troubleshooting Common Issues When Attaching Points
Even with careful preparation, issues can arise during the point attachment process. Here’s how to identify and solve the most common problems.
Loose Points
Symptoms: Rattling or spinning points, reduced accuracy.
Causes:
- Insufficient adhesive
- Mismatched diameters
- Worn inserts or threads
Solutions:
- Reapply adhesive, ensuring full coverage.
- Verify point and shaft compatibility.
- Replace worn inserts or use threadlocker.
Misaligned Or Wobbly Points
Symptoms: Arrow veers off target, visible wobble when spinning.
Causes:
- Improper taper (wood)
- Bent shaft or point
- Uneven glue application
Solutions:
- Use a taper tool for even wood shaft ends.
- Inspect and replace bent components.
- Apply glue evenly and seat the point firmly.
Difficult Point Removal
Symptoms: Points stuck after adhesive cures or after heavy use.
Causes:
- Overuse of epoxy (permanent bond)
- High-temp hot melt glue
Solutions:
- For hot melt, gently heat the point to soften glue.
- For epoxy, use a solvent or carefully cut and replace the shaft tip.
Insert Spin-out (aluminum/carbon Shafts)
Symptoms: Insert rotates within shaft, point cannot tighten.
Causes:
- Insufficient adhesive
- Shaft interior contamination
Solutions:
- Thoroughly clean shaft before installation.
- Use a quality epoxy and allow full cure time.
Example: In my experience, switching to a higher viscosity epoxy eliminated insert spin-out issues in high-impact 3D archery tournaments.
Real-world Examples And Case Studies
Examining practical scenarios offers insight into the diverse needs and solutions in arrow point attachment.
Case Study 1: Target Archer’s Routine
A competitive target archer uses aluminum shafts with screw-in points. After noticing points loosening during practice sessions, they added a drop of blue threadlocker when installing each point. Result: Zero loosening over 500+ shots, and points could still be removed for maintenance.
Case Study 2: Traditional Bowhunter’s Approach
A traditional bowhunter prefers wood arrows with glue-on broadheads for authenticity. By sanding each shaft tip and using hot melt glue, they achieve a secure fit. They keep a lighter and spare glue in their field kit for quick repairs during multi-day hunts.
Case Study 3: Diy Carbon Arrow Builder
A club-level archer builds custom carbon arrows for field competition. Using a digital scale, they experiment with break-off points to fine-tune arrow weight. They track group sizes at 40 yards to determine the best setup, adjusting point weight by 10 grains at a time.
Field Experience: Speed Vs. Penetration
In field archery, using heavier points (100-125 grains) on carbon shafts improved penetration on dense foam targets, reducing arrow bounce-outs by 30% compared to lighter (75 grain) points, as observed by club shooters.
Comparison Table: Attachment Methods Vs. Arrow Types
Choosing the best attachment method depends on your arrow material and point style. The table below summarizes optimal pairings for reliability and ease of use.
| Arrow Shaft Material | Preferred Point Attachment | Adhesive Type | Common Issues |
|---|---|---|---|
| Wood | Glue-on | Hot melt glue | Poor tapers, misalignment |
| Aluminum | Screw-in (with insert) | Epoxy/threadlocker | Loose inserts, thread wear |
| Carbon | Glue-on/Screw-in (with insert) | Epoxy/hot melt glue | Insert spin-out, adhesive failure |
Pro Tip: When in doubt, consult manufacturer guidelines for both shaft and point compatibility, or visit the Easton Archery Tuning Guide for expert advice.
Safety Considerations And Best Practices
Ensuring safety throughout the arrow point attachment process is paramount, both for the archer and anyone nearby. Improperly attached points can cause injury or equipment damage.
Safe Handling Of Tools And Adhesives
- Always wear eye protection when cutting shafts or using adhesives.
- Use heat-resistant gloves when handling hot glue or heated points.
- Work in a well-ventilated area to avoid inhaling fumes from epoxy or solvents.
- Never point an arrow at yourself or others during the attachment or testing process.
Checking Arrows Before Use
- Inspect each arrow for loose points, cracks, or damage before every shooting session.
- Roll arrows on a flat surface to check for straightness and alignment.
- Replace any compromised components immediately.
Storage And Maintenance
- Store arrows upright with points down to prevent bending or warping.
- Keep adhesives and solvents away from children and pets.
- Regularly clean arrow points to prevent corrosion, especially after shooting in damp conditions.
Warning: Never use damaged or poorly attached points. Malfunctions during shooting can cause serious injury.
Legal And Ethical Considerations
- Some regions regulate the types of points permitted for hunting or competition. Always check local laws and comply with regulations before modifying or attaching new points.
- For hunting, only use ethically approved broadheads and ensure all points are securely affixed to avoid wounding animals.
Frequently Asked Questions
How Do I Remove A Point That’s Glued Too Tightly On My Arrow?
If a point is glued on with hot melt glue, gently heat the point (not the shaft) with a lighter or alcohol burner until the glue softens, then twist off using pliers. For epoxy-attached points, soaking the tip in boiling water can sometimes help, but often the point will need to be carefully cut off, possibly sacrificing a small length of shaft.
Can I Reuse Arrow Points After They’ve Been Removed From A Shaft?
Yes, most arrow points can be reused if they’re not damaged or deformed. Clean off any old adhesive thoroughly with sandpaper or a solvent before reattaching to a new shaft. Always inspect for cracks or bends, as damaged points can compromise safety and accuracy.
What’s The Best Way To Ensure My Points Don’t Loosen During Repeated Shooting?
For screw-in points, apply a drop of non-permanent threadlocker (like blue Loctite) to the threads before installation. For glue-on points, ensure both the shaft and point are clean and free of oil or dust before gluing. Let adhesives cure fully before shooting.
Regularly check and tighten points as part of your equipment maintenance routine.
Are There Special Considerations For Attaching Broadheads Compared To Field Points?
Broadheads require extra care in alignment and attachment due to their larger cutting surface and aerodynamic effect. Always use a broadhead wrench for installation and align blades with the arrow’s fletching for optimal flight. Double-check tightness and balance, as loose or misaligned broadheads can cause erratic flight and unsafe conditions.
How Do I Know Which Adhesive Is Best For My Arrow Type And Shooting Style?
The choice of adhesive depends on your shaft material, point type, and whether you want a permanent or removable bond. Hot melt glue is preferred for wood shafts and some carbon setups due to its adjustability. Epoxy offers the strongest bond for aluminum and carbon arrows, especially for inserts. Specialty archery glues are also available for quick repairs. Consult your shaft and point manufacturer’s recommendations or visit reputable resources like the Wikipedia Arrow Article for further reading.
Attaching points to arrows is more than just a technical skill, it’s a craft that enhances your connection with your equipment and improves every shot you take. By understanding the materials, mastering the techniques, and prioritizing safety, you’ll ensure your arrows fly true and your archery experience reaches new heights.
Whether you’re building a dozen for a tournament or customizing a single hunting arrow, the right attachment method makes all the difference.