
Building your own archery target might seem tricky at first, especially if you’re new to the sport. You want something that stops your arrows safely without damaging them too much. Many beginners find the “How to Build a Layered Archery Target (Ultimate Guide)” information a bit overwhelming.
But don’t worry! This guide breaks it all down. We’ll show you simple steps to create a great target.
Get ready to learn how to make a target that will last.
DIY Layered Archery Target Construction
Making your own layered archery target is a rewarding project for any archer. It allows for customization and can save money compared to buying commercial targets. This guide will walk you through the entire process, from selecting materials to final assembly.
We’ll cover the benefits of a layered design and how it improves arrow stopping power and longevity. You’ll learn to build a target that’s effective and durable, making your practice sessions more enjoyable and productive. This is the core of your target-building adventure.
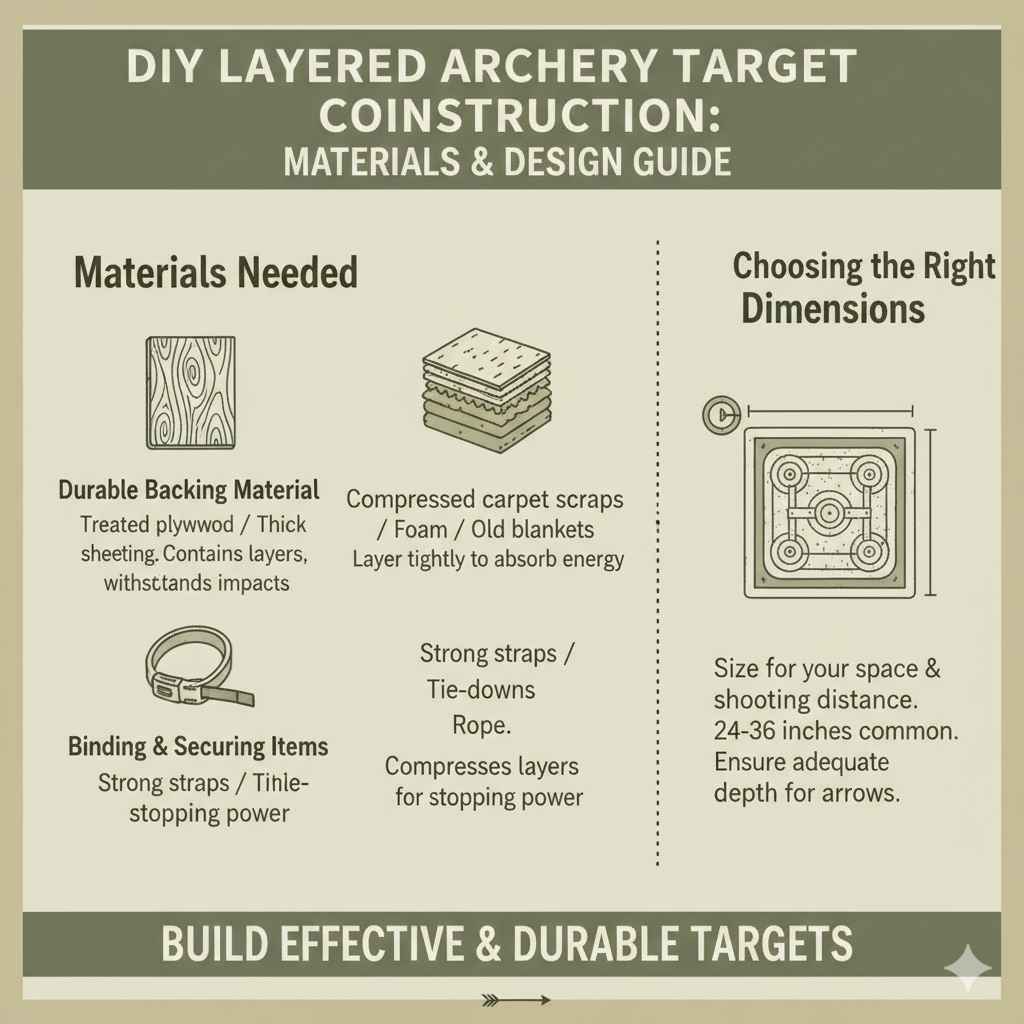
Materials Needed For Your Target
Gathering the right materials is the first step to building a successful layered archery target. You’ll need items that can effectively stop an arrow without causing excessive wear or damage. The choice of materials directly impacts the target’s performance and how long it lasts.
Think about durability, cost, and how well each material compresses to absorb arrow energy.
Durable Backing Material
This forms the outer shell of your target. It needs to be tough enough to contain the inner layers and withstand repeated arrow impacts. Common choices include treated plywood or thick plastic sheeting.
The backing prevents arrows from passing straight through and helps maintain the target’s shape over time. It’s like the skin of an apple, keeping the good stuff inside. A strong backing means your target will be more reliable and last longer, especially if you shoot many arrows in the same spot.
Arrow Stopping Layers
These are the heart of your layered target. The goal is to create a dense yet forgiving material that absorbs the kinetic energy of an arrow. Materials like compressed carpet scraps, foam sheeting, or even old blankets can work.
The key is to layer them tightly. Each layer contributes to slowing the arrow down gradually. This prevents sharp stops that can damage arrow shafts and makes arrow removal easier.
Think of it like stacking pillows; each one gives a little, absorbing the force.
Binding and Securing Items
You’ll need ways to hold all those layers together. Strong straps, ratchet tie-downs, or even sturdy rope are essential. These will compress the layers tightly.
This compression is vital for arrow stopping. It ensures there are no gaps for arrows to exploit. Securing the layers also keeps the target from falling apart during use or transport.
A well-bound target looks professional and performs much better.
Choosing the Right Dimensions
The size of your target matters for different archery disciplines. A smaller target is great for close-range practice, helping you focus on accuracy. A larger target is better for longer distances or for groups of archers.
Consider where you’ll place the target and how much space you have. The dimensions also influence the amount of material you’ll need. Standard targets often range from 24 inches in diameter to 36 inches square.
Always ensure the target is deep enough to stop your arrows completely, especially from your longest shooting distance.
Assembling Your Layered Archery Target
Now that you have your materials, it’s time to put them together. This is where the “How to Build a Layered Archery Target (Ultimate Guide)” really comes into play. Proper assembly ensures the target functions as intended.
It’s about creating a dense, stable unit that can absorb arrow energy effectively. Follow these steps carefully for a target that will serve you well.
Layering The Arrow Stopping Material
This is the most crucial part of building your target. You want to pack these materials in as tightly as possible. Start by cutting your chosen stopping material into uniform pieces.
If you are using carpet scraps, try to make them roughly the same size and thickness. Stack these pieces, ensuring there are no voids or gaps. Imagine building a wall brick by brick, but with padding.
The tighter you pack, the more resistance the arrow will face, slowing it down more effectively. This process requires patience, as you are aiming for maximum density in the core.
Some archers prefer to use a rigid frame to help pack the layers. This frame can be a simple wooden box or a metal ring. You fill this frame layer by layer, pushing down firmly after each addition.
This method ensures the layers remain compressed even before you apply external straps. It’s like putting a cake into a mold as you bake it. The mold helps maintain the shape and density.
This is a great technique if you want a very uniform and solid target core.
Tips for Optimal Layering
Alternate the direction of materials if using strips. For example, if using carpet, lay some strips horizontally and others vertically. This helps prevent arrows from finding a consistent path through the target.
Use a heavy object, like a weight or even a car tire, to press down on the layers as you add them. This pre-compresses the material, making the final binding more effective.
If using foam, consider layering different types of foam. Some dense rigid foam combined with softer flexible foam can offer excellent stopping power and arrow retrieval. This combination creates a more forgiving stopping surface.
Securing The Target Layers
Once all your stopping materials are packed in, you need to secure them firmly. This is where straps or tie-downs come in. Wrap them around the entire target assembly, pulling them as tight as you possibly can.
You want to compress the layers significantly. This compression is what gives the target its stopping power and prevents it from deforming too much when hit. Think of it like squeezing a sponge; the more you squeeze, the denser it becomes.
You might need several straps to get even pressure all around. Distribute them evenly to avoid creating weak spots. Ensure the straps are made of strong material that won’t snap under pressure.
Ratchet straps are excellent for this because they allow for very tight tension. Make sure the ends of the straps are secured so they don’t come loose. A well-secured target is a safe target.
It will withstand hundreds of shots without falling apart.
Using A Protective Cover
After securing the layers, you might want to add a protective cover. This can be a heavy-duty tarp, a piece of thick fabric, or even another layer of plywood on the front. This cover helps protect the inner layers from weather and further reinforces the target’s structure.
It also provides a consistent surface for your arrows to hit. Some archers even create a replaceable front shield for their targets. This shield takes the brunt of the arrow impacts and can be easily swapped out when it gets too worn.
Enhancing Your DIY Archery Target
Once your basic layered archery target is built, there are ways to make it even better. These enhancements can improve its performance, durability, and ease of use. Thinking about these additions can make your target a top-notch piece of equipment for your archery practice.
The “How to Build a Layered Archery Target (Ultimate Guide)” isn’t just about the build; it’s about making it work best for you.
Adding A Face And Target Butt
Every archery target needs a face. This is the visible part with the scoring rings. You can buy pre-printed archery target faces or print your own.
Attaching the face securely is important. Staples, strong tape, or a system of clips can work. The face gives you something to aim at, turning your block of material into a functional target.
For a layered target, the assembled block itself acts as the target butt, meaning the material behind the face. However, some archers add a separate, replaceable arrow stop behind the main layered block. This is called a target butt.
It’s designed to catch any arrows that might, by chance, pass through the main target. This adds an extra layer of safety, especially if you are shooting in an area where a pass-through could be dangerous. A sturdy target butt ensures your arrows don’t travel too far past your target.
Weatherproofing Your Target
If your target will be kept outdoors, weatherproofing is essential. Moisture can degrade materials, leading to rot and reduced stopping power. You can treat wooden components with sealants or paints designed for outdoor use.
The layers themselves might absorb water. Using materials that are naturally water-resistant, like certain types of closed-cell foam, can help. Covering the target with a waterproof tarp when not in use also significantly extends its life.
Even compressed carpet can get soggy and heavy if left in the rain for too long.
Making Arrow Removal Easier
One common issue with DIY targets is difficulty removing arrows. This often happens when the material is too dense or not compressed evenly. Using a variety of materials in your layers can help.
For example, some softer materials combined with denser ones can create a more forgiving surface. Ensuring the layers are packed tightly but not excessively is key. Sometimes, a slight twist of the arrow upon removal can help break the seal with the target material.
If arrow removal is a constant problem, consider adding a layer of a more slick material near the surface. Some archery shops sell arrow-release gels that can be applied to arrows. However, this adds to the cost.
A well-designed layered target should provide a good balance between stopping power and ease of arrow removal. This balance is what makes a target truly functional for practice.
Maintaining Your Layered Archery Target
Even the best-built target needs care to last. Regular maintenance ensures it continues to perform well and safely. This section focuses on keeping your target in top condition, which is vital for consistent practice.
Think of it as tending to your equipment so it can tend to your arrows.
Inspecting For Wear And Tear
Frequently check your target for signs of wear. Look for any areas where arrows are consistently hitting. See if the layers are becoming compressed or damaged.
Tears in the backing material or loosening of the straps are also indicators that maintenance is needed. A damaged target can become dangerous. It might not stop arrows as effectively.
Early detection of problems can prevent bigger issues later on.
Pay close attention to the front face. As it wears out, it becomes less visible and can affect your aim. Replacing the face regularly is good practice.
Also, check the integrity of your binding straps. Are they still tight? Are they fraying?
Worn straps are a risk for the target falling apart during use. Make it a habit to inspect the target before each shooting session.
Repairing And Replacing Parts
If you find minor damage, like a small tear in the cover, repair it promptly. Patching up holes can prevent them from growing larger. If a specific layer inside the target becomes too compressed or damaged, you may need to open up the target and replace that section.
This is where the layered design shines. You don’t have to replace the whole thing, just the worn-out part.
If the entire target is showing significant wear, it might be time to rebuild it. You can often reuse the backing material and straps if they are still in good condition. The core stopping materials are what typically wear out the fastest.
This guide, “How to Build a Layered Archery Target (Ultimate Guide),” provides the foundation, and this maintenance section helps you keep that foundation strong for years to come.
Storing Your Target Properly
Proper storage is key to extending the life of your target. When not in use, store the target in a dry place. If it’s kept outdoors, a waterproof cover is a must.
Protect it from direct sunlight, which can degrade some materials over time. Storing it upright, as it would be used, is generally best. Avoid storing it where heavy objects might fall on it or cause it to deform.
Consider the elements. Rain, snow, and extreme heat can all take a toll on your target. If you live in an area with harsh weather, bringing the target indoors during prolonged periods of non-use is a good idea.
A clean, dry storage environment will help preserve the materials and ensure your target remains effective for many practice sessions to come.
Understanding Layered Target Dynamics
The effectiveness of a layered archery target comes down to physics and material science. Understanding how it works helps you build and maintain it better. It’s not just about stacking things; it’s about managing energy.
This section explains the science behind why layered targets are so good at stopping arrows. It reinforces the principles behind “How to Build a Layered Archery Target (Ultimate Guide).”
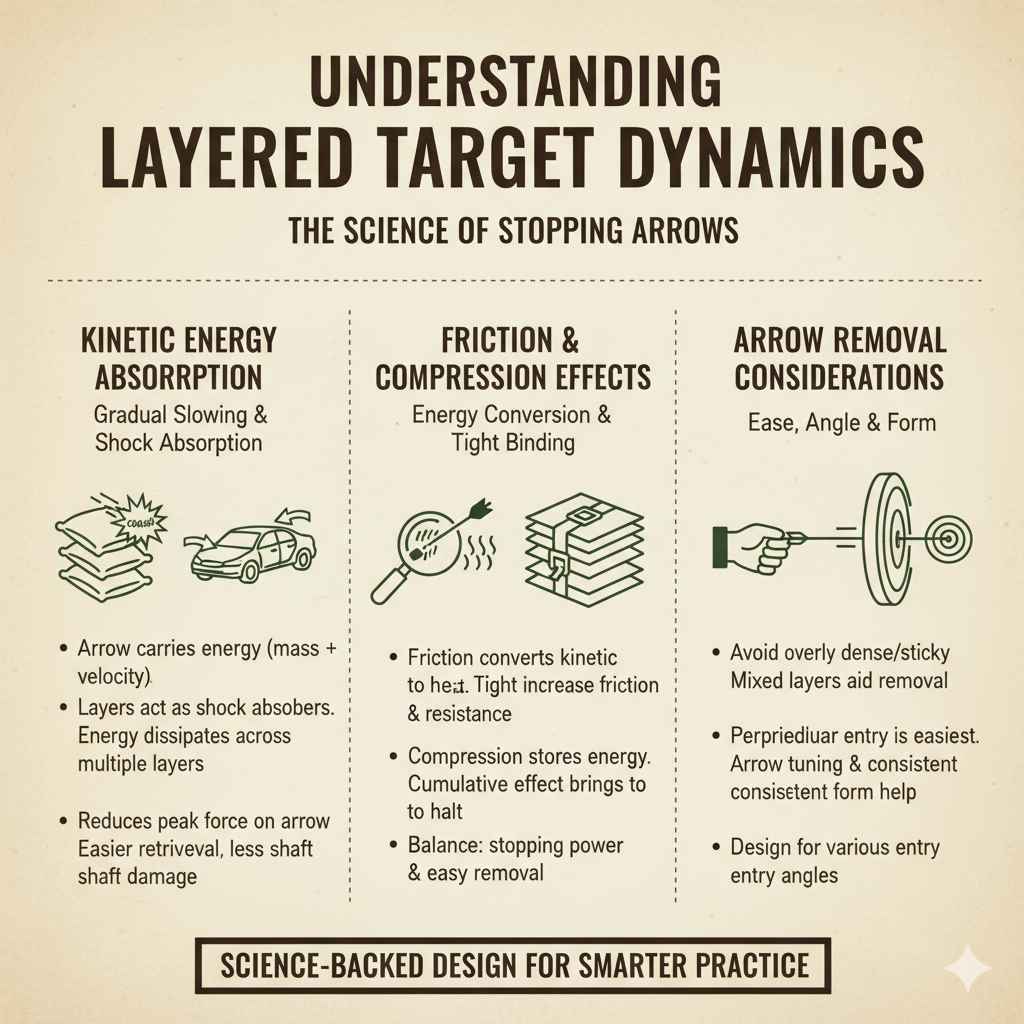
Kinetic Energy Absorption
An arrow flying towards a target carries kinetic energy. This energy is a product of the arrow’s mass and its velocity. When the arrow hits the target, this energy needs to be dissipated.
A solid, unyielding surface would cause the arrow to bounce back or penetrate too deeply, damaging both the arrow and the target. A layered target works by gradually absorbing this energy through multiple stages of compression and friction.
Each layer in the target acts as a shock absorber. As the arrow penetrates the first layer, some of its energy is used to compress that material. The arrow then moves into the next layer, which also offers resistance.
This process continues, with each subsequent layer absorbing a portion of the remaining energy. By spreading the energy absorption over many layers, the peak force on the arrow is reduced. This makes arrow retrieval easier and reduces the likelihood of shaft damage.
It’s similar to how a car’s crumple zones absorb impact in a collision.
Friction and Compression Effects
Friction plays a significant role in stopping an arrow. As the arrow shaft slides through the layers, friction is generated. This friction converts kinetic energy into heat, further slowing the arrow.
The tighter the layers are compressed, the more friction there will be between the arrow and the material. This is why it’s so important to bind the target tightly. A loosely bound target will allow the arrow to move more freely, with less frictional resistance.
Compression itself is a form of energy absorption. When a material is compressed, it stores some of the energy applied to it. As the arrow pushes through the material, the material deforms and compresses.
This deformation requires energy. In a layered target, this compression happens repeatedly across multiple layers. The cumulative effect of compression and friction is what brings the arrow to a safe halt.
The ideal layered target finds a balance, offering enough resistance for stopping power but not so much that arrows become impossible to remove.
Arrow Removal Considerations
The ease of arrow removal is a critical factor in any archery target. If it’s too difficult to pull arrows, it can lead to frustration and potential injury. A well-constructed layered target minimizes this problem.
Materials that are too dense or have a “sticky” surface can make removal difficult. Using a mix of materials can help. Some layers might be firm to stop the arrow, while others are slightly softer or more slick to allow for easier passage.
The angle of the arrow as it enters the target also affects removal. Arrows that enter perpendicular to the face are usually easier to remove than those that enter at a steep angle. This is because the force is distributed more evenly.
Proper arrow tuning and consistent shooting form can also contribute to easier arrow removal. A good target design aims to accommodate a variety of arrow entry angles while still providing effective stopping power.
Frequently Asked Questions
Question: What is the best material for the core of a layered archery target
Answer: Many archers find success using compressed carpet scraps, foam mats, or even tightly packed old clothing. The key is to use materials that can be compressed densely and offer good friction.
Question: How deep should a layered archery target be
Answer: For most compound bows, a target that is at least 18 to 24 inches deep is recommended. For recurve bows or lower poundage, 12 to 18 inches might suffice. Always err on the side of deeper for safety.
Question: Can I use recycled materials to build an archery target
Answer: Absolutely. Recycled materials like old carpet, foam padding, and even tightly packed cardboard can be excellent for target cores. This makes building a target more affordable and eco-friendly.
Question: How often do I need to replace the layers in my DIY target
Answer: This depends heavily on how much you shoot and the materials you use. You might notice arrows starting to pass through or the target becoming too soft. Inspect it regularly; some layers might need replacing after a few months of heavy use, while others last much longer.
Question: What is the main benefit of a layered target over a solid block
Answer: Layered targets distribute arrow energy more effectively, which leads to less damage to the arrow shaft and easier arrow retrieval. They are also more durable and can often be repaired by replacing worn layers instead of the entire target.
Summary
Building a layered archery target is a practical and achievable project. By carefully selecting materials and following simple assembly steps, you can create an effective and durable target. This guide provided the essential steps for materials, assembly, enhancements, and maintenance.
You now have the knowledge to build a target that stops arrows safely and makes practice more enjoyable. Happy shooting!