How to Make a Folding Bow: Step-by-Step Guide for Beginners
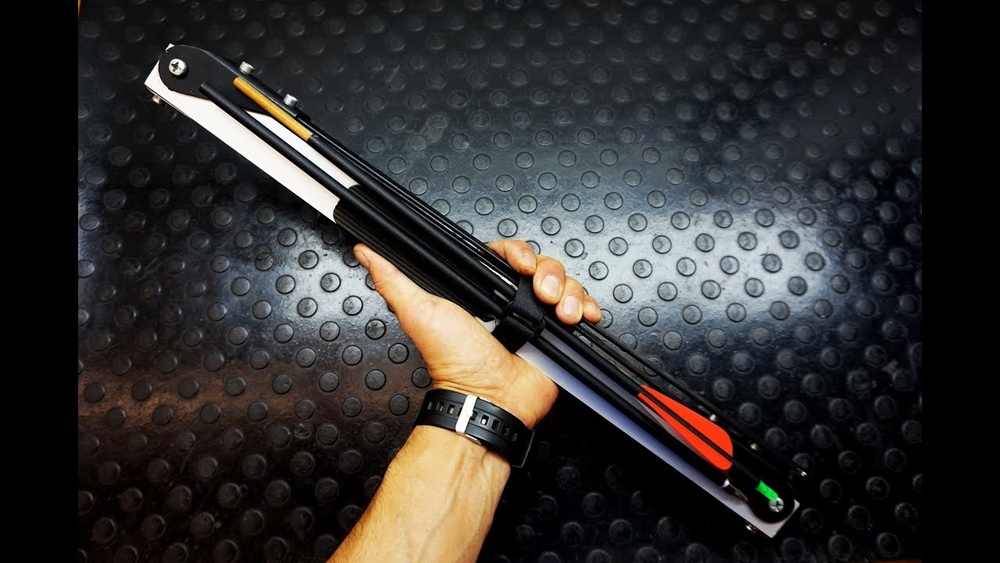
Building your own folding bow is both a rewarding project and a practical way to learn about archery mechanics. A folding bow is a compact, portable version of a traditional bow, designed to collapse into a smaller size for easy transport.
Whether you want a survival tool, a unique DIY challenge, or just a conversation piece, making a folding bow can teach you valuable skills. This guide will walk you through every step, from choosing materials to tuning and using your bow safely.
What Is A Folding Bow And Why Build One?
A folding bow works like a standard bow but includes hinges or joints, so it folds in half or thirds. This makes it easy to carry in a backpack or under a car seat. Folding bows are popular among survivalists, campers, and anyone who values space-saving gear.
Building your own folding bow means you can:
- Customize the size and draw weight to fit your needs.
- Learn about bow mechanics and material strength.
- Save money compared to buying commercial models.
- Enjoy the satisfaction of using something you made with your own hands.
Pro Tip: Beginners often think folding bows are less powerful than fixed bows. This is not always true, well-made folding bows can reach draw weights of 30, 50 pounds, enough for hunting or target shooting.
Tools And Materials Needed
Before you start, gather all tools and materials. Quality matters, strong materials make a safer, longer-lasting bow.
Tools:
- Hacksaw or hand saw
- Drill with bits (5mm and 8mm recommended)
- File and sandpaper (medium and fine grit)
- Screwdrivers
- Wrenches
- Measuring tape
- Marker or pencil
- Clamps (optional but helpful)
Materials:
- Bow limbs: Solid hardwood strips (maple, hickory, ash) or fiberglass strips, 1, 1.5 inches wide, 24, 30 inches long, 0.5, 0.75 inches thick.
- Riser (handle): Hardwood block, 10, 16 inches long, 1.5, 2 inches wide, 1, 1.5 inches thick.
- Hinges: Two strong steel hinges, 2, 3 inches long (piano-style or heavy-duty barrel hinges).
- Bolts and nuts: Four to six steel bolts, 1/4″ or 6mm, with lock washers.
- Bowstring: Dacron, Fast Flight, or strong paracord (never use cotton or weak cord).
- Epoxy or wood glue: For extra strength at joints.
- Protective finish: Varnish, oil, or polyurethane to seal wood.
If you want to compare a few common limb and riser materials, see the table below:
| Material | Strength | Weight | Durability | Cost |
|---|---|---|---|---|
| Maple (wood) | High | Medium | Good | Low |
| Hickory (wood) | Very High | Medium | Excellent | Medium |
| Fiberglass | Very High | Low | Excellent | Medium |
| Aluminum (riser) | High | Low | Good | High |
Warning: Always use strong, knot-free wood or reliable fiberglass. Weak or cracked materials may break under tension and cause injury.
Planning Your Folding Bow Design
A well-thought-out design is the key to a successful folding bow. Decide on the size, shape, and folding method before you cut any wood.
Key Design Choices
- Bow length: Most folding bows are 48, 60 inches when open. Shorter bows are more portable but harder to draw smoothly.
- Draw weight: For target shooting, 25, 35 pounds is enough. For hunting, aim for 40+ pounds.
- Hinge placement: Hinges usually go near the center or at 1/3 points from the handle, allowing the limbs to fold alongside the riser.
- Locking mechanism: Some bows use pins, bolts, or latches to keep limbs locked during use.
Example: A common design is a two-piece folding bow, with a hinge at the center of each limb, folding inward to meet the riser.
Sketch Your Bow
Draw your design on paper or cardboard, showing:
- Full length when open
- Folded size
- Hinge placement
- Limb width and thickness
This helps you visualize the steps and spot problems before you start building.
Step-by-step Guide To Making A Folding Bow
Follow these steps to build your folding bow, with details and tips for each stage.
1. Shaping The Limbs
Start with your limb blanks, solid strips of hardwood or fiberglass.
- Mark the limb shape: Taper the ends to about 0.5 inches wide, keeping the center wider for strength.
- Use a saw to cut along your lines. Smooth the edges with a file.
- Sand all surfaces, starting with medium and finishing with fine grit.
- Check for flexibility: Gently bend the limb. It should flex smoothly without cracking.
Pro Tip: Beginners often make limbs too thick or too thin. Aim for even thickness, uneven limbs cause poor performance or breakage.
2. Building The Riser (handle)
Shape the riser so it fits your hand comfortably.
- Mark the grip area. Round the edges for comfort.
- Saw and file to shape. Test the grip in your hand.
- Drill holes for the hinge bolts, matching the limb width.
- Sand and finish the handle.
For extra comfort, you can add a leather or rubber grip.
3. Installing The Hinges
The hinges allow your bow to fold. Their strength is critical.
- Mark hinge placement on the riser and limb ends.
- Drill holes for bolts. Ensure holes are straight for smooth folding.
- Attach hinges using bolts, washers, and nuts. Tighten securely, but allow the hinge to move.
- Test folding action: The limbs should fold flat against the handle without binding.
Example: Some makers glue and screw the hinges for extra strength, but always use bolts for a secure, adjustable connection.
4. Attaching The Limbs To The Riser
- Align the limb and riser holes. Insert bolts and tighten with lock washers.
- Check the limb angle. Both limbs should line up and open smoothly.
- Fold and unfold the bow several times, checking for smooth action and no catching.
- If desired, add a locking pin or latch to hold the limbs in the open position.
Warning: Never use wood screws alone, bolts provide much more strength, especially under tension.
5. Cutting Nocks For The Bowstring
At the limb tips, you need nocks, small grooves for the string.
- Mark the spot about 0.5 inches from each tip.
- Cut a shallow groove on each side of the limb tip, angled slightly toward the handle.
- Smooth the groove with fine sandpaper to avoid cutting the string.
Pro Tip: Beginners sometimes cut nocks too deep or at the wrong angle. Shallow, smooth grooves are best for string life and safety.
6. Making And Attaching The Bowstring
A safe, strong bowstring is essential.
- Measure your bow’s length (nock-to-nock when open). The string should be about 4 inches shorter for good tension.
- Cut your string material to length, adding extra for knots.
- Tie a bowyer’s knot or use a double overhand knot at each end to form loops.
- Slip the loops over the nocks.
- Check string tension. The limbs should flex but not bend excessively.
Example: For a 54-inch bow, cut a 50-inch string. Paracord works for low-poundage bows, but use Dacron or Fast Flight for higher draw weights.
7. Finishing Touches
- Sand all edges and corners smooth.
- Apply a protective finish to the wood, oil, varnish, or polyurethane.
- Let the finish dry completely before use.

Credit: www.youtube.com
Testing And Tuning Your Folding Bow
After assembly, test your bow carefully. Never draw a new bow fully on the first try, limbs need to adjust to tension.
Initial Testing
- With the bow unfolded, check all bolts and hinges for tightness.
- String the bow. Draw it a few inches, listening for cracks or creaks.
- Gradually increase the draw, checking for smooth action.
- If the limbs twist or bend unevenly, check hinge alignment.
Tuning For Performance
- Brace height (distance from grip to string): Adjust by twisting the string or making a new one. Typical range is 6, 8 inches for a 54-inch bow.
- Draw weight: Test with a luggage scale or by feel. If too heavy, thin the limbs slightly; if too light, use thicker limbs.
- Arrow flight: Shoot a few arrows. If they fishtail or wobble, check limb symmetry and string alignment.
Pro Tip: I found that small tweaks to limb thickness and hinge tightness made a big difference in arrow accuracy and smooth draw.
Safety Tips And Common Mistakes
Safety is vital when building and using any bow. Here are critical points to remember:
- Always wear eye protection when drilling or sawing.
- Never draw the bow without checking for cracks or weak spots first.
- Use only strong, tested materials for limbs and hinges.
- Don’t store your bow strung for long periods, this can weaken the limbs.
- Keep fingers and hands away from the hinges during folding/unfolding.
Common mistakes to avoid:
- Using soft or cracked wood for limbs.
- Failing to secure bolts tightly.
- Cutting nocks too deep, which weakens the limb tips.
- Ignoring hinge alignment, crooked hinges cause uneven bending and poor accuracy.
Real-world Uses For A Folding Bow
A well-made folding bow is more than a showpiece. Here are practical uses:
- Survival: Compact bows fit easily in emergency kits for hunting or self-defense.
- Camping: Lightweight and packable for target practice or small game hunting.
- Backpacking: Saves space compared to traditional bows.
- Learning: Making and tuning your own bow teaches valuable problem-solving and woodworking skills.
Example: Some military survival kits have included folding bows due to their portability and effectiveness.
Comparing Folding Bows To Other Types
How does a folding bow stack up against other designs? Here is a simple comparison:
| Type | Portability | Setup Time | Durability | Power |
|---|---|---|---|---|
| Folding Bow | Excellent | Fast | Good | Moderate, High |
| Take-Down Bow | Very Good | Moderate | Very Good | High |
| One-Piece Bow | Poor | None | Excellent | High |
| Compound Bow | Fair | Slow | Excellent | Very High |
Pro Tip: For most outdoor users, the folding bow offers the best balance of portability and power.

Credit: www.youtube.com
Maintenance And Storage
Proper care keeps your bow working safely for years.
- Wipe down the bow after each use to remove moisture and dirt.
- Check bolts and hinges regularly for tightness.
- Reapply finish to wood parts every few months.
- Store the bow unstrung, in a cool, dry place.
- Inspect for cracks or wear before each use.
Example: A folding bow stored in a damp place may develop rust on hinges, regular oiling prevents this.
Troubleshooting Common Problems
If your folding bow isn’t working as expected, try these fixes:
- Limbs don’t fold smoothly: Check for debris in hinges or misaligned bolts.
- String slips off nocks: Re-cut nocks at a steeper angle or add string grooves.
- Riser or limb cracks: Stop using immediately. Replace cracked parts and check for material flaws.
- Low power: Thicken limbs or shorten the string slightly for more tension.
Most problems have simple solutions if you check each part carefully.

Credit: chalkingupsuccess.com
Where To Learn More
Building bows is a skill with a rich history. For more advanced designs, materials, and techniques, check out resources like the Wikipedia page on bow and arrow. Archery forums and YouTube channels also provide tutorials and troubleshooting help.
Frequently Asked Questions
How Strong Can A Folding Bow Really Be?
A well-built folding bow can reach draw weights of 40, 50 pounds, enough for hunting small game or serious target shooting. The key factors are strong, high-quality materials and solid hinge installation.
What Is The Best Wood For Folding Bow Limbs?
Hickory and maple are top choices because they combine strength and flexibility. Avoid softwoods like pine. Fiberglass is also excellent for high draw weights.
Can I Use A Folding Bow For Hunting?
Yes, if the bow has enough draw weight (usually 40+ pounds) and is tuned well. Always check local hunting regulations before using homemade bows.
How Do I Make Sure My Bow Does Not Break?
Inspect all parts for cracks before each use. Use only strong, straight-grained wood or tested fiberglass. Tighten all bolts, and avoid storing the bow strung for long periods.
Is A Folding Bow Suitable For Beginners?
Yes, folding bows are great projects for learning bow-making skills. They are forgiving if you use the right materials and check your work at each step. Start with a lower draw weight for easier handling.