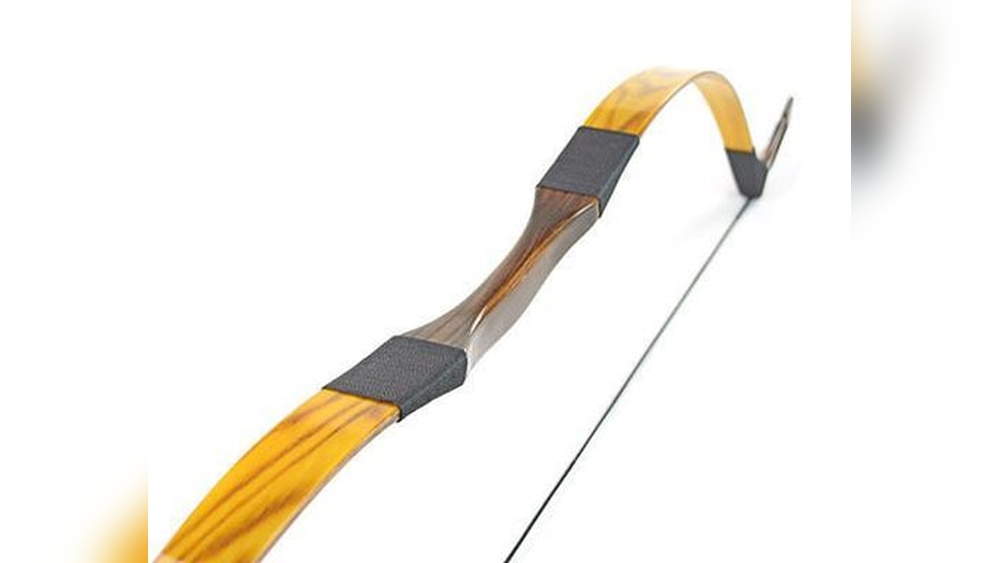
How to Make Mongoling Horse Bow: Step-by-Step Guide for Beginners
Making a Mongolian horse bow is both an art and a science. The process involves traditional skills, deep respect for history, and careful handling of natural materials. Mongolian bows have powered the legendary mounted archers of the steppes for centuries.
For many, these bows are more than weapons, they are symbols of craftsmanship and cultural pride. If you want to make a Mongolian horse bow, this guide will help you understand the steps, tools, and secrets of this ancient craft.
Whether you are a beginner or have some woodworking experience, you will find practical advice and insights that are rarely discussed. Let’s explore how to create a bow that honors Mongolian tradition and delivers real performance.
Understanding The Mongolian Horse Bow
The Mongolian horse bow is a type of composite bow. It is famous for its power, compact size, and unique shape. Unlike Western longbows, Mongolian bows are shorter and have a pronounced recurved design. This allows archers to shoot quickly and accurately from horseback.
Most Mongolian bows use three main materials:
- Wood (core)
- Horn (belly)
- Sinew (back)
These materials are glued together to form a strong, flexible bow. The combination gives the bow high power and durability, even in harsh climates.
Key Features
- Length: Usually 48, 54 inches (120, 137 cm)
- Draw weight: Varies, but often between 40, 70 lbs
- Recurve shape: Curved tips for speed and energy
- Composite construction: Multiple materials for strength
Why Composite Bows?
Composite bows are not just historical curiosities. Their layered construction makes them powerful and reliable, even after years of use. This is why Mongolian bows were the main weapon of the Mongol cavalry, helping them conquer vast territories.
Choosing Materials
Selecting the right materials is crucial for both performance and authenticity. Each part of the bow serves a specific purpose.
Wood (core)
The wood core is the backbone of the bow. It must be flexible, strong, and resistant to splitting. Traditional Mongolian bow makers often use maple, mulberry, or birch.
- Maple: Flexible and strong, easy to shape
- Mulberry: Durable and widely used in Asia
- Birch: Lightweight and bends well
When picking wood, look for straight grain and avoid knots or cracks.
Horn (belly)
The horn is glued to the inner side of the bow. It stores energy as the bow bends. Buffalo or sheep horn is preferred. Horn must be cut and shaped carefully to fit the bow’s belly.
- Buffalo horn: Common and easy to work
- Sheep horn: Slightly softer but can be shaped well
Horn pieces should be at least 18, 20 inches long, matching the curve of the bow.
Sinew (back)
Sinew is animal tendon, usually from cattle or deer. It is soaked, separated into fibers, and glued to the back of the bow. Sinew increases the bow’s strength and allows it to flex without breaking.
- Cattle sinew: Thick and strong
- Deer sinew: Fine fibers, good for detailed work
Glue
Traditional bow makers use hide glue made from animal collagen. It dries hard and holds materials together. Modern makers sometimes use epoxy, but hide glue is more authentic.
Other Materials
- Silk thread: For wrapping and decoration
- Leather: To cover grip and protect tips
Example: Material Comparison
Here’s a quick comparison of wood types used for the core:
| Wood Type | Flexibility | Strength | Availability |
|---|---|---|---|
| Maple | High | High | Easy |
| Mulberry | Medium | Very High | Moderate |
| Birch | Medium | Medium | Easy |
Tools Needed
You do not need expensive machinery to make a Mongolian horse bow. Basic hand tools are enough, but precision is important.
Essential Tools
- Saw: For cutting wood and horn
- Rasp/File: For shaping wood
- Knife: For trimming sinew and horn
- Clamps: To hold pieces during gluing
- Sandpaper: For smoothing surfaces
- Heat gun or stove: For bending wood
- Brush: For applying glue
Optional Tools
- Measuring tape: For accuracy
- Bow scale: For measuring draw weight
Pro Tip: If you do not have a heat gun, you can use boiling water to soften wood for bending.
Step-by-step Process
Making a Mongolian horse bow takes patience. Each step builds on the previous one. The process can take several weeks, mainly because of drying times.
1. Preparing The Wood Core
Start by choosing a straight, clear piece of wood about 54 inches long and 1, 1. 5 inches wide. Mark the center and shape the limbs using a rasp and knife. The ends should be slightly thinner than the center.
- Shape the wood to a gentle curve.
- Sand the surface until smooth.
- Heat the wood gently and bend it into the classic recurve shape.
Warning: Don’t overheat the wood. Too much heat can cause cracks.
2. Shaping And Attaching The Horn
Cut horn pieces to fit the belly of the bow. Each piece should cover about half of each limb. Use a rasp to thin the horn to about 1/4 inch.
- Roughen the horn and wood surfaces.
- Apply hide glue and clamp the horn to the wood.
- Let it dry for at least 48 hours.
This step is crucial because the horn stores most of the bow’s energy.
3. Preparing And Gluing Sinew
Soak sinew in warm water to separate fibers. Dry the fibers and coat them with hide glue.
- Lay sinew strands on the back of the bow.
- Press firmly and wrap with silk thread if needed.
- Let the sinew dry for at least one week.
Sinew gives flexibility and stops the bow from breaking under tension.
4. Shaping The Final Bow
Once glue is dry, use a rasp and sandpaper to smooth the entire bow. Shape the grip area so it’s comfortable for your hand.
- Check the curve and make sure both limbs match.
- Sand the horn and wood until smooth.
5. Wrapping And Finishing
Wrap the grip with leather or silk. Decorate the limbs with thread or paint if desired. Apply a thin layer of oil or wax to protect the bow.
- Attach string nocks to the tips.
- Use silk thread to reinforce the tips.
6. Stringing And Testing
Make a bowstring from silk or synthetic material. Attach to the nocks and gently flex the bow. Test draw weight and make adjustments if needed.
- Never pull the bow fully on the first try.
- Increase tension slowly to avoid damage.
Example: When I tested a newly made bow, I started with half draw and checked for any cracks or glue failures. Only after several tests did I draw the bow fully.

Credit: meanwhileinmongolia.com
Tuning And Adjusting
A Mongolian horse bow requires tuning after assembly. Adjustments ensure safety and performance.
Checking Draw Weight
Use a bow scale to measure draw weight. Most traditional bows range from 40, 70 lbs. Beginners should start with lower weights.
- Draw weight too high: Thin the limbs slightly
- Draw weight too low: Add more sinew or horn
Balancing Limb Strength
Both limbs should bend evenly. If one limb is stiffer, sand it lightly and check again.
Pro Tip: Uneven limbs can cause poor accuracy and damage over time.
Adjusting String Length
The string should be tight but not overstressed. Traditional Mongolian bows use short strings for fast shooting.
| Bow Length | String Length | Recommended Draw Weight |
|---|---|---|
| 48″ | 45″ | 40, 55 lbs |
| 54″ | 51″ | 60, 70 lbs |
Practical Tips For Beginners
Making a Mongolian horse bow is not easy, but some practical tips can help you succeed.
- Start with a lower draw weight for your first bow.
- Use local materials if possible, but test them first.
- Take time to let glue and sinew dry fully.
- Mark measurements clearly before cutting or shaping.
- Test the bow gradually, never rush full draw.
- Keep tools sharp for clean cuts.
Example: One common mistake is using too much glue. Excess glue can squeeze out and weaken the bond. Apply thin, even layers for best results.

Credit: classic-bow.com
Common Mistakes To Avoid
Even experienced makers can make mistakes. Here are some issues to watch for:
- Rushing drying times: Glue and sinew need days to cure. Rushing will cause weak joints.
- Ignoring limb balance: Uneven limbs affect accuracy and can cause breakage.
- Over-bending wood: Too much curve can crack the core.
- Using poor-quality sinew: Thin or brittle sinew breaks easily.
- Skipping horn shaping: Horn must fit perfectly, or it will pop off under stress.
Pro Tip: If you see bubbles or cracks in the glue line, stop and fix them before continuing.
The Science Behind Mongolian Bows
Mongolian bows are famous for their efficiency. The composite design stores and releases energy quickly. This makes the bow powerful for both short and long range.
Energy Storage
- Horn compresses and stores energy during draw.
- Sinew stretches and helps release energy during shot.
- Wood core acts as a spring to balance both.
Modern Testing
Studies show that Mongolian bows can shoot arrows over 150 meters, rivaling many modern bows. The recurved shape increases arrow speed by up to 10, 15% compared to straight bows.
| Bow Type | Average Range | Arrow Speed |
|---|---|---|
| Mongolian Horse Bow | 150 m | 160 fps |
| English Longbow | 200 m | 130 fps |
| Modern Recurve | 300 m | 200 fps |
Source: Wikipedia
Preserving Tradition
Making Mongolian horse bows is not just about function. It is about honoring tradition. Bow making is still practiced in Mongolia and other regions.
- Local makers use family recipes for glue and sinew.
- Designs are often decorated with symbols and colors.
- Some bows are used in festival competitions.
If you want to make a bow that is truly authentic, study traditional techniques and materials. Attend workshops or speak with experienced makers if you can.
Safety Considerations
Bow making involves sharp tools and strong adhesives. Always follow safety guidelines:
- Wear gloves when handling horn and sinew.
- Use eye protection when cutting or sanding.
- Keep glue and chemicals away from children.
- Test bows safely, never aim at people or animals.
Warning: If you are unsure about a step, seek advice before proceeding.

Credit: www.youtube.com
Frequently Asked Questions
What Is The Best Wood For A Mongolian Horse Bow?
The best wood is maple or mulberry. Both offer good flexibility and strength. However, if you cannot find these, birch is a suitable substitute. Always choose wood with straight grain and no knots for safety and performance.
Can I Use Modern Glue Instead Of Hide Glue?
Yes, epoxy glue can be used, but it is less traditional. Hide glue allows the bow to flex and move with changes in temperature and humidity. If authenticity is important to you, stick to hide glue. Otherwise, epoxy offers a strong bond.
How Long Does It Take To Make A Mongolian Horse Bow?
It usually takes 2, 4 weeks. Most of this time is spent waiting for glue and sinew to dry. Rushing the process can lead to weak spots and breakage. Experienced makers can sometimes finish faster, but patience is key.
Are Mongolian Horse Bows Suitable For Beginners?
Mongolian bows are powerful and require careful handling. Beginners should start with a lower draw weight, around 40, 45 lbs. With practice, you can move up to heavier bows. Learning proper shooting technique is also important.
Where Can I Learn More About Mongolian Bow Making?
You can join archery clubs or attend workshops in Mongolia and neighboring countries. Books and online videos are also helpful. For detailed history and technical information, visit Wikipedia.
Making a Mongolian horse bow is a journey. It requires patience, skill, and respect for tradition. If you follow the steps and tips in this guide, you can craft a bow that is both functional and beautiful. Remember to start small, use quality materials, and always test your bow safely.
The satisfaction of shooting your own handmade bow is unmatched. Good luck on your bow-making adventure!