A bow’s center cut determines how much the riser is carved out for the arrow rest, directly affecting the arrow’s path. Arrow spine is the arrow’s stiffness. A bow cut past center needs a stiffer arrow (spine) because the path is straighter. A bow not cut to center needs a more flexible arrow to bend around the riser properly.
Welcome, archers! I’m Salman Arfeen, and I’m here to make your archery journey fun and clear. Have you ever heard people talk about “center cut” and “arrow spine” and felt a little lost? You’re not alone! These terms sound technical, but they are actually simple ideas that unlock incredible accuracy. Getting them right is the difference between arrows flying wild and arrows hitting right where you aim.
Think of it like a partnership. Your bow and arrow must work together perfectly. If they don’t, your shots can feel frustrating and unpredictable. But don’t worry! In this guide, I’ll break down exactly what center cut and arrow spine are. We will explore how they connect in a simple, step-by-step way. Soon, you’ll be choosing and tuning your gear with confidence.
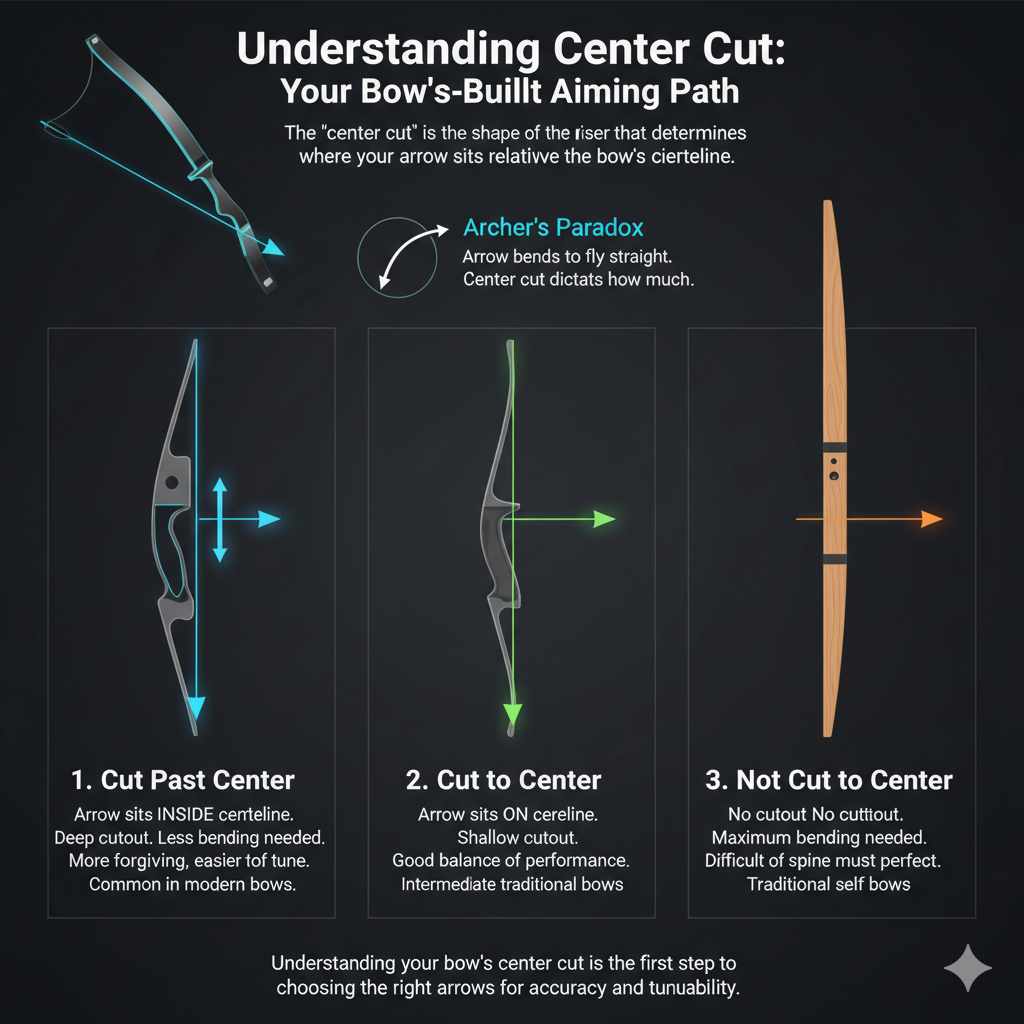
Understanding Center Cut: Your Bow’s Built-In Aiming Path
Let’s start with your bow. The “center cut” is all about the shape of the riser—the main handle section you hold. Specifically, it refers to how much the shelf (where your arrow rests) is carved inward toward the bow’s centerline. Imagine drawing a straight line from the string down the middle of the limbs. The center cut determines where your arrow sits in relation to that line.
Why does this matter so much? It all comes down to a concept called the “Archer’s Paradox.” When you release the string, the arrow doesn’t fly perfectly straight at first. It has to bend and wiggle around the riser before stabilizing. The center cut of your bow dictates just how much bending is needed for a clean, straight shot. A well-designed center cut makes tuning your bow much easier and your shooting far more forgiving.
Three Main Types of Center Cut
Bows generally fall into one of three categories based on their center cut. Understanding which one you have is the first step to choosing the right arrows.
1. Cut Past Center
This is the most common design in modern traditional bows and all compound bows. “Cut past center” means the arrow shelf is carved out so deeply that the arrow actually sits to the inside of the bow’s centerline. If you look down your bowstring, the tip of your arrow will point slightly to the left of the string (for a right-handed archer).
- What it looks like: A deep, noticeable cutout in the riser where the arrow rest is mounted.
- The Advantage: This design requires the arrow to bend less to get around the riser. It creates a more direct and efficient path to the target. This makes the bow much more forgiving of small shooting mistakes and easier to tune.
- Who it’s for: Nearly all compound shooters and most modern recurve and longbow archers who want maximum accuracy and tunability.
2. Cut to Center
A bow that is “cut to center” has a shelf that is carved exactly to the bow’s centerline. When you nock an arrow and look down the string, the arrow will appear to be in a perfectly straight line with the string.
- What it looks like: A shallow cutout in the riser. The side of the riser is flush with the bow’s centerline.
- The Advantage: This design provides a good balance. It allows for decent arrow flight and is a common feature on many intermediate traditional bows. It still requires the arrow to flex, but not as dramatically as a non-center-cut bow.
- Who it’s for: Traditional archers who appreciate a classic design but still want good performance and easier tuning than older styles.
3. Not Cut to Center (or Center Shot)
This design is found on very traditional longbows, often called “self bows” or historical replicas. The riser has little to no cutout. The arrow rests on a shelf that is built up on the outside of the riser. From above, the arrow points significantly away from the bow’s centerline.
- What it looks like: The side of the riser is rounded or flat, with no cutout for the arrow.
- The Challenge: This bow requires the arrow to perform the full Archer’s Paradox, bending dramatically around the handle. This makes arrow selection and tuning extremely critical. Your spine match must be perfect to get a clean shot.
- Who it’s for: Purists, historical archery enthusiasts, and those who love the challenge of mastering a truly traditional piece of equipment.
| Type of Center Cut | Arrow Position Relative to Centerline | Required Arrow Bend | Ease of Tuning |
|---|---|---|---|
| Cut Past Center | Inside (closer to archer) | Minimal | Easiest |
| Cut to Center | Directly on the line | Moderate | Medium |
| Not Cut to Center | Outside (away from archer) | Significant | Most Difficult |
Understanding Arrow Spine: The Secret to Straight Flight
Now, let’s talk about your arrows. “Arrow spine” is simply a measurement of the arrow’s stiffness. It’s not about a backbone; it’s about how much the shaft bends when a force is applied. When you shoot, the immense energy from the bowstring compresses the arrow, causing it to flex. This flex is what allows the arrow to navigate around the riser.
If the arrow is too stiff (too much spine), it won’t bend enough. If it’s too weak (not enough spine), it will bend too much. Either way, the arrow will fly erratically off to one side. Getting the spine just right is the key to tight groups and hitting your mark.
Static vs. Dynamic Spine: What Beginners Need to Know
You might hear archers talk about two types of spine. Let’s keep it simple.
- Static Spine: This is the number printed on the arrow shaft (e.g., 500, 400, 340). It’s a measurement of how much the arrow bends when a standard weight is hung from its center. A lower number means a stiffer arrow, which is a bit counterintuitive but important to remember! For example, a 340 spine arrow is much stiffer than a 500 spine arrow.
- Dynamic Spine: This is how the arrow actually behaves when it’s shot from your bow. It’s affected by your bow’s draw weight, your draw length, the weight of your arrowhead, and even the type of string you use. You can’t see a number for dynamic spine, but you can see its effects when you shoot.
As a beginner, you should focus on choosing the right static spine based on your bow’s specifications. The rest will come with fine-tuning.
Center Cut vs Arrow Spine: The Genius Connection
Here it is—the essential answer. Center cut and arrow spine are a team. The shape of your bow’s riser (center cut) determines the stiffness your arrow (spine) needs to be.
Think of it like this: The center cut creates the path, and the arrow spine provides the flexibility to follow that path perfectly.
- A bow that is cut past center has a straighter path. The arrow doesn’t need to bend much to clear the riser. Therefore, you need a stiffer arrow (lower spine number).
- A bow that is not cut to center has a much bigger obstacle—the riser itself. The arrow must bend a lot to get around it. Therefore, you need a weaker, more flexible arrow (higher spine number).
- A bow that is cut to center sits in the middle. It needs a moderately flexible arrow to clear the riser cleanly.
This relationship is the foundation of bow tuning. If your arrows are constantly flying to the left or right (not up or down), a mismatch between your bow’s center cut and your arrow’s spine is almost always the culprit.
| If Your Bow Is… | It Means the Arrow Path Is… | You Need an Arrow That Is… | Example Static Spine |
|---|---|---|---|
| Cut Past Center | More direct, with less riser in the way. | Stiffer (less flexible). | 340, 400 |
| Cut to Center | Partially obstructed by the riser. | Moderately Flexible. | 500, 600 |
| Not Cut to Center | Fully obstructed, requiring a large bend. | Weaker (more flexible). | 700, 800+ |
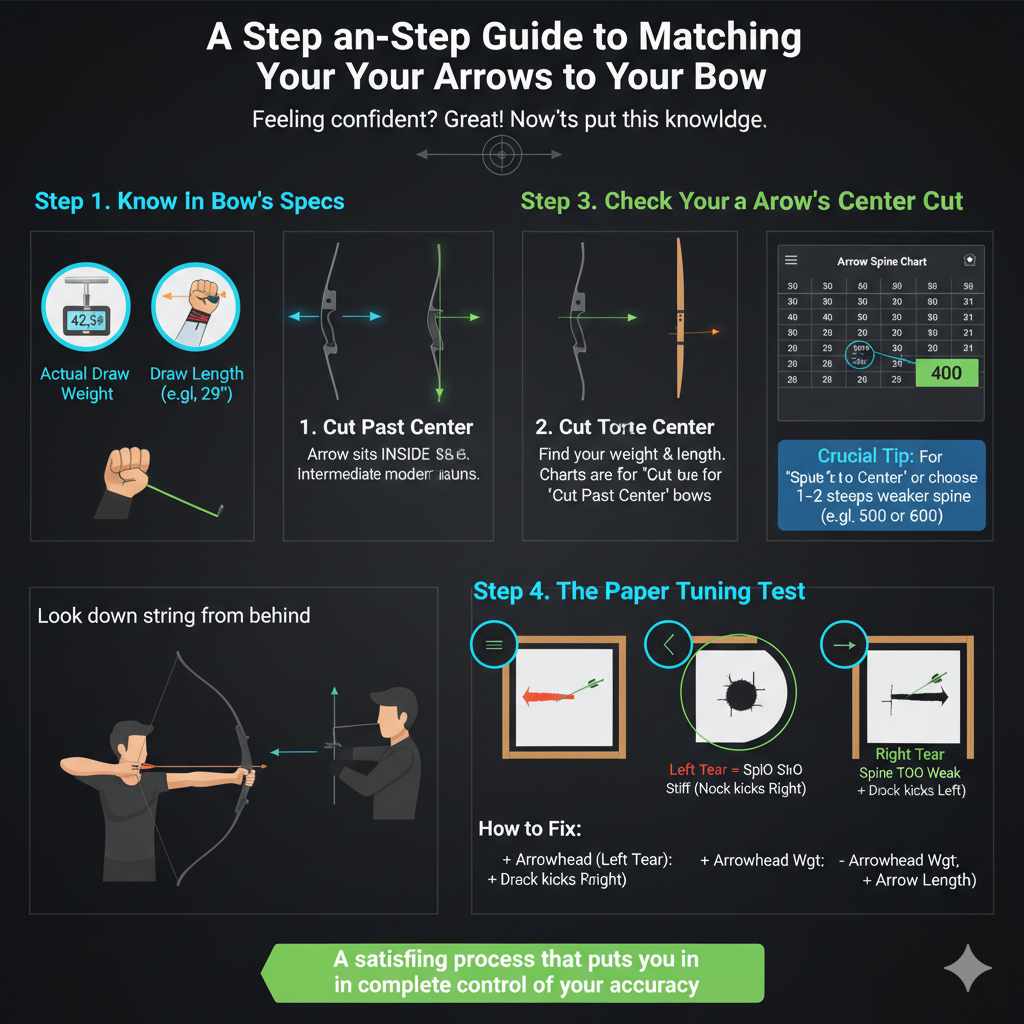
A Step-by-Step Guide to Matching Your Arrows to Your Bow
Feeling confident? Great! Now let’s put this knowledge into action. Follow these simple steps to find the perfect arrow spine for your bow setup.
Step 1: Know Your Bow’s Specs
Before you can pick an arrow, you need two key pieces of information about your setup:
- Your Actual Draw Weight: This is the amount of force required to pull the string back to your anchor point. Don’t just use the number written on the limbs (e.g., 40# @ 28″). That number is a standard. If your draw length is longer than 28″, your draw weight will be higher. If it’s shorter, it will be lower. The best way to know for sure is to use a bow scale, which you can find at any archery pro shop.
- Your Draw Length: This is the distance from the nock point on the string to the throat of the bow’s grip when you are at full draw. You can measure this by standing with your arm out, making a fist, and having a friend measure from your knuckles to the corner of your mouth. An accurate measurement is key.
Step 2: Check Your Bow’s Center Cut
Now, determine what kind of center cut your bow has. Nock an arrow, hold the bow out, and look down the string from behind.
- If the arrow tip points inside the string, it’s cut past center.
- If the arrow tip lines up perfectly with the string, it’s cut to center.
- If the arrow tip points outside the string, it’s not cut to center.
This piece of information is crucial for the next step.
Step 3: Use an Arrow Spine Chart
Arrow manufacturers provide charts that do all the hard work for you! These charts cross-reference your draw weight and arrow length (which is usually your draw length plus an inch or two) to recommend the correct static spine.
Here’s how to use one:
- Find a reliable spine chart online. A great resource is the Easton Archery Shaft Selector, which is widely trusted in the industry.
- On the chart, find your actual draw weight along one axis.
- Find your arrow length along the other axis.
- The box where they intersect will show you the recommended spine number (e.g., 500, 400).
Crucial Tip: Most charts are designed for modern bows that are cut past center. If your bow is cut to center or not cut to center, you will need to select a weaker spine than what the chart recommends. A good rule of thumb is to go one or two steps weaker (e.g., if the chart says 400, try a 500 or 600). When in doubt, ask an expert at your local pro shop for help.
Step 4: The Paper Tuning Test (Your First Tuning Method)
Once you have your arrows, you can perform a simple test to see how well they are matched to your bow. This is called “paper tuning,” and it gives you instant feedback on your arrow flight.
What You’ll Need:
- A large wooden frame or cardboard box with the middle cut out.
- A sheet of newspaper or butcher paper taped over the frame.
- Your bow and arrows.
- A safe backstop behind the paper!
How to Do It:
- Set up the paper frame about 6-8 feet in front of a safe target.
- Stand about 10-15 feet away from the paper.
- Shoot an arrow straight through the center of the paper and into the target behind it.
- Carefully examine the tear the arrow made in the paper.
Interpreting Your Paper Tear (for a Right-Handed Archer)
The shape of the tear tells you everything about your spine match. (For left-handed archers, just reverse the left/right results).
- A Perfect “Bullet Hole”: If you see a clean hole with three small slits from the fletching, congratulations! Your arrow spine is perfectly matched to your bow. Your arrows are flying straight.
- A Left Tear: If the tear is a long slit to the left of the main hole, it means the back of your arrow (the nock) is kicking out to the right. This indicates your arrow spine is too stiff. The arrow isn’t bending enough to get around the riser.
- A Right Tear: If the tear is a long slit to the right of the main hole, it means the back of your arrow is kicking out to the left. This indicates your arrow spine is too weak. The arrow is over-bending as it goes around the riser.
How to Fix a Bad Tear
If you don’t get a perfect bullet hole, don’t panic! You can make small adjustments to fine-tune your setup.
- To fix a stiff arrow (left tear): You need to make the arrow behave weaker. You can do this by increasing your arrowhead weight (e.g., switch from a 100-grain tip to a 125-grain tip), increasing your draw weight slightly, or leaving your arrows slightly longer.
- To fix a weak arrow (right tear): You need to make the arrow behave stiffer. You can do this by decreasing your arrowhead weight (e.g., switch from 125 grains to 100 grains), decreasing your draw weight, or shortening your arrows (do this carefully and in small increments!).
Making one of these small changes and re-testing is the essence of bow tuning. It’s a satisfying process that puts you in complete control of your accuracy.
Frequently Asked Questions About Center Cut and Arrow Spine
What happens if my arrow spine is too weak?
If your arrow spine is too weak (too flexible), it will over-bend when shot. For a right-handed archer, this will cause the arrow to fly significantly to the right of where you are aiming. It can also lead to poor arrow flight, wobbling, and in extreme cases, the arrow could even break upon release, which is very dangerous.
What happens if my arrow spine is too stiff?
If your arrow spine is too stiff, it won’t bend enough to clear the riser cleanly. For a right-handed archer, this will cause the arrow to fly to the left of your target. Your groups will be inconsistent, and you’ll struggle with accuracy, especially at longer distances.
Can I shoot any arrow from my bow?
No, and it’s a critical safety issue. You must shoot arrows that are correctly spined for your bow’s draw weight and your draw length. Shooting a dangerously underspined (weak) arrow from a powerful bow can cause the arrow to shatter on release, potentially causing serious injury. Always use a spine chart to find the right arrows for your setup.
Does center cut matter for compound bows?
Yes, but in a different way. Virtually all modern compound bows are cut well past center. This is part of their design for maximum efficiency and forgiveness. When tuning a compound bow, you adjust the arrow rest left or right to achieve a perfect “center shot” rather than changing arrow spines to match a fixed riser. However, you still must select the correct arrow spine for the bow’s massive power and speed.
How do I know if my bow is cut past center?
The easiest way is to nock an arrow and look down the string from behind the bow. If the bow is at rest (not drawn), and the arrow tip is pointing to the inside of the bowstring (left for a righty, right for a lefty), your bow is cut past center. If it lines up perfectly, it’s cut to center.
Is a higher spine number stiffer or weaker?
This is a common point of confusion! A higher spine number (e.g., 600, 700) means the arrow is WEAKER and more flexible. A lower spine number (e.g., 340, 400) means the arrow is STIFFER. Remember: Low Number = Stiff. High Number = Flexible.
What is the easiest way to start tuning my bow and arrows?
Start by getting the fundamentals right. Use a trusted spine chart to buy the correct arrows for your draw weight and length. Then, try the paper tuning test. It’s a simple, visual way to see if you need to make small adjustments, like changing your arrow point weight. This one test will solve 90% of tuning problems for beginners.
Your Journey to Perfect Arrow Flight Starts Now
See? Center cut and arrow spine aren’t so complicated after all. They are simply two halves of a perfect partnership. Your bow’s center cut creates the question, and your arrow’s spine provides the answer. When you match them correctly, your arrows will fly truer, your groups will get tighter, and your confidence will soar.
Don’t be afraid to experiment. Buy a pack of arrows based on a spine chart, grab a few different weights of field points, and spend an afternoon paper tuning. The feeling of seeing that perfect bullet hole tear is incredibly rewarding. It’s the moment you go from just shooting a bow to truly understanding how it works.
Remember, every archer starts right where you are. Be patient, stay safe, and enjoy the process. Happy shooting!