How to Make a Fiberglass Takedown Bow: Step-by-Step Guide
Making a fiberglass takedown bow is a rewarding project for anyone passionate about archery, craftsmanship, or DIY. This type of bow is not only strong and reliable but also portable due to its takedown design, you can easily break it down into parts for travel or storage. Unlike traditional wooden bows, a fiberglass takedown bow offers increased durability and consistent performance, even in changing weather. Building one yourself gives you the chance to customize its look, draw weight, and length, making it truly your own.
But don’t be fooled, this is a project that requires careful planning, the right materials, and attention to detail. You’ll need to understand both the function and structure of modern bows, and be willing to invest time in each step.
In my experience, beginners often miss small but crucial details, like limb alignment or proper glue-up methods, that can make or break the finished bow.
This guide will walk you through everything you need to know, from selecting materials to final tuning. Whether you’re new to bow making or have some woodworking background, you’ll find clear, practical advice here. Let’s get started on building a fiberglass takedown bow you can be proud of.
Understanding The Fiberglass Takedown Bow
A takedown bow is a type of recurve or longbow that can be separated into three main parts: the riser (handle) and two limbs. Fiberglass is used for the limbs because it’s flexible, strong, and resists changes from humidity or temperature. The takedown design allows archers to switch limb sets for different draw weights, or replace damaged limbs without buying a whole new bow.
Key Advantages
- Portability: Easy to disassemble and transport.
- Customization: You can change limbs to adjust draw weight or length.
- Durability: Fiberglass resists warping, cracking, or water damage.
- Consistent Performance: Less affected by environmental changes than wood-only bows.
Essential Parts
- Riser: The central handle, usually made from hardwood or laminated plywood.
- Limbs: The flexible arms that bend when the string is drawn, typically layered with fiberglass and wood or foam cores.
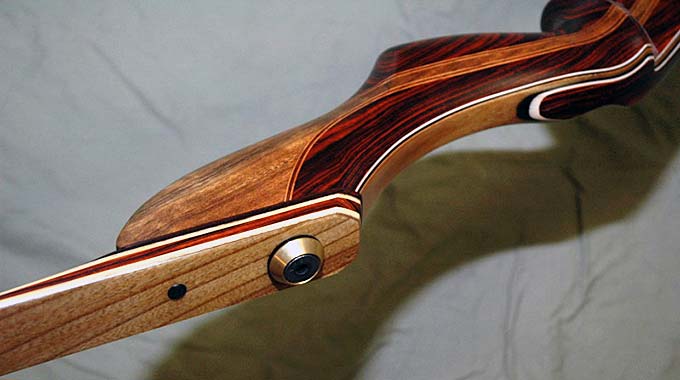
- Limb bolts and bushings: Secure the limbs to the riser for easy assembly/disassembly.
- String: Usually made from Dacron or Fast Flight material.
Let’s look at the most common materials used in these bows:
| Component | Common Materials | Purpose |
|---|---|---|
| Riser | Hardwood, Plywood, Micarta | Strength, aesthetics, stability |
| Limbs | Fiberglass, Maple, Foam | Flexibility, energy storage |
| String | Dacron, Fast Flight | Durability, speed |
Tools And Materials You’ll Need
Before you start, gather all the necessary tools and materials. Quality matters, using the right supplies will make construction smoother and your bow more reliable.
Tools
- Jigsaw or bandsaw: For cutting the riser and limb shapes.
- Drill and drill bits: For hardware holes.
- Files and rasps: For shaping and smoothing.
- Clamps: Essential for glue-ups.
- Sandpaper (80, 400 grit): For finishing.
- Epoxy glue: For strong, permanent bonding.
- Measuring tape and ruler: For accurate sizing.
- C-clamps or bow press: To form and set the limbs during curing.
Materials
- Fiberglass strips: 1.5, 2 inches wide, 1/16 inch thick is standard.
- Hardwood or laminated plywood: For the riser, about 18 inches long, 2 inches wide, and 1.5 inches thick.
- Core wood (maple or bamboo): For the limb core, 1/8, 1/4 inch thick strips.
- Limb bolts and bushings: Usually 5/16 inch.
- Bowstring material: Dacron or Fast Flight.
- Finish (varnish or polyurethane): For protection.
Pro Tip: Buy extra fiberglass and core wood, as mistakes are common when cutting or gluing for the first time.
Credit: www.youtube.com
Planning Your Bow Design
A successful fiberglass takedown bow starts with a clear plan. Bow dimensions and draw weight depend on your body size, strength, and intended use (target shooting or hunting).
Determining Bow Length
The average takedown recurve bow length is between 58 and 62 inches. If you’re taller or have a longer draw length (over 29 inches), aim for a bow length at the higher end.
Choosing Draw Weight
Draw weight is the force needed to pull the string back to anchor point (usually 28 inches). Beginners often start with 25, 35 lbs for target shooting. For hunting, 40 lbs or more is common.
Sketching Your Bow
Draw full-size templates on paper or cardboard for the riser and limbs. Mark the limb bolt holes and alignment points. This helps visualize the final shape and ensures balance.
Pro Tip: Double-check symmetry. Uneven limbs or riser holes lead to poor performance or even dangerous failures.
Shaping The Riser
The riser is the heart of your takedown bow. It must be comfortable to hold and strong enough to withstand stress.
Cutting The Riser
- Trace your template onto your hardwood or plywood block.
- Cut out the rough shape using a jigsaw or bandsaw.
- Mark the limb bolt locations precisely at each end.
Shaping And Smoothing
Use files and rasps to round the grip, sculpt finger grooves, and remove sharp edges. Progressively sand with finer grits (start with 80, finish with 220).
Drilling Holes
Drill the limb bolt holes straight and true. If the holes are even slightly off, your limbs won’t align correctly. Add bushings if your hardware requires them.
Pro Tip: Test fit bolts and bushings before gluing, fix any fit issues early.
Adding Cutouts And Features
Some risers have cutouts for lighter weight or aesthetic appeal. These are optional but can improve balance.
Building The Limbs
This stage requires patience and attention to detail. The limbs must be flexible, strong, and matched in thickness and shape.
Preparing Limb Cores
Cut two strips of maple or bamboo to your limb length and width (typically 1. 5, 2 inches wide, 24, 28 inches long). Sand the surfaces smooth.
Laminating Fiberglass And Core
- Clean all bonding surfaces with acetone or alcohol.
- Apply epoxy glue evenly to both sides of the core and fiberglass.
- Stack the layers: Fiberglass on the outside, wood core in the middle.
- Clamp the assembly between two straight boards (use wax paper to prevent sticking). Apply even pressure.
- Cure for 24 hours at room temperature.
Pro Tip: Use a form or mild curve in the clamping process to pre-bend the limbs for better performance.
Shaping The Limbs
After curing, trace your limb template onto the blank. Cut out the limb shape, tapering gently from the riser end to the tip.
Sand edges smooth and ensure both limbs are identical in shape and thickness. Small differences can affect accuracy and feel.
Drilling Limb Bolt Holes
Mark and drill holes at the limb butt for mounting to the riser. Double-check alignment with the riser holes.
Attaching Limbs To The Riser
The takedown system uses limb bolts, bushings, and sometimes alignment pins.
Installing Bushings
Press-fit or glue bushings into the riser. Make sure they are perfectly perpendicular to the riser face.
Bolting On Limbs
Align the limb holes with bushings and insert bolts. Tighten firmly, but don’t overtighten, fiberglass can crack under too much pressure.
Checking Alignment
Sight down the length of the bow. The string groove, limb tips, and riser should all be perfectly straight. If not, sand or adjust until everything lines up.
Shaping And Finishing
This is where your bow starts to look and feel professional.
Rounding And Smoothing
Sand all surfaces again, moving from 220 grit up to 400 for a smooth feel. Pay special attention to the grip and limb edges.
Adding Nock Grooves
Use a small round file to cut string nocks at each limb tip. Make sure they are centered and smooth to avoid string wear.
Finishing
Apply several coats of clear varnish or polyurethane. This protects the wood and fiberglass from moisture and damage. Let each coat dry fully and sand lightly between coats.
Pro Tip: A well-finished bow is easier to maintain and lasts much longer.
Making And Attaching The String
The string is critical for safe and efficient shooting.
Measuring String Length
String length is typically bow length minus 3, 4 inches for a recurve design. For example, a 62-inch bow uses a 58, 59 inch string.
Making The String
You can buy a ready-made Dacron string or twist your own using a string jig and serving tool. Beginners often prefer the first option for reliability.
Stringing The Bow
Use a bow stringer tool, never string by hand, as it can twist or damage the limbs. Check the brace height (distance from string to grip) matches your design (usually 7, 9 inches).
Tuning And Testing
A well-tuned bow is accurate, smooth, and safe.
Checking For Limb Twist
With the bow strung, look down the string at each limb. Both should be straight, with no twist. If you see a twist, carefully adjust by sanding or re-gluing, or remake the limb if severe.
Adjusting Brace Height
Test different brace heights by twisting the string to shorten or lengthen it. The right height reduces hand shock and noise.
Shooting Test
Start with light arrows. Shoot at a safe target and listen for unusual sounds. The draw should feel smooth, and arrows should fly straight.
If you notice vibration, noise, or poor grouping, check for misalignment or rough spots on the limbs and riser.
Comparison: Fiberglass Takedown Bow Vs. One-piece Bow
Understanding the pros and cons helps you appreciate your project’s benefits.
| Feature | Fiberglass Takedown Bow | One-Piece Bow |
|---|---|---|
| Portability | High, easy to pack | Low, full length always |
| Customizability | Swap limbs, adjust draw weight | Fixed design |
| Durability | Excellent (fiberglass/wood) | Good (wood) |
| Maintenance | Easy, replace limbs | Harder, repair whole bow |
Credit: buildyourownbow.com
Common Mistakes And How To Avoid Them
- Poor limb alignment: Causes twisted shots or limb failure. Always check alignment before glue-up.
- Uneven limb thickness: Makes one limb stiffer, causing inaccurate shots. Use calipers to measure.
- Inadequate glue coverage: Leads to delamination. Spread epoxy evenly and clamp tightly.
- Overtightening bolts: Can crack fiberglass. Tighten firmly but stop if you feel resistance.
Pro Tip: Keep a build journal to track measurements and steps, this helps troubleshoot if problems arise.
Safety Tips For Diy Bow Making
- Wear safety goggles when cutting or sanding.
- Use a mask when sanding fiberglass, dust is harmful.
- Work in a well-ventilated space when using epoxy.
- Never overdraw the bow (pulling farther than designed).
- Inspect the bow for cracks before each use.

Credit: www.youtube.com
Maintenance Tips
A well-cared-for bow can last decades.
- Store unstrung in a cool, dry place.
- Wipe down after use, especially if wet.
- Check bolts and bushings regularly.
- Refinish with clear coat if you see wear.
- Replace the string every 1, 2 years or if frayed.
Where To Learn More
If you want to advance your skills, consider joining an archery club or checking out respected guides like the Bow and Arrow Wikipedia page. Hands-on experience and advice from veteran bowyers are invaluable.
Frequently Asked Questions
How Long Does It Take To Make A Fiberglass Takedown Bow?
For a beginner, expect the process to take 20, 30 hours spread over several days. This includes time for curing epoxy and careful sanding. Experienced builders can finish in less time, but rushing leads to mistakes.
Can I Use Only Hand Tools For This Project?
Yes, it’s possible to make a fiberglass takedown bow with just hand tools like saws, rasps, and files. However, power tools speed up the process and help with precision. Using hand tools may require more patience, especially during shaping and sanding.
What Type Of Finish Is Best For A Fiberglass Takedown Bow?
A clear polyurethane or marine varnish works well. These finishes protect against moisture and UV damage, and are durable under outdoor conditions. For a more natural look, some builders use tung oil, but it offers less protection than synthetic finishes.
How Do I Know What Draw Weight Is Right For Me?
As a rule of thumb, most adult beginners are comfortable with 25, 35 lbs for target shooting. If you plan to hunt, local laws may require a minimum draw weight (often 40 lbs or more). Try pulling different weights at a local shop before building your own.
Are There Special Arrow Requirements For Fiberglass Takedown Bows?
Fiberglass bows can shoot both wooden and carbon arrows. Make sure your arrows are the correct spine (stiffness) for your bow’s draw weight. Using arrows that are too weak or too strong can affect accuracy and safety. Consult an archery pro for arrow selection.
Building your own fiberglass takedown bow is both challenging and satisfying. Each step, from design to final tuning, teaches you new skills and brings you closer to the art of archery. With patience, careful work, and the guidance in this article, you’ll create a bow that’s uniquely yours, ready for the range, the woods, or simply to hang proudly on your wall.