What Spine Arrow Should I Shoot With My Traditional Recurve?
Choosing the right spine arrow for your traditional recurve bow is one of the most important steps for accurate and enjoyable archery. The arrow’s “spine” is not about its look or decoration, it’s about how much the shaft bends when the bow launches it. This detail can make the difference between hitting the bullseye and missing the target completely. Many new archers overlook spine, but the right arrow spine gives you better grouping, less frustration, and a safer shooting experience.
If you’ve just picked up a traditional recurve, you might feel lost looking at numbers like 400, 600, or 800 on arrow labels. You may wonder why your arrows seem to fly left or right even though your form feels good. Or maybe you’re trying to tune your setup but can’t get tight groups. The answer often lies in matching your arrow spine to your bow’s needs and your shooting style.
Let’s break down what spine means, why it matters, and how you can confidently pick the best arrows for your traditional recurve, whether you’re a backyard shooter, a serious target archer, or a bowhunter.
Understanding Arrow Spine: The Basics
Arrow spine is the measure of how much an arrow flexes. When you release the string, the arrow bends around the bow before straightening out mid-flight. This flex is called the archer’s paradox. If the arrow is too stiff or too weak (flexible) for your setup, it won’t fly straight.
There are two main types of spine:
- Static spine: How much the arrow bends when weight is hung from the center.
- Dynamic spine: How much the arrow bends in real shooting conditions, affected by your bow’s power, your release, and arrow setup.
Manufacturers usually label arrows by static spine, for example, a “500 spine” arrow bends 0. 5 inches under a set weight. A “400 spine” is stiffer, and a “600 spine” is more flexible.
Why Spine Matters On A Traditional Recurve
Unlike compound bows, traditional recurves don’t have a release aid or precise centershot. Your fingers cause the string to move sideways, and the arrow must bend just right to clear the riser and fly true. The wrong spine causes arrows to “porpoise” (go up and down) or “fish-tail” (go side to side).
- Too stiff: The arrow will usually hit to the left (for right-handed shooters) and feel hard to tune.
- Too weak: The arrow will hit right, may slap the bow, and fly unpredictably.
Getting spine right is critical for good arrow flight, tight groups, and even bow safety.
Factors That Affect Arrow Spine Choice
No two archers are the same. The best arrow spine for your traditional recurve depends on several variables:
Bow Draw Weight
The most important factor is your bow’s draw weight at your draw length. Higher draw weights need stiffer (lower number) arrows. Lower draw weights need more flexible (higher number) arrows.
Example:
If your bow is 40 lbs at your draw length, you’ll need a spine in the 500, 600 range. If it’s 30 lbs, 700, 800 spine may be better.
Your Draw Length
Draw length changes the force applied to the arrow. Longer draws mean more force, so you may need a slightly stiffer arrow than charts suggest.
Arrow Length
Longer arrows flex more than short arrows of the same spine rating. If you shoot arrows longer than your draw length, you may need to go stiffer.
Point Weight
Heavier points (arrow tips) make the arrow flex more. If you use 150 grain tips instead of 100 grain, your arrow will act “weaker. ” You may need a stiffer spine to compensate.
Bow Design And Material
Traditional recurves vary. Some have cut-past-center risers, some don’t. A bow that’s not cut to center (more “traditional”) needs slightly weaker spined arrows. Wood bows often require different tuning than modern ILF metal risers.
Release And Shooting Style
Archers with a very “clean” release may get away with slightly weaker arrows. If your release is rough, a stiffer arrow can help.
Pro Tip: Always start with the manufacturer’s spine chart, but use it as a guide, not a rule. Testing is key.
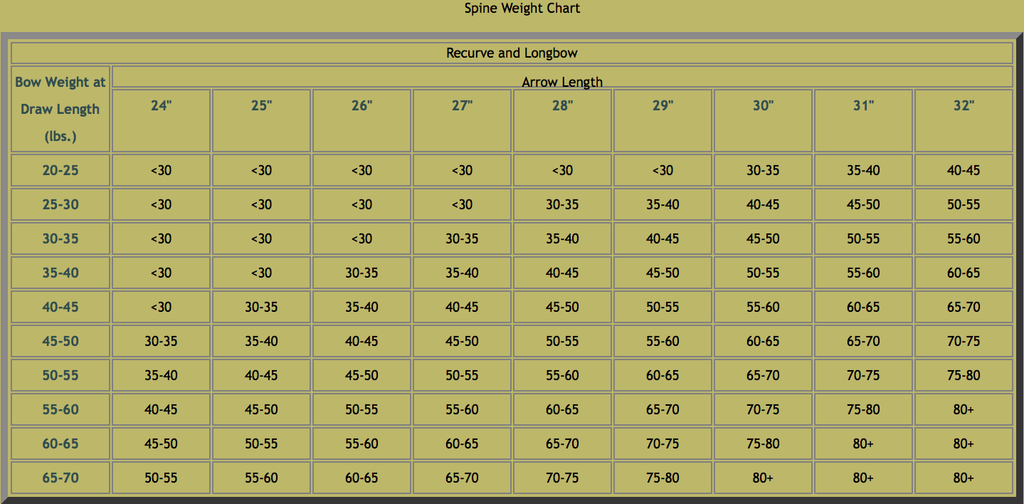
How To Read And Use Arrow Spine Charts
Most arrow brands publish spine charts. These tables cross-reference your bow’s draw weight and your arrow length, then recommend a spine.
Below is a typical example for traditional recurves:
| Bow Draw Weight | Arrow Length | Recommended Spine |
|---|---|---|
| 25, 30 lbs | 28, 30 inches | 800, 1000 |
| 31, 35 lbs | 28, 30 inches | 700, 800 |
| 36, 40 lbs | 28, 30 inches | 600, 700 |
| 41, 45 lbs | 28, 30 inches | 500, 600 |
| 46, 50 lbs | 28, 30 inches | 400, 500 |
Always double-check the chart for your specific arrow brand, as spine numbers can change slightly between manufacturers.
Adjusting For Your Setup
- If your arrows are longer than the chart, go stiffer.
- If you use heavy points (over 125 grains), go stiffer.
- If your bow is not cut to center, go weaker.
- If your release is rough, go stiffer.
When in doubt, buy a test kit with several spine options. Shooting and observing flight is the best way to find your perfect match.
Carbon Vs. Wood Vs. Aluminum Arrows: Spine Differences
The material of your arrow affects spine and performance. Here’s a quick comparison:
| Material | Typical Spine Range | Best For | Notes |
|---|---|---|---|
| Carbon | 250, 1000 | Target, hunting, beginners | Consistent, durable, easy to find |
| Wood | 30, 80 lbs (spine in lbs) | Traditionalists, historical shooting | More spine variation, needs careful selection |
| Aluminum | 1816, 2016 (Easton code) | Target, indoor, some hunting | Good consistency, can bend on impact |
Carbon arrows are the most popular for modern recurve shooters. Their spine numbers are easy to compare. Wood arrows use a different system, spine is measured in pounds, not numbers. Aluminum arrows use a code (like 1916), which refers to diameter and wall thickness.
Pro Tip: If you switch arrow materials, re-check your spine requirements. Carbon arrows that work for you may not have an exact wood or aluminum match.
Tuning Your Arrow Spine For Traditional Recurve
Even after following charts, your arrows may need fine-tuning. Here are key steps for tuning with a traditional recurve:
1. Bare Shaft Test
Shoot an un-fletched (no feathers) arrow at 10, 15 yards. Compare where it lands versus your fletched arrows.
- If the bare shaft hits left (for right-handed shooters), arrows are too stiff.
- If the bare shaft hits right, arrows are too weak.
Adjust your arrow spine, point weight, or arrow length as needed.
2. Paper Tuning
Shoot through a paper sheet 6, 10 feet from the bow.
- A clean hole means good arrow flight.
- Tears left/right show spine issues.
3. Group Tuning
Shoot groups at 15, 20 yards. The arrows that group tightly and fly straight (no fishtailing or porpoising) are best.
Example: In my experience, even a 0.1 inch change in arrow length can move a bare shaft hit by an inch or more at 20 yards. Fine-tuning is worth the effort.
4. Small Adjustments
- Try heavier or lighter points to see how flight changes.
- Trim arrows 1/4 inch at a time for stiffer spine.
- Switch to a lighter or heavier nock if needed.
Tuning is a process, spend time and keep notes.
Common Mistakes When Choosing Arrow Spine
Many beginners make errors that hurt their shooting and confidence. Here are pitfalls to avoid:
- Ignoring Draw Length: Assuming your bow’s rated weight is your draw weight. Always measure your own draw length.
- Overestimating Bow Power: Choosing arrows for a higher draw weight than you actually pull back.
- Using the Wrong Chart: Not all spine charts are the same. Use the one for your arrow brand and model.
- Skipping Bare Shaft Testing: Relying on fletching to “fix” poor spine, which hides tuning problems.
- Forgetting About Point Weight: Adding heavy points later without adjusting spine.
- Mixing Arrow Materials: Comparing carbon and wood spine numbers directly, they use different systems.
Warning: Shooting arrows that are much too weak for your bow can cause the arrow to break, which is dangerous. Always check manufacturer guidelines.
How To Measure Your Draw Length And Bow Weight
To get the right arrow spine, you must know your draw length and actual draw weight at that length.
Measuring Draw Length
- Stand upright, arms extended to the sides.
- Measure fingertip-to-fingertip in inches.
- Divide by 2.5 for a rough estimate.
Or, draw your bow with an arrow marked in inches and have a friend read where the arrow meets the riser.
Measuring Actual Draw Weight
Most bows are rated at 28 inches. If your draw is shorter or longer, the draw weight changes. Use a bow scale at your full draw to get the real number.
Example: A bow marked 40 lbs at 28 inches is about 37 lbs at 27 inches, and 43 lbs at 29 inches.
The Arrow Spine Numbering System Explained
Carbon and aluminum arrows use a numbering system, but it confuses many archers at first.
- Carbon arrows: The number (e.g., 500) is how much the arrow bends under a set weight. Lower numbers = stiffer.
- Aluminum arrows (Easton): The first two digits are the diameter (in 64ths of an inch), the last two are wall thickness (in thousandths).
For wood arrows, spine is usually measured in pounds (e. g. , “spined at 40, 45 lbs”) and should match your bow’s draw weight.
Credit: www.rosecityarchery.com
Practical Examples: Matching Arrow Spine To Traditional Recurve Setups
Let’s look at a few real-world cases to bring it all together:
Example 1: 30-lb Recurve, 28-inch Draw
- Bow: 30 lbs @ 28 inches
- Arrow length: 29 inches
- Point: 100 grains
Recommended spine: 700, 800 carbon, or wood arrows spined at 30, 35 lbs.
Example 2: 45-lb Recurve, 29-inch Draw, Heavy Points
- Bow: 45 lbs @ 29 inches (actual draw weight ~48 lbs)
- Arrow length: 30 inches
- Point: 150 grains
Recommended spine: 400, 500 carbon, or wood arrows spined at 50, 55 lbs.
Example 3: 40-lb Traditional Longbow, Off-the-shelf
- Bow: 40 lbs @ 28 inches, not cut to center
- Arrow length: 28.5 inches
- Point: 125 grains
Recommended spine: 600, 700 carbon, or 40, 45 lbs wood, but consider going slightly weaker to compensate for the bow design.
Arrow Spine And Hunting Vs. Target Shooting
If you’re hunting with a traditional recurve, spine selection is even more critical. Broadheads (hunting tips) are heavier and less forgiving of poor arrow flight. Over-spined (too stiff) or under-spined (too weak) arrows can cause missed shots or poor penetration.
For hunting, slightly stiffer arrows are safer, but always tune for your setup. For target shooting, you can be more flexible, but consistency is key.
Credit: goldtip.com
Fine-tuning And The Importance Of Personal Testing
No chart or article can replace hands-on testing. Even two bows of the same model may prefer different arrows due to tiny differences. Your release, grip, and even local humidity (for wood arrows) can change ideal spine.
- Try different spines before buying a full dozen.
- Record your results in a notebook.
- Don’t chase perfection: If your groups are tight and your arrows fly true, you’re on the right track.
Pro Tip: If you are stuck between two spine options, most traditional archers prefer to go slightly stiffer, as arrows can be made weaker (by adding point weight or cutting longer), but not stiffer.
Useful Resources For Traditional Archers
For more in-depth information on arrow spine, tuning, and traditional archery, the Archery Trade Association provides a solid guide.

Credit: www.youtube.com
Frequently Asked Questions
What Happens If I Shoot The Wrong Arrow Spine?
Shooting arrows that are too stiff or too weak can cause poor accuracy, wild arrow flight, and even safety risks. Overly weak arrows may break upon release. Stiff arrows can damage your bow or cause inconsistent grouping.
Can I Use The Same Spine Arrows For Different Bows?
It depends on each bow’s draw weight, design, and your draw length. If both bows are similar in setup, you may use the same arrows. But if there’s a big difference, you’ll need to select spine for each bow.
How Does Arrow Spine Affect Penetration On Game Animals?
Correct spine ensures the arrow flies straight, which is vital for deep penetration. If the spine is wrong, the arrow may hit at an angle, wasting energy and reducing penetration, especially with broadheads.