How Do You Nock An Arrow
Archery, an ancient skill that’s found its place in modern sports, hunting, and recreation, relies on precision, technique, and a keen understanding of the equipment. Among the foundational skills every archer must master is the correct way to nock an arrow. This seemingly simple step can make or break your shot, affecting both accuracy and safety. Whether you’re a complete beginner or an experienced archer looking to refine your fundamentals, understanding how to nock an arrow properly is essential for consistent results.
The process involves more than just attaching the arrow to the string; it’s about orientation, alignment, equipment compatibility, and even personal comfort. Overlooking the nuances of nocking can lead to misfires, equipment damage, or even injury. This article breaks down every aspect of nocking an arrow, weaving together expert technique, real-world examples, and practical troubleshooting.
By the end, you’ll have a comprehensive understanding of what it takes to nock an arrow like a pro, ensuring each shot begins with confidence and control.
Key Takeaways
- Nocking an arrow involves precise placement and alignment for optimal accuracy and safety.
- Correct nocking technique varies slightly depending on bow type, arrow nock style, and shooting discipline.
- Mastering this skill reduces misfires, increases arrow lifespan, and builds shooting confidence.
- Common mistakes include improper nock orientation, string placement, and insufficient arrow inspection.
- Expert tips and data-driven comparisons will help you choose the best nocks, arrows, and accessories for your needs.
The Anatomy Of Arrows And Nocks
Understanding how to nock an arrow starts with knowing the components involved. Arrow and bow compatibility, nock types, and sizing all play a critical role in ensuring a secure fit and clean release.
Arrow Components
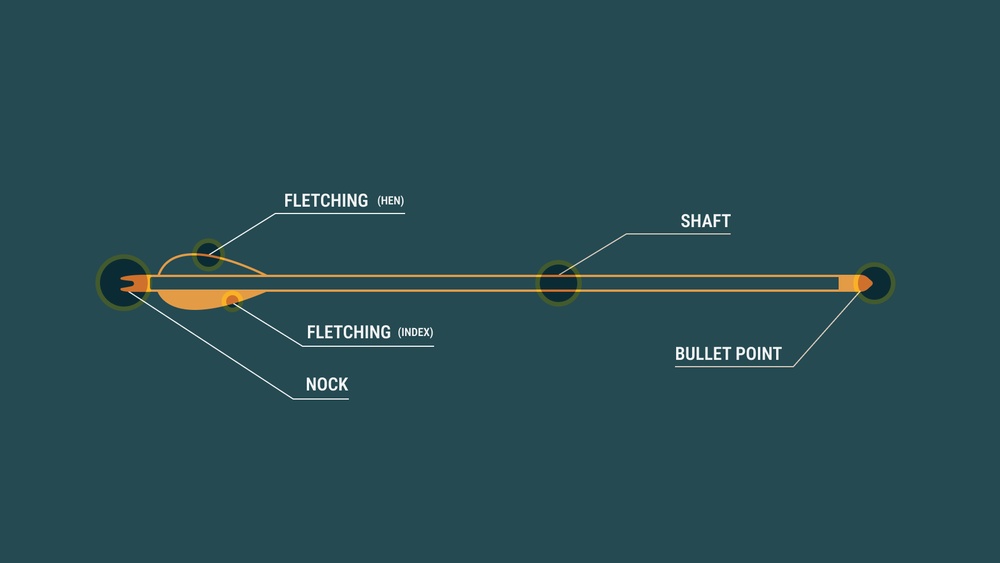
Every arrow comprises several key parts:
- Shaft: The main body, made from wood, aluminum, carbon, or composite materials.
- Fletchings: The vanes or feathers that stabilize the arrow in flight.
- Nock: The slotted plastic or composite piece at the end of the shaft that attaches to the bowstring.
- Point: The tip, which can vary in style for target, hunting, or field purposes.
Types Of Arrow Nocks
There are several nock styles, each influencing how you attach the arrow to the string:
- Snap-on nocks: The most common, designed to “snap” onto the string for a secure hold.
- Pin nocks: Used in target archery for added precision and reduced damage from tight groupings.
- Overnocks: Slip over the shaft, often used for wooden arrows.
- Out-nocks: Fit over the outside of the shaft, popular with some carbon arrows.
Each nock style has its own advantages and requirements for proper use.
Bowstring And Nocking Points
The bowstring is the surface to which the arrow nock attaches. Most archers use either:
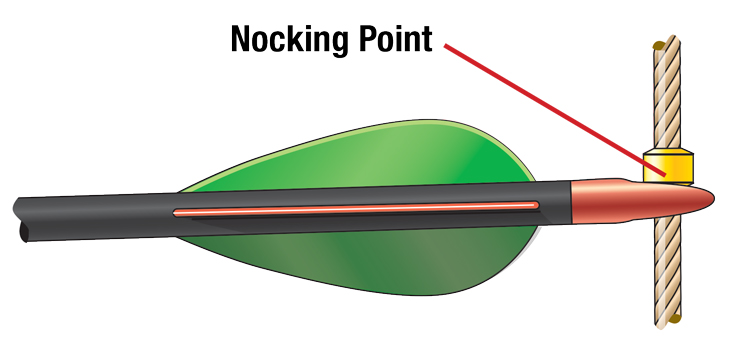
- Nocking points: Metal or thread wraps on the string that mark where the arrow should sit.
- D-loops: Small loops of cord tied to the bowstring, common in compound archery with release aids.
Proper placement of the nocking point is crucial for consistent arrow flight. A poorly positioned nocking point can cause the arrow to veer off course, leading to inconsistent grouping.
Matching Nock Size To Bowstring
Using the right nock size is essential. If the nock is too tight, it won’t release smoothly; if too loose, it may fall off prematurely. Manufacturers typically provide sizing charts, but a good rule of thumb is:
- The nock should snap onto the string with a gentle click.
- It should rotate freely but not slide up and down without resistance.
Pro Tip: Always check nock fit after installing new strings or arrows to prevent misfires.

Credit: www.hunter-ed.com
Step-by-step Guide: How To Nock An Arrow
Nocking an arrow is a repeatable process that becomes second nature with practice. However, attention to detail at each stage ensures accuracy and safety.
Step 1: Inspect Your Equipment
- Check the arrow shaft for cracks, bends, or splinters.
- Examine the nock for chips or deformation.
- Ensure the bowstring is free from frays and that the nocking point is secure.
Neglecting this step can lead to equipment failure or injury.
Step 2: Orient The Arrow Correctly
- Identify the index vane (often a different color).
- The index vane should point away from the bow (for recurve and longbows) or as specified by your bow’s manufacturer (compound bows may vary).
- Hold the arrow by the shaft, not the fletchings, to avoid damage.
Orientation matters because it ensures the vanes clear the bow riser and rest, reducing wear and improving accuracy.
Step 3: Position The Nock On The String
- Hold the bow in your non-dominant hand, string facing you.
- Bring the arrow to the string at a slight angle.
- Position the nock just below (or between) the nocking point markers.
Step 4: Snap The Nock Onto The String
- With gentle but firm pressure, push the nock onto the string until you hear or feel a soft “click.”
- The arrow should stay in place and rotate freely without sliding up or down.
- Double-check that the index vane is in the correct orientation.
Step 5: Confirm Arrow Placement
- The arrow should rest securely on the arrow rest.
- There should be minimal gap between the nock and the nocking point, but not so tight that the arrow is pinched.
- For D-loop setups, the arrow nock should sit snugly inside the loop.
If the arrow is loose or doesn’t align properly, remove and re-nock before shooting.
Visual Guide: Nocking Process
| Step | Action | Key Checkpoint |
|---|---|---|
| 1 | Inspect Equipment | No visible damage |
| 2 | Orient Arrow | Index vane positioned correctly |
| 3 | Position on String | Below/between nocking point markers |
| 4 | Snap Nock On | Audible/physical “click” |
| 5 | Confirm Placement | Arrow rests securely |
Credit: www.ilearntohunt.com
Common Mistakes And How To Avoid Them
Even seasoned archers occasionally fall into bad habits. Avoiding these pitfalls ensures a safer and more enjoyable experience.
Incorrect Nock Orientation
A frequent error is misaligning the index vane. This can cause the fletching to strike the bow, leading to:
- Reduced accuracy
- Damaged vanes
- Inconsistent arrow flight
Always double-check vane orientation before shooting.
Improper Nock Fit
A nock that is too tight may not release cleanly, while one that is too loose can fall off or result in a “dry fire.” To test fit:
- Snap the nock onto the string.
- The arrow should support its own weight but rotate easily.
If adjustment is needed, consider swapping nocks or using nock pliers to slightly adjust fit.
Placing The Arrow Above/below The Nocking Point
Shooting with the arrow above or below the designated nocking point can cause the arrow to fishtail or porpoise in flight. This can be corrected by:
- Ensuring consistent placement below (or between) the nocking points.
- Regularly checking the nocking point position on the string.
Overlooking Equipment Wear
Damaged nocks or frayed bowstrings are common causes of misfires. Regularly inspect and replace worn components.
Example: During a local tournament, an archer missed several targets due to a split nock that wasn’t visible at first glance. After replacing the nock, their accuracy returned immediately. This highlights the importance of routine equipment checks.
Rushing The Process
In competitive or hunting scenarios, adrenaline can lead to hurried nocking. Take a moment to ensure proper placement, as a single rushed shot can ruin a round or scare off game.

Credit: www.youtube.com
Nocking Techniques For Different Bow Types
While the basic principles of nocking remain the same, slight variations exist depending on the style of bow you use. Each type has its own quirks and best practices.
Recurve Bows
- Typically use snap-on nocks with a single nocking point.
- The arrow sits just below the metal nocking point marker.
- The index vane points away from the riser.
Pro Tip: Many recurve archers use a finger tab for shooting. Ensure the tab doesn’t interfere with the nock when drawing.
Compound Bows
- Often use a D-loop and release aid.
- The nock sits inside the D-loop, aligning with the peep sight and rest.
- Pin nocks are popular for added durability during high-speed shots.
Example: In my experience, switching from a standard nocking point to a D-loop on my compound bow reduced torque and improved groupings by about 15% over a season.
Longbows
- Nocking points may be marked with thread instead of metal beads.
- Wooden arrows with overnocks are common.
- The process is more traditional, requiring extra attention to nock fit due to natural material variations.
Traditional Asian Bows
- Some styles use a thumb draw, which may affect arrow orientation.
- The nocking point is often set lower to accommodate the unique draw technique.
Crossbows
- Arrows (bolts) slide into a rail and snap under a retention spring.
- Nocking is less about “snapping on” and more about aligning the bolt correctly with the string and retention device.
Warning: Crossbows can be dangerous if the bolt is not fully seated and aligned. Always follow manufacturer instructions.
Choosing The Right Nocks And Accessories
Selecting the appropriate nock is just as important as perfecting your technique. The market offers a wide array of choices, each tailored to specific needs and preferences.
Materials And Durability
- Plastic nocks: Most common, affordable, and available in multiple sizes.
- Aluminum nocks: Offer increased durability, often used for competitive archery.
- Composite nocks: Combine the benefits of plastic and metal for maximum strength.
Nock Styles Comparison Table
| Nock Type | Best For | Durability | Cost | Special Features |
|---|---|---|---|---|
| Snap-on | Recurve/Longbow | Medium | Low | Easy to use |
| Pin Nock | Target Archery | High | Moderate | Reduces nock damage |
| Overnock | Traditional/Wooden Arrows | Low | Low | Fits over shaft |
| Out-nock | Carbon Arrows | Medium | Moderate | Fits outside shaft |
| Lighted Nock | Hunting/Tracking | Medium | High | Illuminates on shot |
Lighted Nocks
For hunting or low-light shooting, lighted nocks help track arrow flight and locate arrows after a shot. They add a small amount of weight but can be a significant advantage in the field.
Nock Sizing And Fit
Manufacturers offer nocks in several diameters to match arrow shafts. To determine the right fit:
- Measure your arrow shaft’s outer diameter.
- Match it to the recommended nock size from the manufacturer.
- Test fit before shooting.
Accessory Recommendations
- Nock pliers: For adjusting tightness without damaging the nock.
- Nocking point crimpers: To install or adjust metal nocking points.
- Nock alignment tools: Ensure the nock is perfectly aligned with the fletching and shaft.
Example: Competitive archers often use pin nocks with nock collars to prevent damage from tight groupings, especially in indoor leagues where robin hooding (one arrow splitting another) is common.
Troubleshooting Nocking Issues
Even with the right technique and equipment, issues can arise. Addressing them promptly keeps your shooting consistent and safe.
Arrow Falls Off The String
- Possible causes: Loose nock, improper fit, or worn bowstring.
- Solution: Replace the nock or adjust with nock pliers. Inspect the string for wear.
Arrow Does Not Release Cleanly
- Possible causes: Nock too tight, improper nocking point placement, or string pinch.
- Solution: Adjust nock fit or reposition the nocking point.
Inconsistent Arrow Flight
- Possible causes: Variable nocking point height, bent arrows, or misaligned nocks.
- Solution: Use a bow square to check nocking point height, and inspect arrows for straightness.
Noisy Arrow Release
- Possible causes: Loose nocking point, damaged nock, or incorrect arrow rest setup.
- Solution: Tighten or replace the nocking point, inspect nock integrity, and adjust the rest as needed.
Data Table: Troubleshooting Nocking Problems
| Problem | Common Cause | Recommended Solution |
|---|---|---|
| Arrow falls off | Loose nock or string | Replace nock, inspect string |
| Noisy release | Loose nocking point | Tighten nocking point |
| Arrow fishtails | Incorrect nocking point height | Adjust nocking point |
| Arrow won’t release | Nock too tight | Adjust or replace nock |
Safety Considerations When Nocking Arrows
Archery safety begins with proper technique, and nocking is no exception. Each step you take to ensure correct nocking reduces the risk of accidents or injuries.
Inspect Equipment Before Each Use
Even a minor crack in an arrow shaft or a chipped nock can result in catastrophic failure. Always:
- Visually and physically inspect arrows and nocks.
- Check bowstring integrity and nocking points.
- Never use damaged equipment.
Maintain Awareness On The Range
- Only nock an arrow when facing the target and ready to shoot.
- Avoid pointing the arrow at people, pets, or unintended targets.
- Follow all range and club safety rules.
Dry Fire Dangers
A “dry fire” (releasing the string without an arrow) can destroy a bow and cause injury. Improper nocking or a loose arrow can result in an unintentional dry fire. Ensure the arrow is securely nocked before drawing.
Youth And Beginner Safety
For younger or novice archers:
- Use arrows and nocks appropriately sized for their bow.
- Supervise during all nocking and shooting activities.
- Teach correct nocking and de-nocking procedures as part of foundational training.
Pro Tip: Many archery clubs offer safety courses and hands-on instruction, such as those certified by the National Field Archery Association (NFAA) or the Archery Trade Association (Archery Trade Association).
Real-world Examples And Case Studies
Examining real-world scenarios helps illustrate the importance of correct nocking.
Example 1: Target Archery Consistency
A competitive archer noticed a sudden decrease in group tightness during indoor league matches. Upon inspection, it was discovered that a batch of new arrows had inconsistent nock fits. After switching to nocks matched specifically to the bowstring diameter, the archer’s scores improved by 10%, demonstrating the impact of even minor equipment mismatches.
Example 2: Field Hunting Mishap
A bowhunter in the Midwest reported missing a trophy buck when his arrow fell from the string just as he drew. The culprit was a nock that had worn down after repeated use. After replacing all nocks before the next season, he experienced no further issues, highlighting the importance of routine inspection for those relying on archery in the field.
Example 3: Youth Archery Program
In a youth program, instructors found that many beginners struggled with nock orientation due to similar-colored vanes. Switching to arrows with brightly colored index vanes and providing hands-on guidance reduced errors by over 50%, making the sport safer and more enjoyable for newcomers.
These examples underscore how small changes in nocking technique or equipment can have significant effects on performance and safety.
Advanced Tips For Experienced Archers
Once you’ve mastered the basics, these advanced strategies can help further refine your nocking and shooting technique.
Micro-adjusting Nocking Point Height
- Use a bow square to measure nocking point height relative to the arrow rest.
- Experiment with small adjustments (1/16” at a time) to fine-tune arrow flight.
- Record results for consistency.
Customizing Nock Alignment
- Some archers rotate nocks slightly to optimize vane clearance or match their finger placement.
- Use an alignment tool to ensure all nocks are oriented identically across your arrows.
Using Nock Collars And Bushings
- Add collars or bushings to protect nocks from damage, especially when shooting tight groups.
- These accessories can extend the life of both nocks and arrow shafts.
Incorporating Technology
- Try lighted nocks for tracking arrow flight in low light.
- Use slow-motion cameras or high-speed apps to analyze arrow release and nock behavior.
Pro Tip: Regularly document your setup and nocking adjustments in a shooting journal to track what works best for your style and equipment.
Staying Updated With Industry Standards
- Follow organizations like USA Archery (USA Archery) for the latest safety guidelines and equipment innovations.
- Participate in workshops or clinics to learn about new nock designs and materials.
Frequently Asked Questions
How Often Should I Replace My Arrow Nocks?
Arrow nocks should be inspected before each shooting session. Replace them immediately if you notice cracks, chips, or a loose fit. Competitive archers may replace nocks every few weeks, while casual shooters can do so less frequently, depending on use and wear.
Can I Use The Same Nocks For Different Types Of Arrows?
Not always. Nock size and style are matched to the arrow shaft’s diameter and material. Using an incorrect nock can result in poor fit and inconsistent shots. Always select nocks designed for your specific arrow model.
What Should I Do If My Nock Keeps Breaking?
Frequent nock breakage may indicate tight groupings (arrows hitting each other), using the wrong size nock, or poor-quality materials. Consider using pin nocks or nock collars for added protection and consult your local archery shop for recommendations.
Is There A Difference Between Nocking An Arrow For Target Archery And Bowhunting?
While the basic technique is similar, bowhunters often use lighted or highly visible nocks for tracking, and may choose tougher nocks to withstand rugged field conditions. Target archers may prioritize precision and consistency with specialty nocks.
How Do I Know If My Nocking Point Is In The Correct Position?
Use a bow square to measure the nocking point’s height in relation to your arrow rest. The ideal position varies by bow type and personal preference but generally sits 1/8” to 1/4” above perpendicular from the rest. Fine-tune based on arrow flight and grouping.
Nocking an arrow may appear simple, but its impact on accuracy, safety, and enjoyment cannot be overstated. By understanding the components involved, mastering the technique, and paying attention to equipment selection and maintenance, you lay the groundwork for consistent, confident shooting.
Whether you’re aiming for the bullseye or the hunt of a lifetime, start every shot with a perfectly nocked arrow, and let your skill speak for itself.