
Mastering different bow draws is key to unlocking your archery potential, ensuring accuracy and consistency. Learn the fundamental techniques for a smooth, powerful shot that builds confidence and improves your aim, transforming frustration into focused skill.
Learning to shoot a bow is exciting! Many beginners find themselves wondering about the best way to draw their bow. It can feel a bit tricky at first, but with a little guidance, you’ll be drawing smoothly and accurately in no time. This guide will break down the different ways to draw a bow, making it simple and encouraging for anyone starting out. We’ll explore proven methods that are essential for building a solid foundation in archery. Let’s get started on improving your shooting!
Understanding Different Bow Draws: Your Path to Archery Success
When you first pick up a bow, the draw might seem like just pulling the string back. But there’s more to it! How you draw your bow significantly impacts your accuracy, consistency, and overall shooting experience. Understanding the nuances of different bow draws allows you to find what works best for your body and your style of archery. This isn’t about complicated techniques; it’s about building a strong, repeatable motion that makes every shot count. From compound bows to traditional recurves, mastering the draw is a fundamental step that will boost your confidence and fun.
Why Your Bow Draw Matters
Think of the draw as the engine of your shot. A good draw means a smooth release and an accurate arrow. A bad one can lead to jerky movements, inconsistent aim, and even frustration. For beginners, focusing on a proper draw is more important than speed or power. It’s about creating a solid anchor point, using your back muscles correctly, and preparing for a clean release.
Consistency: A repeatable draw motion means your aim will be consistent shot after shot.
Accuracy: Proper technique helps you aim more steadily and release the arrow precisely.
Power: While beginners focus on form, a good draw efficiently transfers energy to the arrow.
Safety: Correctly drawing and holding reduces the risk of accidental drops or misfires.
Comfort: Finding the right draw method makes shooting more enjoyable and less fatiguing.
The Core Components of a Good Bow Draw
Regardless of the specific technique, a few core elements are present in every effective bow draw:
Stance: A stable, balanced stance is the foundation for any shot. Your feet should be shoulder-width apart, with your weight evenly distributed.
Grip: Your bow hand grip should be firm but relaxed. Avoid a death grip, which can cause torque and affect your shot.
Draw Motion: This is the act of pulling the bowstring back. It should be a smooth, controlled movement.
Anchor Point: This is a consistent spot on your face where you bring the drawing hand and string. Common anchor points include the corner of your mouth, your cheekbone, or your jaw.
Hold: Once at full draw and anchored, you’ll hold the bow steady before releasing.
Essential Bow Draw Techniques for Beginners
When we talk about “different bow draws,” we’re often referring to how archers transfer the bow’s energy from their drawing hand to their back and shoulder muscles. This is crucial for a stable and powerful draw cycle. Let’s explore some key techniques that form the basis of good archery.
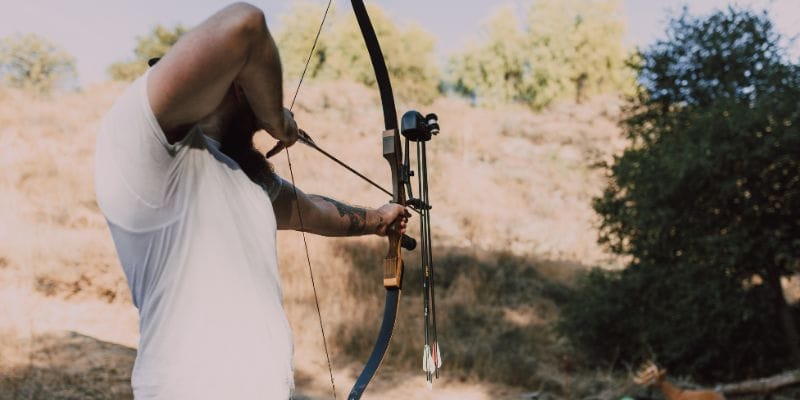
1. The Back Tension Draw (Essential for Compound and Recurve)
This is arguably the most important draw technique to learn for any archer, especially those using compound bows or modern recurves. Instead of just pulling with your arm, you engage your large back muscles. This creates a more stable draw and a smoother release.
How it works:
Imagine you’re trying to pull your shoulder blades together.
1. Start with your stance: Stand tall, feet shoulder-width apart, knees slightly bent.
2. Grip the bow: Hold the bow grip lightly.
3. Nock the arrow: Place an arrow on the rest and nock it to the string correctly.
4. Begin the draw: As you start to pull the string towards you, focus on rotating your drawing elbow outwards. Think of it like trying to “screw” your elbow into the socket of your shoulder. This motion directly engages your back muscles – your rhomboids and latissimus dorsi (lats).
5. Feel the tension: You should feel the tension building in your back, not just in your arm or shoulder. Your arm acts more like a hinge, guided by your back.
6. Reach your anchor: Continue drawing until your drawing hand reaches your chosen anchor point. Your elbow should be high, aligned with the arrow.
7. Hold and aim: Maintain the back tension and keep your drawing elbow up. This creates a stable platform for aiming.
8. Release: Execute a smooth release by relaxing the muscles in your back, allowing the string to move forward.
Benefits of Back Tension:
Stability: Engages larger muscle groups for a steadier hold at full draw.
Reduced Fatigue: Uses muscles better designed for sustained effort.
Improved Accuracy: A stable draw leads to more consistent shots.
Smoother Release: Helps prevent “punching” the release or plucking the string.
Common Beginner Mistake: Pulling with the bicep muscle of the arm instead of engaging the back. This often results in a shaky draw and inconsistent aim.
2. The Hook and Pull (A foundational concept)
While back tension is the ultimate goal, understanding how to properly “hook” the string is the first step. This is about how your fingers interact with the bowstring.
String Hooks:
Glove (Three Fingers): For traditional archery (recurve, longbow), archers often use a shooting glove with a tab for protection. The string rests on the first creases of the index, middle, and ring fingers.
Finger Tab: Similar to a glove but a separate piece of leather, offering protection. The string is held in the same finger positions.
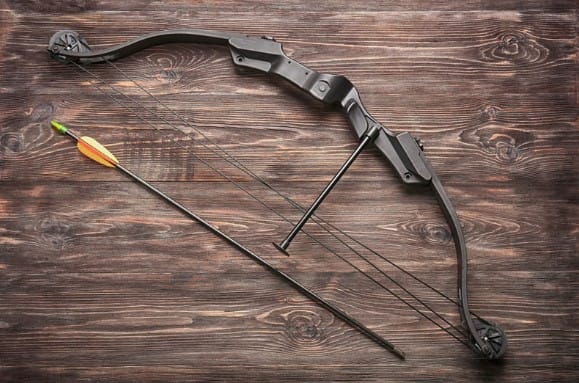
Mechanical Release Aid (Compound Bows): For compound bows, a mechanical release is almost always used. This device attaches to the string and is triggered by a button. Common release types include:
Back-Tension Release: These require a slight squeeze or rotation of the back to fire, promoting the back tension draw.
Thumb Release: Activated by pressing a thumb button.
Pinch-Style Release: The jaws of the release close around the loop on the bowstring.
The Pulling Action:
Whether using fingers or a release aid, the pulling action starts with the initial engagement to draw the bow.
1. Nock the arrow and position your release/fingers: Ensure your finger(s) are correctly placed on the string or your release aid is properly attached according to its design.
2. Initiate the draw: With your elbow up and slightly out, begin to pull the string back. The primary motion should still come from engaging your back muscles to “pull” your shoulder joint backward.
3. Smooth and Straight: The draw should be a smooth, linear motion directly towards your anchor point. Avoid any side-to-side or jerky movements.
Table: String Attachment Methods & Common Bow Types
| String Attachment Method | Common Bow Types | Primary Draw Style Supported | Notes for Beginners |
|---|---|---|---|
| Finger Release | Recurve Bows, Longbows | Back Tension, Straight Pull | Requires finger protection (glove/tab). Focus on a smooth pull without plucking. |
| Mechanical Release Aid | Compound Bows | Back Tension (preferred) | Offers a cleaner release. Learn to activate it smoothly without anticipating the shot. |
| Thumb Release | Compound Bows (some traditional) | Varies | Button trigger. Can be easier to learn for some, but back tension is still key for accuracy. |
| Jaw/Loop Release | Compound Bows | Back Tension | Common trigger style, jaws close on the string loop. |
3. Understanding Anchor Points
An anchor point is a consistent reference point on your face where you bring your drawing hand. This consistency is vital for repeatable accuracy.
Common Anchor Points and How to Find Them:
The goal is to find a natural, repeatable position that feels comfortable and stable.
1. Index Finger to Corner of Mouth: A very common anchor point for finger shooters.
How: Draw the string back until your index finger naturally rests at the corner of your mouth.
Feel: Your hand should be in a relaxed, cupped position against your jaw.
2. Anchor to Cheekbone: Often used by compound archers or those with longer draws.
How: Draw the string back until the release aid or the back of your hand touches a consistent spot on your cheekbone.
Feel: Ensure your jaw is relaxed and your anchor is firm against the bone, not pressing into soft tissue.
3. Under the Chin/Jawline: Some archers anchor under their chin, with the string hand tucked neatly below the jaw.
How: Draw until your hand contacts the underside of your jawbone.
Feel: This often feels natural and can provide a solid anchor.
Finding Your Anchor Point:
Experiment Safely: With an un-nocked arrow, draw the bow to the same point each time. Stop and see where your string hand naturally falls.
Consistency is Key: Once you find a comfortable spot, commit to it. Your head position should also be consistent.
Reference the Forehead: Many archers use their drawing hand on their face as a rough indicator for consistent draw length, but the string/release contacting the face is the primary anchor.
4. The Waiting Period and Release
Once you’re at full draw and anchored, there’s often a moment of hold before you release. This isn’t usually a prolonged pause, but rather a controlled moment where you aim and then allow the shot to happen.
Holding the Draw:
Back Tension: Continue to apply slight back tension. This keeps the bow steady and the drawing system engaged.
Relaxation: While holding, try to keep as much of your body relaxed as possible, except for the muscles actively holding the bow and drawing. Unnecessary tension causes jitters.
Breathing: Many archers hold their breath for the moment of release, or take a small, controlled inhale and hold. Experiment to see what keeps you steadier.
The Release:
This is where the arrow leaves the bow. A good release is often described as “surprise.”
For Finger Shooters: Instead of actively “plucking” the string, relax the fingers holding the string. Let the tension stored in your back muscles do the work. As you continue to apply back tension, your fingers will naturally open or release the string. This prevents you from “pushing” the bow forward or “pulling” the bow aside.
For Mechanical Release Shooters: This depends on the type of release.
Back-Tension Release: Continue to increase back tension smoothly. You don’t actively “squeeze” the trigger button; the increased tension causes the release to fire. This is the most consistent method.
Thumb/Trigger Release: Gently press the trigger. The key is to do this without jerking or anticipating the shot. Think about a “surprise” trigger activation.
What NOT to do:
Plucking the string: Yanking or plucking the string with your fingers.
Punching the release: Abruptly jerking the trigger on a mechanical release.
Anticipating the shot: Jerking to get the arrow to fly.
Dropping the bow arm: Letting the bow arm fall forward or down immediately upon release.
Common Bow Draw Terminology
Let’s clarify some terms you might hear when discussing bow draws.
Draw Length: The distance from the nocking point of the string to the pivot point of the grip (or the throat of the release) when the bow is at full draw. This is specific to the archer and the bow. For compound bows, it’s typically set by the cam’s let-off. For recurves, it’s how far you pull the string.
Full Draw: The position where the bowstring is drawn back to the archer’s established anchor point.
Let-Off (Compound Bows): The percentage of the bow’s peak draw weight that is reduced once you reach full draw. For example, an 80% let-off means if your peak draw weight is 50 lbs, you only hold 10 lbs at full draw. This makes it much easier to hold steady.
Holding Weight: The actual weight you feel when holding the bow at full draw, especially relevant with let-off on compound bows.
Back Wall: On a compound bow, this is the physical stopping point of the draw cycle, usually controlled by the cams. It prevents overdrawing and hitting yourself.
Transfer: The smooth transition of energy from your drawing muscles to the bowstring. This is what happens during a good release.
Tips for Improving Your Bow Draw
Consistent practice and focused attention on your draw are your best allies.
- Focus on Back Tension First: Even if using a mechanical release, prioritize feeling your back muscles engage.
- Smoothness Over Speed: Draw the bowstring back in a slow, controlled motion.
- Find a Consistent Anchor Point: Identify a spot on your face or jaw that you can easily and repeatedly find.
- Stay Relaxed (Where Possible): Avoid tensing up your drawing arm, shoulder, or neck unnecessarily.
- Practice Weak-Hand Drawing: If shooting traditional archery, practice drawing with only your fingers, focusing on a clean release.
- Use a Release Aid (for Compound): Learn the proper technique for your specific release aid, focusing on a surprise activation.
- Visualize Success: Imagine a smooth draw and a perfect release before you shoot.
- Don’t Rush the Hold: Once anchored, take a moment to settle your aim before executing the release.
- Video Yourself: If possible, have someone film your draw. This can highlight form issues you might not be aware of.
- Seek Guidance: If you have the opportunity, learn from an experienced archery instructor. They can provide personalized feedback. Organizations like USA Archery offer resources for finding coaches. You can also check with local archery ranges or retailers for lessons.
Improving your draw takes time and patience. Don’t get discouraged if it doesn’t feel perfect immediately. Every archer started where you are!
Common Beginner Draw Problems and Solutions
Let’s address some issues you might encounter and how to fix them.
| Problem | Cause | Solution |
|---|---|---|
| Jerky Draw | Pulling with arm/bicep instead of back muscles. | Focus on rotating the drawing elbow outwards to engage back muscles. Draw slower. |
| Inconsistent Anchor Point | Not having a set, repeatable anchor. | Find a comfortable anchor and commit to it 100% of the time. Use a mirror or video. |
| Arrow Slap/Fletching Contact | Nock too far out, or arrow rest not tuned. | Ensure the arrow is nocked correctly. Check your arrow rest alignment. Try drawing with an un-nocked arrow to feel the draw cycle. |
| Target Panic (during draw) | Anticipation, fear of the shot. | Practice drawing and holding without shooting. Focus on the process, not just the result. Use back tension to create a “surprise” release rather than actively aiming to shoot. |
| Slight Drop of Bow Arm | Unexpected release or focusing too much on drawing hand. | Keep the bow arm steady; the release should come from the drawing hand/back. Gravity will naturally pull the bow arm down after a good release. |
| Eye Blinking/Closing | Anticipating the shot or sound. | The “surprise” release is key. Practice holding the draw without shooting. Relax your face and especially your eyes before the release. Think about your aiming process. |
Conclusion
Mastering the draw is a journey, not a destination. By focusing on back tension, a consistent anchor, and a smooth, controlled motion, you’ll build a strong foundation for accurate and enjoyable archery. Remember, every archer, from beginner to Olympian, works on their draw. Be patient with yourself, practice consistently, and celebrate your progress. Your dedication to understanding these “different bow draws” and implementing these techniques will undoubtedly lead to more satisfying shots and a deeper appreciation for this timeless sport. Happy shooting!
Frequently Asked Questions (FAQ)
What is the most important part of a bow draw?
The most crucial element is engaging your back muscles (back tension) rather than just pulling with your arm. This creates stability, power, and a smoother release, leading to greater accuracy.
Should I use my fingers or a release aid?
For traditional archery (recurve, longbow), you’ll use your fingers or a finger tab. For compound bows, a mechanical release aid is generally recommended for achieving consistent accuracy and managing the increased draw weights.
How do I find my correct draw length?
Draw length is the distance the string is pulled back. For compound bows,